Table Of Contents
- Why Installation Ease Matters During Remodeling
- Canless LED Recessed Lights: The DIY-Friendly Champion
- Retrofit Recessed Lights: Quick Updates for Existing Cans
- Key Features That Make Installation Easier
- Wiring Considerations: Parallel Connections and Push-In Connectors
- Step-by-Step Installation Process for Canless Lights
- Common Installation Challenges and Solutions
- Choosing the Right Lights for Your Remodeling Project
Home remodeling projects come with enough complexity without adding difficult lighting installations to the mix. Whether you're updating a single room or tackling a whole-house renovation, choosing the right recessed lights can mean the difference between a smooth weekend project and days of frustration wrestling with complicated fixtures.
Slim LED recessed lights have revolutionized residential lighting, offering energy efficiency, long-lasting performance (50,000+ hours), and modern aesthetics. But not all recessed lights are created equal when it comes to installation ease. Some require extensive carpentry work, while others snap into place in minutes. The key is understanding which design features translate to simpler installation, especially during the time-sensitive phase of a remodel.
This guide examines the easiest-to-install slim LED recessed lighting options available today, comparing canless designs with retrofit fixtures, exploring installation-friendly features, and providing practical guidance for homeowners and contractors who want professional results without professional-level complexity. We'll cover everything from wiring methods to ceiling compatibility, helping you select fixtures that match both your lighting goals and your installation capabilities.
Why Installation Ease Matters During Remodeling
Remodeling timelines are notoriously tight, with multiple trades coordinating schedules and homeowners eager to reclaim their living spaces. Lighting installation often falls during critical phases when delays cascade through the entire project. Choosing fixtures that install quickly and reliably keeps your remodel on track and reduces labor costs, whether you're doing the work yourself or hiring professionals.
Installation ease isn't just about speed. It's also about reducing the risk of errors that require rework. Simpler fixtures with fewer components and intuitive mounting systems mean fewer opportunities for mistakes. This is especially valuable during remodels when you're working around existing structures, unexpected obstacles like cross-bracing, and the typical surprises that come with opening up walls and ceilings.
For DIY homeowners, easy-to-install lights expand what's possible without hiring an electrician for every fixture. Modern designs have democratized recessed lighting installation, turning what was once a specialized skill into an achievable weekend project. However, understanding the differences between fixture types helps you choose options that match your skill level and available tools.
Canless LED Recessed Lights: The DIY-Friendly Champion
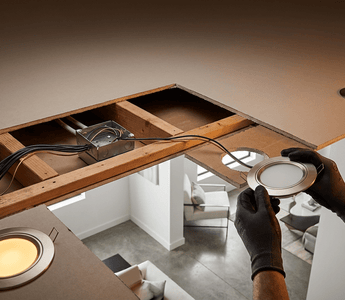
Canless LED recessed lights represent the most significant innovation in installation ease for recessed lighting. Unlike traditional fixtures that require separate housing cans installed in the ceiling cavity, canless designs integrate everything into a single compact unit. This eliminates the need to maneuver bulky cans into tight ceiling spaces and dramatically reduces installation time.
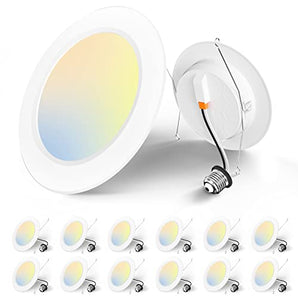
The typical canless fixture consists of an integrated LED module with built-in trim, a junction box or quick-connect wiring system, and spring clips or mounting tabs that secure the fixture directly to the ceiling drywall. Installation often takes less than 15 minutes per fixture once electrical connections are in place. The slim profile (usually 1-2 inches deep) makes them ideal for ceilings with limited plenum space or shallow cavities where traditional recessed cans won't fit.
Amico's 4-Inch Canless LED Recessed Lighting exemplifies this design philosophy, offering fixtures that install with minimal tools and no specialized knowledge. These units feature ETL and FCC certification, ensuring they meet safety standards while remaining accessible to DIY installers. The integrated design means there's no separate trim to align or LED module to install—everything arrives as one ready-to-install piece.
For remodeling projects, canless lights offer several distinct advantages:
- No structural modification: The lightweight design doesn't require additional ceiling support beyond standard drywall thickness
- Flexible placement: Slim profiles fit in locations where traditional cans won't, including areas with ductwork or insulation
- Reduced ceiling damage: Smaller cutout holes (typically 4 or 6 inches) mean less drywall work and easier repairs if repositioning is needed
- Single-person installation: Compact size and weight allow one person to handle the entire installation without assistance
- Universal compatibility: Most canless fixtures work with standard junction boxes and wiring configurations
The main consideration with canless fixtures is that they're permanent installations—the LED is integrated and not replaceable. However, with a rated lifespan of 50,000+ hours (roughly 17 years at 8 hours daily use), this rarely presents a practical concern during the useful life of the fixture. The time saved during installation and the expanded placement options typically outweigh this limitation for most remodeling scenarios.
Retrofit Recessed Lights: Quick Updates for Existing Cans
If your remodeling project involves updating existing recessed lighting rather than installing new fixtures, retrofit LED recessed lights offer the easiest installation path. These fixtures are specifically designed to convert old-style recessed cans with traditional bulbs to energy-efficient LED lighting without removing or replacing the existing housing.
Retrofit fixtures typically feature a plug-and-play adapter that connects to the existing socket in the recessed can, along with spring clips that secure the new trim against the ceiling. Installation usually takes less than five minutes per fixture and requires no electrical work beyond plugging in the adapter—making it accessible even to homeowners with no electrical experience.
Amico's Retrofit Can Lights collection provides integrated LED units where the trim and LED module are built as one piece, eliminating the separate assembly steps required by some retrofit designs. This integrated construction ensures consistent appearance and removes potential alignment issues between trim and LED components.
Retrofit fixtures work best when:
- Existing cans are structurally sound: The housing is secure and properly installed in the ceiling
- Can size matches fixture requirements: Most retrofit LEDs are designed for standard 4-inch, 5-inch, or 6-inch cans
- You want to preserve ceiling integrity: No drywall cutting or patching is required
- Quick updates are priority: Multiple fixtures can be upgraded in an afternoon
- Budget is limited: Retrofit fixtures cost less than complete new installations
The limitation of retrofit fixtures is that you're constrained by existing can locations. If your remodel involves changing room layout or lighting design, new recessed lighting installations may better serve your needs. However, for updating lighting quality and energy efficiency without repositioning fixtures, retrofit LEDs offer unmatched installation simplicity.
Key Features That Make Installation Easier
Beyond the fundamental choice between canless and retrofit fixtures, specific design features significantly impact installation ease. Understanding these elements helps you identify fixtures that will install smoothly in your particular remodeling situation.
Mounting System Design
The mounting mechanism determines how quickly and securely fixtures attach to your ceiling. Spring-loaded clips are the gold standard for easy installation—they compress during insertion through the ceiling cutout, then expand to grip the drywall from behind. This design requires no tools beyond what's needed to cut the hole and make electrical connections. Look for clips with sufficient tension to hold the fixture firmly without being so stiff that installation becomes a wrestling match.
Some fixtures use mounting tabs or brackets that screw directly to ceiling joists or blocking. While this provides extremely secure attachment, it requires precise placement relative to framing and adds installation time. These systems work well when you're installing during the construction phase with exposed framing, but they're less convenient for remodel situations with finished ceilings.
Integrated Junction Box vs. Separate Box
Canless fixtures come in two electrical configurations. Integrated junction box designs include a built-in electrical compartment as part of the fixture housing. This eliminates the need to install a separate junction box in the ceiling cavity, reducing installation steps and allowing for more flexible fixture placement. The electrical connections happen right at the fixture location.
Separate junction box fixtures require you to install a standard electrical box in the ceiling, then connect the fixture to that box with provided leads. While this adds a step, it can simplify rough-in work when electricians are running wiring before drywall installation. The choice depends on your remodeling timeline and whether electrical rough-in happens before or simultaneously with fixture installation.
Slim Profile and Low Clearance Requirements
Installation ease often depends on what's hidden above your ceiling. Fixtures with shallow profiles (under 2 inches) fit in spaces where deeper fixtures won't, working around insulation, ductwork, and structural elements. This flexibility means fewer obstacles during installation and more viable placement options throughout your remodeled space.
Check the manufacturer's specifications for minimum clearance requirements. The best fixtures for remodeling applications need only 1-2 inches of clearance above the ceiling surface, making them compatible with almost any residential ceiling cavity. This becomes especially important in older homes where ceiling cavities may contain unexpected obstacles.
Pre-Wired Connections and Quick-Connect Systems
Fixtures that arrive with pre-attached wiring and standardized connectors significantly reduce installation complexity. Look for designs that provide sufficient wire length to reach your junction box without requiring extensions. Amico's fixtures typically include appropriate wire lengths for standard installations, reducing the need for additional materials and connections.
The connector type also matters, which leads directly into our next important consideration for installation planning.
Wiring Considerations: Parallel Connections and Push-In Connectors
Proper electrical connections are fundamental to both safety and functionality. Understanding the wiring methods used with modern LED recessed lights helps you plan your installation and gather the right materials before starting work.
Parallel Connection Configuration
When installing multiple recessed lights in a room, fixtures are connected using parallel connections. This configuration means each fixture connects independently to the power supply circuit, ensuring that if one fixture fails, the others continue operating normally. Parallel wiring also ensures each fixture receives full voltage, maintaining consistent brightness across all lights.
In a parallel connection setup, the hot wire (typically black) connects to the hot wire of each fixture, the neutral wire (typically white) connects to each neutral, and the ground wire (typically bare copper or green) connects to each ground. This is typically accomplished at junction boxes positioned along the circuit, with individual fixtures connected to these distribution points.
For remodeling projects, parallel connections offer flexibility because you can add or remove fixtures without affecting the entire circuit. This proves valuable if you decide to adjust lighting layout during installation or need to troubleshoot specific fixtures later.
Push-In Wire Connectors: The Modern Standard
The method you use to join wires significantly impacts installation speed and reliability. Push-in wire connectors have emerged as the preferred choice for professional installers and DIY homeowners alike, offering substantial advantages over traditional connection methods.
Push-in connectors feature spring-loaded ports that accept stripped wire ends. To make a connection, you simply strip about half an inch of insulation from each wire, then insert the stripped ends into the appropriate connector ports until they click into place. The internal spring mechanism grips the wire securely, creating a reliable electrical connection without any twisting motion. This method is more reliable than traditional alternatives because it eliminates the inconsistency of hand-twisted connections and provides visual confirmation of proper insertion.
For remodeling installations, push-in connectors offer several practical benefits:
- Faster connections: Each junction takes seconds rather than minutes to complete
- Consistent quality: The spring mechanism ensures proper contact pressure every time
- Reduced hand fatigue: No repetitive twisting motion when making multiple connections
- Easier inspection: You can visually verify that wires are fully inserted into connector ports
- Simplified parallel connections: Multiple wires insert into common ports for straightforward parallel wiring
When planning your recessed lighting installation, ensure you have appropriate push-in wire connectors sized for your wire gauge and the number of connections at each junction point. Most residential lighting circuits use 14-gauge or 12-gauge wire, and connectors are rated for specific wire sizes and quantities.
Planning Your Electrical Rough-In
For remodeling projects, electrical planning happens before drywall installation or through careful mapping when working with existing finished ceilings. Map out fixture locations, identify power source connections, and plan junction box placements before cutting any holes. This advance planning ensures your parallel connections can be made efficiently with appropriate wire runs between fixtures.
Consider creating a centralized junction box location if you're installing multiple fixtures in one room. This simplifies parallel connections by providing a single distribution point for the circuit, reducing the number of connection points and potential failure locations throughout your installation.
Step-by-Step Installation Process for Canless Lights
Once you've selected your fixtures and planned your layout, the actual installation process follows a straightforward sequence. This guide covers canless LED installation, which represents the most common remodeling scenario for new fixture locations.
1. Turn Off Power and Verify – Shut off power to the circuit at your electrical panel, then use a non-contact voltage tester to verify power is off at the installation location. This critical safety step prevents electrical shock during installation. Never skip this verification step, even if you're confident you switched off the correct breaker.
2. Mark Fixture Locations – Measure and mark the center point of each fixture location on your ceiling. Account for any spacing requirements from walls (typically 18-24 inches) and ensure even spacing between multiple fixtures. Use a stud finder to verify you're not placing fixtures directly over ceiling joists or other obstructions.
3. Cut Ceiling Openings – Most canless fixtures include a template for marking the cutout diameter. Trace the template at each marked location, then use a drywall saw or hole saw to cut the opening. Cut carefully to maintain clean edges, which ensures the fixture trim sits flush against the ceiling. For existing ceilings, have a drop cloth below to catch drywall debris.
4. Run Electrical Wiring – If installing during construction or in accessible ceiling cavities, run electrical cable from your power source to each fixture location. For parallel connections, plan your circuit path and junction box locations. Ensure all wiring complies with local electrical codes, including proper cable securing and protection. Leave approximately 8-12 inches of wire extending beyond the ceiling surface at each fixture location for connection ease.
5. Make Electrical Connections – Strip approximately half an inch of insulation from each wire end. Connect the fixture wires to your circuit wiring using push-in wire connectors: black to black (hot), white to white (neutral), and ground to ground. Insert each stripped wire end into the appropriate connector port until you feel and hear it click into place. Gently tug each wire to verify secure connection. If your fixtures include integrated junction boxes, these connections happen inside the fixture housing. For separate junction box configurations, make connections at the junction box before attaching the fixture.
6. Install the Fixture – For spring-clip mounting systems, compress the mounting clips against the fixture body, then insert the fixture up through the ceiling cutout from below. Once the fixture is through the opening, release the clips and allow them to expand against the back of the ceiling drywall. The trim ring should sit flush against the ceiling surface. Some fixtures include adjustment screws that allow you to fine-tune the fit after initial installation.
7. Test Operation – After installing all fixtures, restore power at the electrical panel and test each light. Verify that all fixtures illuminate properly and that wall switches control the intended fixtures. This is also the time to check for any dimming functionality if you've installed dimmer-compatible fixtures and dimmers.
8. Final Adjustments – For adjustable or gimbal-style fixtures from Amico's Wholesale Gimbal Recessed Lights collection, aim the fixtures to achieve your desired lighting effect. Make any necessary trim ring adjustments to ensure all fixtures sit uniformly against the ceiling.
The entire installation process typically takes 15-30 minutes per fixture once you've completed the initial planning and electrical rough-in. For a typical room with 4-6 recessed lights, expect a half-day project including preparation and testing.
Common Installation Challenges and Solutions
Even with easy-to-install fixtures, remodeling projects occasionally present obstacles that require problem-solving. Being prepared for common challenges helps you handle them efficiently when they arise.
Encountering Ceiling Joists or Obstructions
When your planned fixture location intersects with a ceiling joist, ductwork, or other obstruction, you'll need to adjust the placement. Slim canless fixtures offer flexibility here because their compact size often allows you to shift the location a few inches while maintaining your desired lighting effect. Use your stud finder thoroughly before cutting to identify these obstacles in advance rather than discovering them after cutting the opening.
If you encounter blocking or cross-bracing that can't be avoided, consider whether the obstruction can be safely modified (consulting with a contractor or structural engineer if you're uncertain about load-bearing elements) or whether repositioning the fixture provides a better solution.
Insufficient Ceiling Cavity Depth
Shallow ceiling cavities present challenges for fixtures with deeper profiles. This commonly occurs in older homes, cathedral ceilings, or areas where ceiling space contains extensive insulation or ducting. Canless fixtures with profiles under 2 inches typically solve this problem, but verify clearance requirements before purchasing.
If you discover insufficient clearance after cutting the opening, shallow-profile options like those in Amico's 6-Inch Recessed LED Lighting collection may provide alternatives.
Wiring Challenges in Finished Ceilings
Running new wiring through finished ceilings presents the biggest installation challenge for remodeling projects. Access is limited, and you want to minimize ceiling damage. Strategic approaches include:
- Using existing light locations: Start from an existing electrical box and fish new wire to adjacent fixture locations
- Creating strategic access points: Cut access holes at locations that will be covered by fixture trim or that occur in closets or less-visible areas
- Following walls and corners: Route wiring along ceiling joists accessible from wall top plates or corner intersections
- Professional assistance: For complex wiring runs, consulting with an electrician saves time and reduces ceiling damage
If wiring access proves prohibitively difficult, consider whether your remodeling project allows for complementary lighting approaches, such as track lighting or additional outlets for plug-in fixtures, to achieve your lighting goals with less invasive installation.
Fixture Won't Sit Flush
Sometimes a fixture's trim ring doesn't sit completely flush against the ceiling, creating gaps or uneven appearance. Common causes include:
- Oversized cutout: The hole is too large for the fixture's trim ring to cover properly
- Uneven ceiling surface: Texture or irregularities prevent flush contact
- Spring clips misaligned: Mounting clips aren't properly positioned or aren't generating adequate pressure
Solutions depend on the cause. For oversized cutouts, trim rings with larger diameters (if available for your fixture model) can cover the opening. Uneven surfaces may require careful sanding or the application of a thin bead of caulk to fill gaps. Misaligned clips usually can be adjusted or repositioned to improve fixture seating.
Choosing the Right Lights for Your Remodeling Project
With understanding of installation processes and challenges, selecting the right fixtures for your specific remodeling situation becomes more straightforward. Your choice should balance installation ease with performance requirements and aesthetic goals.
Assessing Your Installation Capabilities
Honestly evaluate your skills, available time, and access to the installation area. If you're comfortable working with basic electrical connections and have a clear ceiling cavity, canless LED fixtures offer the best combination of installation ease and performance. The learning curve is gentle, and the required tools are minimal—typically just a drill or drywall saw, wire strippers, screwdriver, and voltage tester.
For installations requiring extensive ceiling access or complex wiring runs, consider whether professional electrical assistance makes sense for rough-in work while you handle fixture installation yourself. This hybrid approach keeps costs reasonable while ensuring code compliance and reducing remodeling stress.
Matching Fixture Specifications to Room Requirements
Beyond installation ease, your fixtures need to provide appropriate illumination for each space. Consider these factors:
- Light output: Measured in lumens, with higher values providing brighter illumination; kitchens and workspaces typically need 60-80 lumens per square foot, while living areas work well with 20-30 lumens per square foot
- Color temperature: Measured in Kelvin, ranging from warm white (2700-3000K) for living spaces to bright white (4000-5000K) for task areas
- Color accuracy: CRI 80+ rating ensures colors appear natural and true, important for spaces where appearance matters
- Dimming capability: If you want adjustable lighting levels, verify fixtures are dimmer-compatible and match them with appropriate dimmer switches
- Beam angle: Wider angles (100-120 degrees) provide general ambient lighting, while narrower beams work for accent or task lighting
Amico's fixtures are designed with these requirements in mind, offering CRI 80+ color rendering for natural light quality and a 50,000+ hour lifespan that eliminates concerns about bulb replacement for many years. The ETL and FCC certifications provide assurance that these fixtures meet safety and performance standards without compromising installation simplicity.
Considering Long-Term Value
The easiest fixture to install isn't necessarily the best choice if it fails prematurely or requires frequent maintenance. Quality fixtures backed by solid warranties provide better long-term value despite potentially higher upfront costs. Amico backs their products with 2-5 year warranties and offers a 30-day hassle-free return policy, reducing the risk associated with trying new products during your remodel.
For larger remodeling projects or multiple properties, Amico's bulk sales program offers tiered volume discounts that improve value while ensuring consistent quality across all fixtures. Professional contractors and property managers can request wholesale pricing through the Wholesale Quote Request page, making it cost-effective to standardize on reliable, easy-to-install fixtures.
Planning for Future Flexibility
Remodeling offers an opportunity to future-proof your lighting infrastructure. Consider whether you might want smart home integration later, even if you're not implementing it immediately. Many LED fixtures work with smart switches or dimmers that add wireless control without requiring fixture replacement. Planning your wiring and switch locations with this possibility in mind adds minimal cost now but preserves options for future upgrades.
Additionally, consider whether your lighting plan accommodates potential room repurposing. Flexible general lighting that works for multiple uses provides better long-term value than highly specialized layouts that become obsolete if room function changes.
Choosing the easiest-to-install slim LED recessed lights for your home remodeling project ultimately comes down to understanding your specific situation and matching it with appropriate fixture designs. Canless LED fixtures offer the most straightforward installation for new lighting locations, with integrated designs that eliminate complicated assembly and slim profiles that fit almost any ceiling cavity. Retrofit fixtures provide the quickest path for updating existing recessed cans without extensive electrical work or ceiling modification.
The key to successful installation lies in preparation: mapping your layout carefully, understanding the parallel wiring configuration with push-in wire connectors, gathering appropriate tools and materials, and selecting fixtures with features that match your installation environment. Modern fixtures from manufacturers like Amico combine installation-friendly design with professional performance, offering ETL and FCC certified products that deliver 50,000+ hours of reliable illumination with CRI 80+ color quality.
Whether you're tackling a DIY weekend project or coordinating with contractors on a comprehensive remodel, the right fixture selection transforms lighting installation from a potential bottleneck into a satisfying milestone in your renovation journey. The combination of thoughtful planning and quality fixtures ensures your new lighting not only looks great and performs efficiently but also installs without the frustration and delays that can derail remodeling timelines.
Need Lighting for a Larger Project?
Planning a whole-house remodel or managing multiple properties? Amico's bulk sales program offers tiered volume discounts on our complete line of LED lighting solutions, from recessed lights to flat panels and high bay fixtures. Our team works with contractors, builders, and property managers to provide competitive pricing, reliable delivery, and consistent quality across projects of any size.
All Amico products include ETL & FCC certification, 2-5 year warranties, 30-day hassle-free returns, and free sitewide shipping.


