Table Of Contents
- Why Basements and Attics Require Different Lighting Considerations
- Choosing the Right Fixture Size for Your Space
- Canless vs. Traditional Recessed Lighting: Which Works Better?
- Essential Features for Basement and Attic Installations
- Getting the Brightness and Color Temperature Right
- Installation Considerations for Challenging Spaces
- Recommended Lighting Layouts for Basements and Attics
- Top LED Recessed Lighting Options from Amico
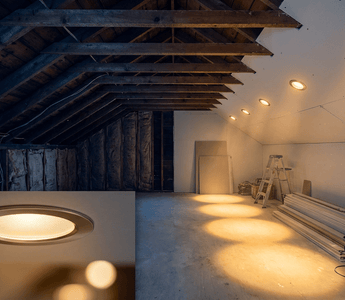
Transforming a basement or attic into usable living space opens up valuable square footage in your home, but these areas present unique lighting challenges that standard fixtures can't always address. Low ceilings, limited natural light, insulation requirements, and unconventional room shapes all demand thoughtful consideration when selecting LED recessed lighting.
The right recessed lighting can make a cramped basement feel open and inviting or turn a stuffy attic into a bright home office or bedroom. The wrong choice, however, can leave you with dark corners, wasted energy, or worse—fixtures that overheat or fail prematurely due to improper installation in insulated spaces.
This guide walks you through everything you need to know about selecting LED recessed lighting for basement and attic renovations. You'll learn which fixture sizes work best in rooms with limited ceiling height, why canless LED fixtures are often the smarter choice for these applications, what safety certifications matter most, and how to create lighting layouts that maximize both functionality and ambiance. Whether you're a homeowner tackling a DIY project or a contractor spec'ing fixtures for a client, you'll find practical recommendations backed by real-world installation experience.
Why Basements and Attics Require Different Lighting Considerations
Basements and attics share several characteristics that set them apart from main-floor spaces when it comes to lighting design. Both typically feature limited or no natural light, which means your artificial lighting needs to work harder to create a comfortable environment. Ceiling heights in basements often fall between 7 and 8 feet—considerably lower than the 9 to 10-foot ceilings common in modern construction. This limited overhead space makes every inch count when installing recessed fixtures.
Attics present their own set of challenges. Sloped ceilings and irregular angles make traditional lighting placement difficult, and the insulation required for energy efficiency creates heat-related concerns for fixtures. Many attics also experience greater temperature fluctuations than other areas of your home, swinging from hot in summer to cold in winter. Your lighting needs to handle these conditions without performance degradation.
Moisture is another consideration, particularly in basements where humidity levels run higher and the risk of water intrusion exists. While you don't necessarily need fully waterproof fixtures (unless you're lighting a utility area prone to flooding), choosing LED recessed lighting with proper seals and moisture-resistant construction provides an extra layer of protection and longevity.
These spaces also tend to serve multiple purposes. A finished basement might include a family room, home gym, and laundry area all in one open space. An attic conversion could function as a bedroom, office, or craft room. This versatility demands flexible lighting that can adapt to different activities and times of day, making features like dimming capability particularly valuable.
Choosing the Right Fixture Size for Your Space
LED recessed lighting typically comes in three standard sizes: 4-inch, 5-inch, and 6-inch diameters. For basement and attic renovations, the choice between these sizes significantly impacts both the visual proportions of your space and the installation complexity.
4-inch fixtures are ideal for basements with lower ceilings (7 to 8 feet) because they require less recessed depth and create a more proportional appearance. In a room with limited ceiling height, oversized fixtures can feel visually heavy and draw attention to the low ceiling rather than the space itself. Four-inch canless LED recessed lighting works particularly well in these applications because you can install them with minimal clearance above the ceiling—often as little as 2 inches, compared to the 6+ inches traditional housing requires.
The compact profile doesn't mean sacrificing light output. Modern 4-inch LED fixtures deliver 650 to 1,000 lumens, which is sufficient for general ambient lighting in most residential spaces. When spaced properly (typically 4 to 5 feet apart in a grid pattern), they provide even, shadow-free illumination throughout the room.
6-inch fixtures make more sense in attics with higher peak ceilings or in larger basement spaces where you want broader light distribution. The larger aperture produces a wider beam spread, which means you can use fewer fixtures to light the same area. 6-inch recessed LED lighting typically outputs between 1,000 and 1,400 lumens, making it suitable for task-oriented areas like basement workshops or attic home offices where you need brighter, more concentrated light.
One practical consideration: if your basement or attic has structural obstacles like floor joists running perpendicular to your planned fixture locations, smaller 4-inch fixtures give you more flexibility in placement since they fit between joists spaced 16 inches on center. Six-inch fixtures require more careful planning to avoid conflicts with framing members.
Canless vs. Traditional Recessed Lighting: Which Works Better?
This is perhaps the most important decision you'll make when planning your basement or attic lighting renovation. Traditional recessed lighting uses a separate housing (can) installed above the ceiling, with a trim piece that mounts from below. Canless LED fixtures, by contrast, are integrated units where the LED module and trim are built as one piece that installs directly into the ceiling cutout.
For basement and attic applications, canless LED fixtures offer several distinct advantages. First, they require significantly less clearance above the ceiling—typically 2 to 3 inches versus 6 to 8 inches for traditional housings. In basements where you might be working around ductwork, plumbing, or low floor joists, this compact profile is often the difference between a feasible installation and one that's impractical.
Canless fixtures also simplify installation considerably. There's no separate housing to secure, no springs or clips to wrestle with in tight spaces, and no alignment issues between housing and trim. You cut the hole, make your electrical connections, and secure the fixture—the entire process takes a fraction of the time of traditional installations. For DIY homeowners working in cramped attic spaces, this ease of installation is a significant benefit.
Energy efficiency is another advantage. Because canless fixtures are purpose-built LED units rather than retrofitted housings originally designed for incandescent bulbs, they typically feature better thermal management and more efficient light output. Many models include built-in junction boxes that simplify parallel connections when wiring multiple fixtures, eliminating the need for separate junction box installations.
The one scenario where traditional housings might be preferable is in new construction or gut renovations where you have unlimited access above the ceiling and want the flexibility to change trim styles or upgrade LED modules in the future. However, given that modern LED fixtures have a 50,000+ hour lifespan (that's over 20 years at 6 hours per day), this flexibility rarely justifies the added complexity and cost.
Essential Features for Basement and Attic Installations
Beyond size and style, certain technical features become particularly important when installing recessed lighting in basements and attics. These certifications and capabilities ensure your fixtures perform safely and efficiently in challenging environments.
IC-Rated Fixtures for Insulated Ceilings
IC rating (Insulation Contact) is non-negotiable if your basement ceiling or attic installation will be in contact with insulation. This certification means the fixture can safely touch insulation without creating a fire hazard or overheating. Most finished attics have insulation between the roof rafters and the finished ceiling, and many basement ceiling cavities contain insulation for soundproofing or energy efficiency.
Non-IC-rated fixtures require a 3-inch clearance from insulation, which defeats the purpose of the insulation and creates air leaks that reduce your home's energy efficiency. IC-rated fixtures eliminate this problem entirely—you can bury them in insulation without any concerns. All quality LED recessed fixtures designed for residential use, including Amico's canless LED options, come with IC ratings as standard because manufacturers recognize that insulated cavities are now the norm rather than the exception.
Airtight Construction and Energy Efficiency
Every penetration in your ceiling creates a potential path for conditioned air to escape into unconditioned spaces. In basements, this means warm air leaking into crawl spaces or the space between floors. In attics, it means heated air escaping through your roof—one of the major sources of energy loss in homes.
Airtight-rated fixtures feature gaskets and seals that minimize air leakage around the fixture body. While this might seem like a minor detail, multiple recessed lights can create significant air infiltration when the fixtures aren't properly sealed. Look for fixtures that meet ASTM E283 standards for air infiltration or are specifically marketed as airtight. Many canless LED fixtures achieve airtight performance naturally because of their integrated, gasketed design.
Dimming Capabilities for Versatile Spaces
Basements and attics often serve multiple functions, and your lighting should adapt accordingly. A basement family room needs bright, energizing light for game nights but softer, relaxed ambiance for movie watching. An attic bedroom requires dim, warm light before sleep but brighter illumination for getting dressed in the morning.
Dimmable LED recessed fixtures provide this flexibility. However, not all LED fixtures dim smoothly—some flicker, buzz, or simply turn off at lower settings. Look for fixtures that specify compatibility with standard TRIAC dimmers and that dim smoothly down to at least 10% of full brightness. Amico's LED fixtures are designed to work with most residential dimmers without flickering or buzzing, though pairing them with LED-specific dimmer switches will always yield the best results.
When wiring multiple dimmable fixtures, remember to connect them in parallel (running power from the switch to each fixture independently or through properly sized wire connectors) rather than attempting series connections. Parallel wiring ensures consistent dimming performance across all fixtures. For connections, use Push-in Wire Connectors that allow you to insert stripped wire ends into the connector ports until they click—no twisting required. This method is more reliable than traditional alternatives and creates secure connections even in tight ceiling cavities.
Getting the Brightness and Color Temperature Right
Lumens and color temperature are the two specifications that most dramatically affect how your finished space feels. Get these wrong, and even the best fixtures will disappoint.
Lumens measure brightness. For basement and attic general lighting, aim for 40 to 60 lumens per square foot. A 200-square-foot basement bedroom would need 8,000 to 12,000 total lumens, which you could achieve with eight to twelve 4-inch fixtures rated at 800-1,000 lumens each. Task areas like workshops or home offices benefit from higher light levels—60 to 80 lumens per square foot—while ambient living spaces can function comfortably at the lower end of the range.
Because basements and attics lack natural light, you might instinctively over-light these spaces. Resist this urge. Too much light creates a harsh, institutional feel. Instead, aim for the recommended lumens per square foot and add dimmers to increase flexibility. You can always turn lights to full brightness when needed, but you can't reduce the intensity of non-dimmable fixtures that are overpowered for the space.
Color temperature is measured in Kelvins and describes whether light appears warm (yellowish) or cool (bluish). This choice profoundly impacts the mood and usability of your space:
- 2700K (Soft White): Warm, yellowish light similar to traditional incandescent bulbs. Best for basement family rooms, bedrooms, and any space where you want a cozy, relaxed atmosphere.
- 3000K (Warm White): Slightly cooler than 2700K but still warm. A versatile choice that works well in most basement and attic applications, providing enough warmth for comfort while maintaining clarity for tasks.
- 3500K-4000K (Neutral White): Balanced light that appears neither warm nor cool. Ideal for basement workshops, home gyms, or attic offices where you need accurate color rendering without the drowsiness that warmer temperatures can induce.
- 5000K (Daylight): Cool, bluish-white light that mimics midday sun. Use sparingly in living spaces, but appropriate for utility areas, storage rooms, or workshops where maximum visibility is the priority.
For most basement and attic living spaces, 3000K offers the best balance—warm enough to feel comfortable but bright enough to combat the natural darkness of these below-grade or tucked-away areas. If you're unsure, choose 3000K fixtures; this color temperature works well in virtually any residential setting.
One final consideration: CRI (Color Rendering Index). This metric rates how accurately colors appear under artificial light compared to natural daylight. CRI 80+ is the standard for residential LED fixtures and ensures that colors look natural and true. This matters more than you might think—poor color rendering can make skin tones look sallow and paint colors appear muddy, which is particularly noticeable in spaces without windows for reference.
Installation Considerations for Challenging Spaces
Even the best fixture selection won't deliver good results if the installation doesn't account for the unique challenges of basement and attic spaces. Here's what to consider before you cut your first ceiling hole.
Joist direction and spacing affect fixture placement more in basements and attics than in main-level spaces. In most basements, floor joists run parallel to the longest wall. If you're installing fixtures in a finished ceiling (drywall attached to the underside of those joists), you'll need to ensure your fixtures fit between the joists rather than requiring cuts through structural members. Standard joist spacing of 16 inches on-center accommodates 4-inch fixtures easily but can be tight for 6-inch fixtures, which typically require 7 to 8 inches of clearance.
In attics with sloped ceilings, you're working with rafters rather than joists, and the angles add complexity. Gimbal or adjustable fixtures become particularly useful in these applications because they allow you to aim the light downward even when installed in an angled ceiling. Without this adjustability, fixtures installed in sloped ceilings would cast light at odd angles rather than straight down into the room. Amico's gimbal recessed lights offer this directional flexibility, making them ideal for attic installations with varied ceiling planes.
Wiring runs require more planning in these spaces because access is often limited. If you're installing multiple fixtures, plan your circuit layout to minimize wire runs and avoid obstacles like HVAC ducts, plumbing stacks, and existing electrical boxes. When connecting fixtures, use parallel wiring (bringing power to each fixture through properly sized conductors or wire connectors) to ensure consistent performance and simplify troubleshooting if issues arise.
For wire connections, Push-in Wire Connectors streamline the process significantly. You simply strip the wire ends to the specified length, insert them into the connector ports until they click into place, and you're done. There's no twisting, no guessing whether the connection is tight enough, and no risk of wires pulling loose over time. This reliability is especially valuable in basement and attic applications where access above the finished ceiling may be limited or impossible after installation is complete.
Existing obstacles like ductwork, recessed heating vents, or structural beams often dictate final fixture placement. Before finalizing your lighting layout on paper, get into the ceiling cavity (if possible) and identify conflicts. It's far better to adjust your plan before cutting holes than to discover a duct or beam in your way after you've already compromised the ceiling.
Recommended Lighting Layouts for Basements and Attics
A well-designed lighting layout makes the difference between a space that feels bright and welcoming and one that has frustrating dark corners or harsh bright spots. Here are proven layout strategies for common basement and attic configurations.
For open-concept basements (family rooms, entertainment spaces), use a symmetrical grid layout with fixtures spaced 4 to 6 feet apart. In a room with 8-foot ceilings, spacing fixtures 4 to 5 feet apart in both directions creates even, overlapping light patterns without dark patches. Start by placing fixtures roughly 2 to 3 feet from the walls rather than at the perimeter—this creates better wall washing and makes the room feel larger than fixtures placed at the ceiling edges.
If your basement includes distinct areas for different activities (a seating area, a bar, a play space), consider putting each zone on a separate switch or dimmer. This allows you to light only the areas you're using while keeping others dim, creating a more intimate, intentional atmosphere than lighting the entire basement uniformly.
For basement bedrooms, plan for lower light levels than you'd use in main living areas. Four to six fixtures in a typical 10×12 bedroom provide ample general lighting. Place fixtures symmetrically for aesthetic balance, and always include them on dimmers so you can reduce brightness for evening relaxation or sleeping.
For attic conversions with sloped ceilings, concentrate your fixtures in the areas with the highest ceiling height where you spend the most time. Avoid placing recessed fixtures in areas where the ceiling drops below 5 feet—these low spaces are typically used for storage rather than active living, and ceiling fixtures here would be uncomfortably close to your head. Instead, use the sloped sections for wall sconces or other task lighting as needed.
When the attic includes a flat ceiling section in the center (common in many dormer-style attics), treat this area like a standard room and use a grid pattern. For the sloped sections, space fixtures along the slope at consistent intervals, angling gimbal fixtures to direct light toward the floor rather than the far wall.
For basement workshops or utility areas, prioritize even, shadow-free lighting. Position fixtures in a tight grid (3 to 4 feet apart) and consider higher lumen output (1,000+ lumens per fixture) and cooler color temperatures (3500K-4000K). In these task-focused environments, you're not aiming for ambiance—you need clear visibility for detailed work. Pair recessed ambient lighting with under-cabinet or workbench task lighting for the best results.
Top LED Recessed Lighting Options from Amico
Amico offers several LED recessed lighting solutions particularly well-suited to basement and attic renovations. These fixtures combine the practical features these spaces require—IC rating, airtight construction, compact profiles—with the quality and value that make them popular with both homeowners and contractors.
The 4-inch canless LED recessed lighting collection is the go-to choice for basement installations with standard 7 to 8-foot ceilings. These ultra-slim fixtures require only 2 inches of clearance above the ceiling, making them ideal for installations where you're working around floor joists, ductwork, or other obstacles. They're IC-rated for direct contact with insulation and feature integrated junction boxes that simplify parallel wiring when installing multiple fixtures on the same circuit.
Available in multiple color temperatures (2700K, 3000K, 4000K, 5000K), Amico's 4-inch canless fixtures deliver 650 to 1,000 lumens depending on the model you choose. They're dimmable down to 10% with compatible LED dimmers, providing the flexibility to adapt lighting levels for different activities and times of day. With CRI 80+ color rendering, colors appear accurate and natural even in spaces without windows.
For larger basements or attic spaces where you need broader coverage, the 6-inch recessed LED lighting options deliver higher lumen output (up to 1,400 lumens) and wider beam spreads. The larger aperture makes these fixtures suitable for rooms with higher ceilings or for task areas where you need concentrated brightness. Like their 4-inch counterparts, these fixtures are IC-rated and airtight, with the same reliable dimming performance.
For attic installations with sloped ceilings, Amico's gimbal recessed lights provide critical adjustability. The LED module pivots within the fixture housing, allowing you to direct light exactly where you need it regardless of ceiling angle. This adjustability is also useful in basement home theaters or media rooms where you might want to aim fixtures away from screen areas to minimize glare.
All Amico recessed lighting fixtures carry ETL and FCC certifications, confirming they meet rigorous safety and performance standards. They're backed by warranties ranging from 2 to 5 years depending on the product line, along with a 30-day return policy and free shipping—valuable protections when you're purchasing multiple fixtures for a whole-room renovation. For contractors or homeowners tackling large projects, Amico's bulk sales program offers volume discounts that make quality LED lighting more affordable at scale.
The integrated design of these fixtures means the LED module and trim are built as one reliable unit, eliminating the separate components and assembly steps that complicate traditional recessed lighting installations. For DIY homeowners working in the tight, awkward spaces typical of basements and attics, this installation simplicity is often as valuable as the fixtures' technical specifications.
Selecting the right LED recessed lighting for your basement or attic renovation comes down to understanding the unique demands of these spaces and matching them with fixtures that deliver the appropriate combination of size, output, and features. Compact 4-inch canless fixtures work best in basements with lower ceilings, while 6-inch options and adjustable gimbal fixtures suit larger areas and sloped attic ceilings.
Prioritize IC-rated, airtight fixtures that can safely contact insulation and minimize energy loss. Choose color temperatures that match your intended use—warmer for living spaces, cooler for workshops and task areas. Plan your layouts to create even light distribution without dark corners, and always include dimming capability to adapt your lighting to different activities and times of day.
The canless LED fixtures from Amico check all these boxes while simplifying installation in spaces where access is limited and working conditions are challenging. With their 50,000+ hour lifespan, ETL certification, and straightforward installation process, they're designed to deliver decades of reliable performance in the applications where traditional lighting often falls short.
Whether you're converting unused square footage into functional living space or upgrading outdated lighting in an existing finished basement or attic, the right LED recessed fixtures transform these formerly forgotten areas into bright, comfortable spaces you'll actually want to spend time in.
Planning a Large Basement or Attic Lighting Project?
Contractors and homeowners taking on multi-room renovations can save significantly through Amico's bulk sales program. Get volume discounts on quality LED recessed lighting backed by ETL certification and multi-year warranties.


