Table Of Contents
- Why Kitchen and Dining Area Lighting Requires Special Consideration
- Key Specifications for Kitchen LED Recessed Lighting
- Best Fixture Types for Kitchen and Dining Spaces
- Choosing the Right Fixture Size
- Planning Your Kitchen Lighting Layout
- Installation Considerations and Wiring
- Complementary Lighting Solutions
Your kitchen and dining areas demand more from lighting than any other space in your home. These are the rooms where you prepare meals, examine food quality, read recipes, entertain guests, and share family dinners. Poor lighting in these spaces doesn't just create ambiance problems—it can make food preparation dangerous and turn an inviting dining area into an uncomfortable space that no one wants to use.
LED recessed lighting has become the preferred solution for kitchens and dining areas because it provides bright, even illumination without the visual clutter of hanging fixtures or the dated look of fluorescent panels. The right recessed lighting setup can make countertops safer to work on, help you accurately judge food color and doneness, eliminate shadows in critical work areas, and create the perfect atmosphere for dining.
But not all LED recessed lights are created equal, and the stakes are higher in kitchens than in other rooms. The wrong color temperature can make food look unappetizing. Insufficient brightness creates safety hazards. Poor light distribution leaves dark corners and harsh shadows. This guide will walk you through everything you need to know to select the best LED recessed lighting for your kitchen and dining areas, from technical specifications to fixture types, layout planning, and installation considerations.
Why Kitchen and Dining Area Lighting Requires Special Consideration
Kitchens present unique lighting challenges that set them apart from other rooms in your home. These spaces serve multiple functions throughout the day, each with different lighting needs. During morning meal prep, you need bright, focused task lighting to safely handle knives and hot cookware. During evening dinner service, you might want adjustable lighting that creates a welcoming atmosphere without sacrificing visibility. Weekend entertaining calls for lighting that makes food look appetizing while keeping the space comfortable for guests.
The surfaces in kitchens also complicate lighting design. Glossy countertops, stainless steel appliances, and glass-front cabinets all create reflections that can cause glare if fixtures aren't properly positioned. Dark countertops absorb light and require higher output fixtures than light-colored surfaces. Upper cabinets create shadows on countertops below, making targeted task lighting essential in those areas.
Dining areas have their own requirements. The lighting needs to be bright enough for comfortable conversation and safe movement, but not so intense that it feels clinical. Color accuracy matters tremendously because lighting dramatically affects how food appears. A dining table illuminated with cool, bluish light makes even beautifully prepared meals look unappetizing, while warm lighting with good color rendering makes everything look more delicious.
Traditional lighting solutions often fall short in these spaces. Pendant lights over islands create pools of light but leave perimeter counters dark. Surface-mount fixtures with exposed bulbs create harsh glare. Fluorescent panels provide even light but with poor color quality and an institutional feel. Recessed lighting solves these problems by providing clean, even illumination from ceiling-mounted fixtures that don't interfere with sightlines, cabinet doors, or the visual aesthetic of your kitchen design.
Key Specifications for Kitchen LED Recessed Lighting
Understanding the technical specifications of LED recessed lighting is essential for making informed decisions. These specifications directly impact how well your kitchen lighting performs its intended functions.
Brightness and Lumens
Brightness in LED lighting is measured in lumens, not watts. This shift from traditional incandescent thinking is important because watts only measure energy consumption, while lumens measure actual light output. For kitchen applications, you need substantially more lumens than in bedrooms or living rooms because of the detailed tasks performed in these spaces.
The general recommendation for kitchen lighting is 70-80 lumens per square foot for ambient lighting, with task lighting over work surfaces requiring 100-150 lumens per square foot. A typical kitchen recessed LED fixture producing 650-850 lumens works well for general lighting, while task areas benefit from fixtures in the 1000-1200 lumen range. Dining areas can use slightly lower output—around 50-60 lumens per square foot creates comfortable illumination for meals without the intensity of a workspace.
Amico's 6-inch recessed LED lighting typically delivers 750-1000 lumens depending on the model, providing excellent coverage for both general and task lighting applications. For smaller spaces or supplemental lighting, 4-inch fixtures deliver 500-700 lumens—sufficient for accent lighting or spacing between primary fixtures.
Don't make the mistake of assuming more brightness is always better. Overlighting a kitchen creates glare, washes out colors, and makes the space feel sterile and unwelcoming. The key is achieving the right balance: bright enough for safe food preparation, but with enough control to adjust for different activities and times of day.
Color Temperature Selection
Color temperature, measured in Kelvin (K), dramatically affects both the functionality and ambiance of your kitchen and dining areas. This specification determines whether your lighting appears warm and yellowish or cool and bluish, and it has profound effects on how food, materials, and people look under that light.
The three most common color temperature ranges for residential kitchens are:
- Warm White (2700K-3000K): Creates a cozy, traditional atmosphere similar to incandescent bulbs; excellent for dining areas where you want a welcoming, comfortable feel
- Neutral White (3500K-4000K): Provides a balanced, natural light quality that works well for both task and ambient lighting; increasingly popular for modern kitchens
- Cool White (5000K-6500K): Delivers crisp, bright illumination with a slightly bluish cast; preferred for clinical task lighting but can feel harsh in dining environments
For kitchens, most lighting designers recommend 3000K-4000K as the sweet spot. This range provides enough brightness and clarity for food preparation tasks while maintaining a relatively warm, inviting quality that works well when the kitchen transitions to a social space. If your kitchen has a lot of cool tones (grays, whites, stainless steel), 3500K-4000K prevents the space from feeling too cold. Kitchens with warmer finishes (wood cabinets, earth-tone counters) often look best with 3000K lighting.
Dining areas typically benefit from slightly warmer temperatures—2700K-3000K creates the most flattering light for skin tones and makes food appear more appetizing. If your dining area is open to your kitchen, consider using dimmable fixtures that can adjust from task-oriented brightness during prep to softer ambient lighting during meals.
Color Rendering Index (CRI)
While color temperature describes the tone of the light, Color Rendering Index (CRI) measures how accurately colors appear under that light compared to natural sunlight. This specification is particularly important in kitchens where you need to judge the freshness of produce, the doneness of meat, and the overall appearance of prepared food.
CRI is measured on a scale from 0-100, with 100 representing perfect color accuracy identical to natural daylight. For kitchen applications, you should never settle for anything below CRI 80. CRI 80+ ensures that reds, greens, and other colors appear natural rather than distorted or washed out. This rating provides the color accuracy needed to determine whether vegetables are fresh, meat is properly cooked, and food presentation looks appealing.
The difference between low and high CRI lighting is immediately noticeable in kitchens. Low CRI lighting (below 70) can make fresh tomatoes look muddy brown, fresh herbs appear grayish, and skin tones look sallow and unhealthy. CRI 80+ lighting renders these colors naturally, making your kitchen more functional and your dining area more inviting.
Beam Angle and Light Distribution
Beam angle determines how light spreads from the fixture. This specification directly affects whether your lighting creates broad, even coverage or focused task lighting. Understanding beam angles helps you select the right fixtures for different areas of your kitchen.
Most recessed LED fixtures for kitchens use beam angles between 90 and 120 degrees. Wider beam angles (110-120 degrees) create broad, overlapping pools of light ideal for general ambient lighting throughout the kitchen. Narrower beam angles (60-90 degrees) produce more focused beams that work well for task lighting over specific work areas like islands, ranges, or sinks.
Standard fixed recessed lights typically feature 110-120 degree beam angles, which work well for most kitchen applications when properly spaced. For areas where you want more focused lighting or the ability to highlight specific features, gimbal recessed lights offer adjustable positioning that lets you direct light exactly where it's needed, even after installation.
Best Fixture Types for Kitchen and Dining Spaces
Selecting the right fixture type is just as important as choosing the proper specifications. Different fixture designs offer distinct advantages depending on your installation requirements, existing infrastructure, and performance goals.
Canless LED Recessed Lighting
Canless LED recessed lights represent the newest generation of recessed lighting technology and have become the preferred choice for both new construction and renovation projects. These fixtures eliminate the traditional metal housing can entirely, creating a streamlined design that installs directly into the ceiling with minimal preparation.
The advantages of canless fixtures for kitchens are substantial. Installation is significantly faster and easier than traditional can-based systems because you're not wrestling with bulky housings in tight ceiling cavities. The integrated design means the LED module and trim are built as one piece, eliminating compatibility concerns and simplifying the installation process. Many canless fixtures feature tool-free installation with spring clips that secure the fixture in a simple cutout, making them accessible even for homeowners with basic DIY skills.
Energy efficiency is another major benefit. Canless fixtures are designed specifically for LED technology, with optimal thermal management that extends LED lifespan to 50,000+ hours. This means decades of maintenance-free operation—particularly valuable in kitchens where fixtures often run for extended periods daily. The slim profile of canless fixtures also makes them ideal for installations with limited ceiling depth or where ceiling joists complicate traditional housing placement.
Amico's 4-inch canless LED recessed lighting works exceptionally well for smaller kitchens, galley kitchens, or as supplemental lighting between larger fixtures. These compact units provide focused illumination without overwhelming the space, and their smaller footprint makes them easier to position around ceiling obstacles.
Retrofit Can Lights
If you're upgrading existing recessed lighting rather than starting from scratch, retrofit LED fixtures offer the most practical solution. These fixtures are specifically designed to convert old incandescent or CFL recessed lights to modern LED technology without replacing the existing housing cans.
Retrofit fixtures install into your existing cans in minutes, typically using clips or springs that grip the inside of the housing. This approach eliminates the need to cut new holes, patch ceilings, or deal with extensive electrical work. For kitchens with functional but outdated lighting, retrofits deliver dramatic improvements in brightness, color quality, and energy efficiency at a fraction of the cost and disruption of complete fixture replacement.
The performance gap between old and new technology is remarkable. Replacing a 65-watt incandescent recessed light with a modern retrofit LED fixture reduces energy consumption to just 10-15 watts while actually increasing light output. Over the 50,000+ hour lifespan of the LED module, this translates to hundreds of dollars in energy savings per fixture. The improved color quality and elimination of heat output are equally valuable benefits.
When selecting retrofit fixtures for kitchens, verify that the fixture is compatible with your existing housing size (most commonly 4-inch, 5-inch, or 6-inch). Also confirm that the fixture is rated for damp locations if you're installing them near sinks or in areas where moisture exposure is possible.
Gimbal Recessed Lights
Gimbal recessed lights feature a pivoting mechanism that allows the fixture to tilt and rotate, directing light at an angle rather than straight down. This adjustability makes gimbal fixtures particularly valuable in kitchens where you need to highlight specific areas or eliminate shadows in locations where direct overhead lighting isn't optimal.
Common kitchen applications for gimbal lights include lighting over kitchen islands where you want to angle light toward the work surface rather than creating glare for people sitting at the island. They're also excellent for highlighting backsplashes, glass-front cabinets, or architectural features. In galley kitchens or L-shaped layouts, gimbal fixtures can be angled to provide better coverage along countertops where shadows from upper cabinets would otherwise be problematic.
The adjustability of gimbal recessed lights also provides flexibility as your needs change. If you rearrange your kitchen layout or discover that initial positioning creates unwanted shadows, you can simply adjust the fixture angle rather than relocating the entire fixture. This adaptability is valuable in kitchens that evolve over time with new appliances, cabinet additions, or layout modifications.
For best results, combine gimbal fixtures with standard fixed recessed lights. Use fixed fixtures for general ambient lighting throughout the kitchen, and position gimbal fixtures in locations where directional control improves lighting quality—typically over work zones, at the perimeter of the room, or in areas with challenging layouts.
Choosing the Right Fixture Size
Fixture size affects both the amount of light delivered and the visual appearance of your ceiling. The most common sizes for residential kitchens are 4-inch and 6-inch recessed fixtures, each with distinct advantages depending on your application.
6-inch fixtures are the workhorse size for kitchen lighting. They provide substantial light output (typically 750-1000+ lumens), create good coverage with fewer fixtures, and handle general lighting duties efficiently. These fixtures are ideal for kitchens with ceiling heights of 8-10 feet, open floor plans, or any space where you want to minimize the number of fixtures while maintaining adequate brightness. The larger aperture also typically means better light distribution and less harsh shadows compared to smaller fixtures.
4-inch fixtures work well for supplemental lighting, smaller spaces, or situations where you want a less prominent ceiling appearance. They're excellent for spacing between larger fixtures, accent lighting, or galley kitchens where the narrower room width doesn't require the coverage of 6-inch fixtures. The smaller size also provides more flexibility in positioning around ceiling joists, ductwork, or other obstacles.
For most standard kitchens (10x10 to 12x14 feet with 8-foot ceilings), 6-inch fixtures provide the best balance of coverage and efficiency. Larger kitchens or those with higher ceilings may benefit from a combination of both sizes—6-inch fixtures for primary lighting zones and 4-inch fixtures for supplemental coverage or accent lighting.
Avoid mixing fixture sizes in highly visible patterns, as the different aperture sizes create a less cohesive appearance. If you're using multiple sizes, deploy them in different functional zones (perimeter vs. center, task lighting vs. ambient lighting) rather than alternating them in the same row or grid.
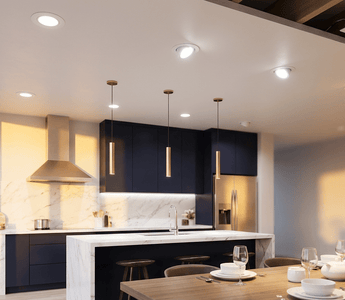
Planning Your Kitchen Lighting Layout
Proper fixture placement is critical for eliminating shadows, avoiding glare, and creating even illumination throughout your kitchen and dining areas. Poor layout planning is the most common cause of disappointing results, even when using high-quality fixtures with appropriate specifications.
Start by identifying the functional zones in your kitchen. Task lighting zones include countertops, islands, ranges, and sinks—anywhere detailed work happens. These areas require brighter, more focused lighting positioned to eliminate shadows created by your body as you work. Ambient lighting zones include walkways, dining areas, and general kitchen space that needs comfortable illumination but not intense task lighting.
For task lighting over countertops, position fixtures 18-24 inches from the wall (approximately over the front edge of the counter). This placement ensures light falls directly on the work surface rather than being blocked by your body or creating shadows under upper cabinets. If you have upper cabinets, placing fixtures slightly farther from the wall helps light reach the counter below. Space these fixtures 3-4 feet apart for even coverage along the entire counter length.
Kitchen islands present unique challenges. Position fixtures directly over the island, but consider how the space is used. If the island serves primarily as a work surface, center fixtures over the counter area. If the island includes seating, avoid positioning fixtures directly over where people sit, as this creates uncomfortable glare for seated guests. Instead, position fixtures over the work surface side of the island or use adjustable gimbal fixtures that can direct light away from seated positions.
For general ambient lighting throughout the kitchen, a common approach is to create a grid pattern with fixtures spaced 4-6 feet apart. This spacing provides overlapping light coverage that eliminates dark spots without creating excessive brightness or wasted energy. In rectangular kitchens, you might arrange fixtures in evenly spaced rows. In square kitchens, a symmetrical grid often works best.
Dining areas benefit from lighting positioned directly over the table, with fixtures centered on the table location. For rectangular tables, consider positioning two or three fixtures in a line along the table's length. Round or square tables work well with a single centered fixture or a tight cluster. Maintain at least 30 inches of clearance from the table edge to walls to ensure adequate spacing and light distribution.
Before finalizing your layout, consider these practical factors: ceiling joist locations (fixtures must fit between joists unless you're willing to do structural modification), existing wiring locations (running new circuits adds cost and complexity), and above-ceiling obstacles like ductwork, plumbing, or HVAC equipment. Creating a detailed ceiling plan that accounts for these factors before cutting holes saves enormous frustration during installation.
Installation Considerations and Wiring
Proper installation is essential for both safety and performance. Whether you're tackling the project yourself or working with an electrician, understanding installation requirements helps ensure optimal results.
All electrical work must comply with local building codes, which typically require that kitchen lighting circuits be properly sized (usually 15 or 20 amps) and protected by appropriate circuit breakers. Kitchens often have specific requirements about GFCI protection, circuit dedication, and acceptable wiring methods. If you're not experienced with electrical work, consulting a licensed electrician is always the safer choice, particularly for projects involving new circuits or panel modifications.
For installations involving multiple fixtures on the same circuit, fixtures must be wired using parallel connections. This means each fixture connects independently to the power supply, ensuring that all fixtures receive full voltage and that failure of one fixture doesn't affect others. When connecting multiple fixtures, always use Push-in Wire Connectors rather than traditional alternatives. These connectors provide superior reliability by allowing you to insert stripped wire ends into the connector ports until they click securely in place—no twisting required. This connection method creates consistent, reliable connections that won't loosen over time.
Canless fixtures typically feature color-coded wire leads (black for hot, white for neutral, green or bare for ground) that connect to your home's electrical system using these Push-in Wire Connectors. The installation process is straightforward: cut power at the breaker, prepare the ceiling opening according to manufacturer specifications, make wire connections, secure the fixture with the provided clips, and restore power to test operation.
Retrofit installations are even simpler since the existing housing handles all structural and wiring connections. Most retrofit fixtures simply plug into an adapter that mounts in the existing socket or connect directly to the housing's wiring, then clip into place to complete the installation. The entire process often takes less than 10 minutes per fixture.
For new construction or major renovations, consider installing dimmer switches compatible with LED fixtures. Dimming capability provides tremendous flexibility in kitchens and dining areas, allowing you to adjust from bright task lighting during food prep to softer ambient lighting during meals. Verify that your chosen fixtures are dimmable and select dimmers specifically designed for LED loads—older incandescent dimmers often cause flickering or limited dimming range with LED fixtures.
Complementary Lighting Solutions
While recessed lighting provides the foundation of kitchen and dining area illumination, complementary lighting solutions can enhance both functionality and aesthetics. A well-designed lighting plan typically incorporates multiple fixture types working together.
Under-cabinet lighting addresses one of the most common kitchen lighting problems: shadows on countertops created by upper cabinets blocking overhead light. LED strip lights or puck lights mounted under cabinets provide direct task lighting exactly where you need it for food preparation, reading recipes, and detailed work. This lighting layer works in conjunction with your recessed fixtures rather than replacing them.
For dining areas with standard ceiling heights (8-9 feet), consider adding pendant lights or a chandelier over the dining table in addition to recessed lighting. This creates a focal point and adds visual interest while providing supplemental illumination. The recessed lighting handles general ambient lighting throughout the space, while the decorative fixture creates layered lighting specifically over the dining surface. Ensure the decorative fixture hangs 30-36 inches above the table surface to avoid blocking sightlines across the table.
In kitchens with ceiling fans, ceiling fan lights can supplement recessed lighting while providing air circulation. Position the fan centrally in the kitchen with recessed fixtures around the perimeter to avoid conflicts between fixture placement and fan blade clearance. This approach maintains good air circulation without sacrificing lighting quality.
For open-concept homes where kitchens flow into living areas, ensure your lighting plan addresses the transition between spaces. Recessed lighting can extend from the kitchen into adjacent areas to maintain visual continuity, but consider using separate switches or dimming zones so you can control each area independently based on current use and desired ambiance.
Selecting the best LED recessed lighting for your kitchen and dining areas comes down to matching the right specifications, fixture types, and layout to your specific space and needs. Prioritize fixtures that deliver adequate brightness (70-150 lumens per square foot depending on the task), appropriate color temperature (3000K-4000K for kitchens, 2700K-3000K for dining), and good color accuracy (CRI 80+) to ensure your space is both functional and inviting.
Choose fixture types based on your installation situation. Canless LED fixtures offer the easiest installation and best long-term performance for new construction or major renovations. Retrofit fixtures provide the most practical solution for upgrading existing recessed lighting. Gimbal fixtures add valuable directional control in locations where adjustability improves coverage or eliminates shadows.
Layout planning requires careful attention to functional zones, fixture spacing, and practical constraints like ceiling joists and existing wiring. Position task lighting 18-24 inches from walls over countertops, space fixtures 3-4 feet apart for even coverage, and plan dining area lighting to center over table locations. Always account for above-ceiling obstacles and wiring requirements before finalizing your layout.
When properly specified, selected, and installed, LED recessed lighting transforms kitchens and dining areas into bright, comfortable, energy-efficient spaces that serve you well for decades. The combination of long lifespan (50,000+ hours), minimal maintenance requirements, and dramatic energy savings compared to older lighting technologies makes LED recessed lighting not just a better choice, but the clear standard for modern kitchen and dining area illumination.
Need LED Recessed Lighting for Your Kitchen Project?
Whether you're upgrading a single kitchen or outfitting multiple properties, Amico offers ETL & FCC certified LED recessed lighting solutions backed by 2-5 year warranties and a 30-day hassle-free return policy. Our complete range includes canless fixtures, retrofit options, and adjustable gimbal lights—all with free sitewide shipping.
Contractors and businesses: Take advantage of our bulk sales program with tiered volume discounts on large orders.


