Table Of Contents
If you've researched recessed lighting recently, you've probably noticed a significant shift happening in the lighting industry. Traditional recessed can lights, those bulky metal housings that have dominated ceiling lighting for decades, are being rapidly replaced by sleek, ultra-thin wafer lights. This isn't just a trend driven by aesthetics. Canless LED wafer lights represent a fundamental improvement in how we approach recessed lighting, offering easier installation, better energy efficiency, and superior performance in a fraction of the space.
For homeowners planning renovations, contractors managing multiple projects, or anyone simply looking to upgrade their lighting, understanding wafer lights has become essential. These innovative fixtures eliminate many of the complications associated with traditional can lights while delivering professional results that rival or exceed what conventional systems can achieve. Whether you're working with new construction, remodeling existing spaces, or dealing with the common challenge of shallow ceiling cavities, wafer lights offer solutions that weren't possible just a few years ago.
In this comprehensive guide, we'll break down exactly what wafer lights are, how they differ from traditional can lights, and why they're becoming the preferred choice for both residential and commercial applications. You'll learn about the specific advantages that make canless LED technology superior, understand the installation process, and discover how to select the right wafer lights for your particular needs.
What Are Wafer Lights?
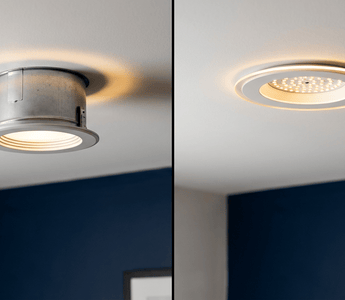
Wafer lights, also called canless recessed lights or ultra-thin LED downlights, are integrated lighting fixtures designed to mount directly into your ceiling without requiring a traditional recessed housing can. The name "wafer" comes from their remarkably thin profile, typically less than an inch thick, which resembles the slim form factor of a wafer cookie. Unlike conventional recessed lighting systems that require a separate metal housing (the "can") installed in the ceiling cavity, wafer lights combine the LED light source, driver, heat sink, and trim into a single, compact unit.
This integrated design represents a complete reimagining of recessed lighting architecture. Where traditional systems require coordination between the rough-in housing and the trim kit, wafer lights arrive as complete, ready-to-install fixtures. The electrical junction box mounts separately in the ceiling cavity, and the wafer light connects to it via a simple electrical connector and mounting system. Most quality wafer lights, including those from manufacturers like Amico, feature spring-loaded retention clips that secure the fixture firmly against the ceiling surface, creating a clean, professional appearance without visible fasteners or gaps.
The LED technology in wafer lights is permanently integrated into the fixture. This might initially concern those accustomed to replacing bulbs, but modern LEDs boast lifespans of 50,000+ hours. At typical residential usage rates, this translates to over 20 years of operation before any replacement is needed. The integrated approach also allows for better thermal management, more efficient optics, and superior light quality compared to retrofit bulb solutions.
The Traditional Can Light System: A Brief History
To fully appreciate why wafer lights are replacing traditional recessed lighting, it helps to understand what came before. Conventional recessed can lights consist of two main components: the housing (or can) and the trim. The housing is a cylindrical metal container, typically 6-8 inches deep, that gets installed in the ceiling cavity during construction or remodeling. This can contains the lamp socket and is designed to protect the light bulb from insulation contact while managing heat dissipation.
The trim, which is the visible portion you see from below, attaches to the housing and serves both aesthetic and functional purposes. It conceals the rough ceiling opening, provides reflective surfaces to direct light, and comes in various styles like baffle, reflector, or gimbal configurations. This two-piece system required coordination between rough-in electrical work and finish carpentry, creating multiple opportunities for sizing mismatches, installation delays, and compatibility issues.
Traditional can lights were designed in an era when incandescent and halogen bulbs were the standard. These bulbs generated substantial heat, necessitating the large metal housings to safely dissipate thermal energy and maintain clearances from combustible building materials. The system worked reliably for decades, but it came with significant drawbacks: challenging installation in existing ceilings, substantial ceiling cavity depth requirements, air leakage issues, and relatively high energy consumption.
How Canless LED Wafer Lights Work
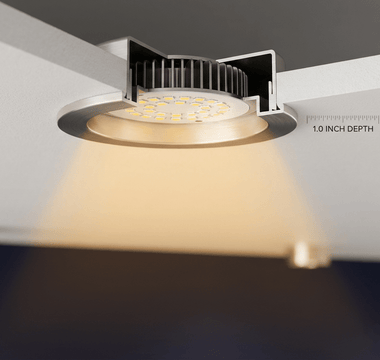
Canless wafer lights operate on the same fundamental electrical principle as any LED fixture, but their engineering represents a significant advancement in thermal management and optical design. The LED chips are mounted on a thin aluminum substrate that serves as both the structural base and the primary heat sink. Unlike bulky traditional housings that rely on air space for cooling, wafer lights use direct-contact thermal conduction to dissipate heat through the metal backing plate and into the surrounding ceiling material.
The integrated LED driver, which converts standard 120V household current to the low-voltage DC power that LEDs require, is miniaturized and incorporated directly into the fixture body. This driver placement, combined with efficient LED chips, generates minimal heat compared to older lighting technologies. The result is a fixture that operates cool enough to install safely in direct contact with insulation, a feature specifically rated as IC (Insulation Contact) in most quality wafer lights.
The optical design of wafer lights leverages precision-engineered reflectors and diffusers molded directly into the trim surface. Without the depth constraints of fitting optics into a traditional trim ring, designers can optimize light distribution patterns more effectively. Most wafer lights achieve excellent uniformity with minimal hot-spotting, providing even illumination across the intended area. The integrated approach also eliminates the air gaps and reflection losses that occur in traditional multi-piece systems, resulting in higher effective lumen output per watt consumed.
Key Advantages of Wafer Lights Over Can Lights
The transition from traditional can lights to wafer technology isn't just about following trends. Canless LED wafer lights offer tangible, measurable advantages that impact installation time, energy costs, design flexibility, and long-term performance. Understanding these benefits helps explain why professional electricians, contractors, and homeowners are making the switch.
Dramatically Easier Installation
Installation simplicity stands out as perhaps the most immediately apparent advantage of wafer lights. Traditional recessed can installation requires cutting precise ceiling openings, maneuvering bulky housings into place, securing them to ceiling joists with adjustable bars or direct mounting, running electrical connections, and finally installing trim rings. In existing ceilings, this process often involves working in cramped attic spaces, dealing with insulation, and hoping you don't encounter unexpected framing or obstacles after cutting your ceiling hole.
Canless LED recessed lighting transforms this multi-step ordeal into a straightforward process. You install a standard electrical junction box in the ceiling cavity, make your electrical connections, cut an appropriately sized hole in the ceiling surface, and snap the wafer light into place using its integrated spring clips. The entire installation can often be completed in 15-20 minutes per fixture, compared to 45-60 minutes for traditional can lights. For retrofit applications where you're replacing existing fixtures or adding new lighting to finished spaces, the time savings multiply dramatically.
The electrical connections are also simplified. Quality wafer lights use push-in wire connectors that accept stripped wire ends with a simple insertion until they click into place. This connection method proves more reliable than traditional alternatives, creating secure connections without the twisting and taping that wire nuts require. When installing multiple fixtures, you'll connect them using parallel wiring, with each fixture receiving its own connection to the branch circuit. This ensures consistent power delivery and allows fixtures to operate independently.
Ultra-Slim Profile for Shallow Ceilings
Ceiling cavity depth frequently limits lighting options in real-world installations. Traditional can lights require 6-8 inches of clearance above the ceiling surface, space that simply doesn't exist in many situations. Homes built on concrete slabs often have shallow ceiling cavities created by furred-out framing. Upper-floor ceilings in multi-story homes may have limited space between the ceiling drywall and the floor structure above. Basement renovations commonly face tight clearances between existing ceilings and floor joists.
Wafer lights address these constraints with their minimal depth requirements. Most units require less than one inch of clearance above the ceiling, with some ultra-thin models needing as little as half an inch. This slim profile opens up recessed lighting possibilities in spaces where can lights simply won't fit. Contractors and remodelers consistently cite this as a game-changing advantage, as it eliminates the need to compromise on lighting quality or resort to less-desirable surface-mounted alternatives.
The shallow installation depth also simplifies working around obstacles in the ceiling cavity. With traditional cans, encountering HVAC ducts, plumbing lines, or electrical conduits often meant relocating the planned fixture location. Wafer lights' minimal intrusion into the ceiling cavity makes it far easier to work around these obstacles, giving you greater flexibility in achieving your desired lighting layout.
Superior Energy Efficiency
LED technology inherently offers better energy efficiency than the incandescent and halogen bulbs traditionally used in can lights, but wafer lights take this advantage further. The integrated design allows for optimal matching between the LED array, driver electronics, and thermal management system. This optimization means wafer lights typically deliver more lumens per watt than retrofit LED bulbs installed in traditional cans.
A typical 6-inch wafer light consuming 12-15 watts can produce 800-1000 lumens, equivalent to a 65-75 watt incandescent bulb. Over the fixture's 50,000+ hour lifespan, this efficiency translates to substantial energy savings. For a home with 20 recessed lights operating an average of 4 hours daily, switching from 65-watt incandescent bulbs to 15-watt wafer lights saves approximately 1,460 kWh annually. At average electricity rates, that's roughly $175 in annual savings, or $3,500 over the fixtures' lifetime.
The integrated design also eliminates compatibility guesswork. With traditional cans, achieving optimal efficiency requires selecting the right LED bulb that works properly with the specific housing and trim combination. Wafer lights arrive as complete, engineered systems where every component is designed to work together, ensuring you achieve the rated efficiency and performance without trial and error.
Better Light Quality and Distribution
Light quality encompasses multiple factors including color rendering, color temperature consistency, distribution uniformity, and the absence of flicker or humming. Wafer lights excel in all these areas thanks to their integrated engineering approach. The LED arrays use quality diodes with CRI 80+ ratings, ensuring that colors appear natural and accurate under the lighting. This color rendering capability matters in kitchens, bathrooms, and any space where accurate color perception is important.
The optical systems in wafer lights are purpose-designed for the specific LED configuration, resulting in smooth, even light distribution without the rings, hot spots, or dark zones that can occur with mismatched traditional can light and bulb combinations. The integrated trim and LED module work as a unified optical system, with reflectors, diffusers, and light-directing surfaces optimized for the exact position and output characteristics of the LED chips.
Quality wafer lights also incorporate flicker-free drivers that provide stable, consistent light output. Cheap retrofit LED bulbs often produce imperceptible flicker that can cause eye strain and headaches during extended exposure. The engineered driver systems in quality wafer lights eliminate this issue, providing comfortable illumination that supports productivity and wellbeing.
Lower Total Cost of Ownership
While wafer lights may initially cost more than basic can housings, the total cost of ownership calculation strongly favors canless technology. Consider all the components required for a traditional recessed light installation: the housing can, mounting hardware, trim ring, and bulb. Quality components in each category add up quickly, often reaching or exceeding the cost of a complete wafer light fixture.
Installation labor represents another significant cost factor. Professional electricians charge by the hour, and the time savings of wafer installation directly reduces labor costs. For new construction projects with dozens of fixtures, this installation efficiency can save thousands in labor expenses. DIY homeowners benefit similarly, completing projects in hours rather than days.
Long-term maintenance costs tilt even more heavily in favor of wafer lights. The 50,000+ hour lifespan means no bulb replacements for decades under typical residential use. Traditional systems require multiple bulb replacements over equivalent periods, each costing $5-15 for quality LED bulbs. Multiply this by the number of fixtures in your home, and the maintenance cost savings become substantial. The reduced energy consumption discussed earlier adds thousands more in savings over the fixtures' lifetime.
Installing Wafer Lights: What to Expect
Understanding the installation process helps demystify wafer lights and illustrates why they've become so popular for both new construction and renovation projects. While specific steps vary slightly depending on the manufacturer and model, the general process follows a consistent pattern that's far simpler than traditional can light installation.
1. Plan Your Layout – Determine fixture locations based on your lighting goals, ensuring appropriate spacing for even coverage. Most residential applications work well with fixtures spaced 4-6 feet apart, though specific needs vary based on ceiling height, room function, and desired light levels. Verify that your planned locations don't conflict with ceiling joists, HVAC ducts, or other obstacles.
2. Install Junction Boxes – Mount standard electrical junction boxes at each fixture location in the ceiling cavity. These boxes should be rated for ceiling fixtures and securely attached to framing members. The junction boxes house the electrical connections and provide the mounting point for the wafer light's electrical connector.
3. Run Electrical Wiring – Route electrical cable from your power source to each junction box location. When wiring multiple fixtures, use parallel connections, where each fixture receives its own connection to the branch circuit. This ensures consistent voltage delivery and independent operation. Always follow local electrical codes and work with power disconnected at the breaker panel.
4. Make Electrical Connections – Connect the fixture's electrical leads to your house wiring using push-in wire connectors. Insert the stripped wire ends into the connector ports until they click securely into place. This method creates reliable connections without the twisting required by traditional wire nuts. Connect black to black (hot), white to white (neutral), and green or bare copper to ground.
5. Cut Ceiling Holes – Using the template provided with your wafer lights or measuring carefully, cut holes in the ceiling surface at each fixture location. A drywall saw or hole saw works well for this step. Cut carefully to ensure clean edges and proper fit. The beauty of wafer lights is that the spring clips and trim ring will cover minor imperfections around the hole edge.
6. Install Wafer Fixtures – Compress the spring-loaded retention clips against the sides of the wafer light and insert the fixture up through the ceiling hole. Once the fixture body clears the ceiling surface, the clips will expand and pull the fixture snugly against the ceiling. The trim ring sits flush with the ceiling surface, creating a clean, professional appearance.
7. Test and Adjust – Restore power at the breaker panel and test each fixture to ensure proper operation. Quality wafer lights should illuminate immediately without flickering, buzzing, or other issues. If you've installed dimmable models, test the dimming function to verify smooth, consistent dimming performance across the full range.
The entire process typically takes 15-20 minutes per fixture once you've established your workflow, making wafer lights ideal for projects ranging from single-room updates to whole-house installations. Many homeowners with basic electrical knowledge successfully install wafer lights themselves, though consulting with or hiring a licensed electrician is always recommended if you're uncertain about any aspect of electrical work.
When to Choose Wafer Lights vs. Other Options
While wafer lights offer compelling advantages, understanding when they're the best choice versus other recessed lighting options helps ensure optimal results for your specific situation. Wafer lights excel in several scenarios, though alternatives may sometimes make more sense depending on your particular needs and constraints.
Choose wafer lights when: You're working with shallow ceiling cavities where traditional cans won't fit. You're retrofitting lighting into existing finished ceilings and want to minimize installation complexity. You're undertaking new construction or major renovation and want the most efficient, cost-effective recessed lighting solution. You need to install multiple fixtures and want to minimize labor time and costs. You're working in spaces with insulation in the ceiling cavity and need IC-rated fixtures.
Consider retrofit options when: You already have traditional recessed can housings installed and want to upgrade to LED technology without replacing the entire fixture. Retrofit can lights allow you to convert existing housings to efficient LED lighting by replacing just the trim and bulb assembly. This approach makes sense when the existing cans are in good condition and properly located, as it requires minimal work while still delivering LED efficiency and performance.
Consider gimbal or adjustable fixtures when: You need directional lighting for highlighting artwork, architectural features, or specific areas of a room. While many wafer lights offer fixed beam patterns optimized for general illumination, adjustable fixtures provide the flexibility to aim light precisely where needed. Some manufacturers, including Amico, offer gimbal-style recessed lights that combine modern LED technology with directional control.
For most residential and commercial general lighting applications, 6-inch recessed LED lighting in wafer format provides the ideal balance of light output, installation ease, and energy efficiency. The 6-inch size has become the industry standard for residential recessed lighting, offering sufficient output for general illumination while maintaining a clean, unobtrusive appearance.
Choosing the Right Wafer Light for Your Space
Not all wafer lights are created equal. Understanding the key specifications and features helps you select fixtures that meet your specific needs while ensuring long-term satisfaction with your investment. Several factors deserve consideration as you evaluate options.
Light Output and Wattage: Consider the lumens produced rather than wattage consumed. For general residential lighting, 800-1000 lumens per fixture works well in most spaces, equivalent to traditional 65-75 watt incandescent bulbs. Kitchens, workshops, and task-oriented areas may benefit from higher output fixtures in the 1200-1500 lumen range. The efficiency ratio of lumens per watt indicates overall quality, with 70-80 lumens per watt representing good performance.
Color Temperature: This specification, measured in Kelvin, determines whether the light appears warm or cool. Residential spaces typically work best with 2700K-3000K (warm white) for living areas, bedrooms, and dining rooms, creating comfortable, inviting ambiance. Kitchens, bathrooms, and workshops often benefit from 3500K-4000K (neutral white), providing crisp, clear illumination that supports detailed tasks. Commercial applications frequently specify 4000K-5000K for alert, productive environments.
Dimming Capability: Dimmable wafer lights offer valuable flexibility, allowing you to adjust light levels for different activities and times of day. Verify that fixtures specify dimming compatibility and check which dimmer types they support. Quality dimmable LEDs should dim smoothly from 100% down to 10% or less without flickering or dropping out. Test dimming performance before purchasing multiple fixtures, as some lower-quality products exhibit poor dimming behavior.
Certifications and Warranties: Reputable manufacturers obtain ETL and FCC certifications for their products, indicating compliance with safety and electromagnetic interference standards. These certifications provide assurance that fixtures meet rigorous testing requirements. Warranty terms reflect manufacturer confidence in their products. Quality wafer lights typically carry warranties of 3-5 years, covering defects in materials and workmanship.
Trim Style and Finish: While wafer lights come in integrated designs, trim appearance still matters. Common finishes include white, brushed nickel, oil-rubbed bronze, and black, allowing coordination with your interior design scheme. Baffle trims reduce glare for comfortable general lighting, while smooth reflector trims maximize light output. Consider the ceiling material and color when selecting trim finishes to ensure the fixtures blend seamlessly or create intentional contrast as desired.
When sourcing wafer lights for your project, working with established manufacturers who specialize in LED lighting ensures access to quality products backed by reliable warranties and support. Amico's range of canless recessed lighting options combines ETL and FCC certification, 5-year warranties, and professional-grade performance at value-oriented prices. Whether you're tackling a single-room update or a comprehensive lighting renovation, selecting quality fixtures from reputable sources protects your investment and ensures long-term satisfaction.
The shift from traditional can lights to wafer lights represents more than just a technological update. It's a fundamental improvement in how we approach recessed lighting, eliminating many of the complications, constraints, and compromises that installers and homeowners have dealt with for decades. Canless LED wafer lights deliver professional results with dramatically simplified installation, superior energy efficiency, better light quality, and lower total ownership costs compared to conventional systems.
For new construction projects, wafer lights have become the default choice among forward-thinking builders and contractors who recognize the value of faster installation and reduced callbacks. In renovation and retrofit applications, they solve the persistent challenge of adding quality recessed lighting to existing spaces without major demolition or reconstruction. The minimal ceiling cavity requirements open up possibilities in spaces where traditional can lights simply won't work, from shallow basement ceilings to upper-floor rooms with limited clearance.
As LED technology continues advancing, wafer lights will only improve, offering even better efficiency, longer lifespans, and enhanced features like color-tuning and smart home integration. But the core advantages that make them superior to traditional can lights are already well established. Whether you're planning a kitchen renovation, finishing a basement, updating your home's lighting, or managing commercial projects, wafer lights deserve serious consideration as your recessed lighting solution. The combination of ease, efficiency, and performance makes them a smart investment that pays dividends in both immediate installation savings and long-term operational benefits.
Ready to Upgrade to Wafer Lights?
Amico offers a comprehensive selection of ETL and FCC certified canless LED recessed lighting designed for both residential and commercial applications. With 5-year warranties, 50,000+ hour lifespans, and professional-grade performance at competitive prices, our wafer lights deliver the quality you need with the value you want.
Need fixtures for a larger project? Our bulk sales program offers volume discounts that make equipping entire homes or commercial spaces more affordable. Request a wholesale quote today and discover how Amico's contractor-focused pricing can reduce your project costs while maintaining the quality your reputation depends on.
Free shipping on all orders • 30-day hassle-free returns • Trusted by professionals nationwide


