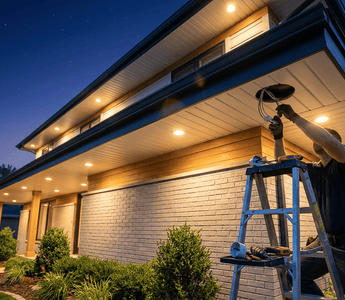
Walk up to almost any newer home after dark and you'll notice something: a clean row of recessed lights tucked neatly into the soffit, washing the exterior walls with a soft, even glow. It looks intentional, architectural, and expensive — but it's a project many homeowners can tackle themselves with the right fixtures, a weekend afternoon, and a clear plan. Whether you're lighting an entryway, a covered porch, a garage overhang, or the full perimeter of your home, exterior soffit lighting transforms how your property looks and feels after sunset.
This guide covers everything you need to know about installing recessed lights in exterior soffits: how to choose the correct fixture type and size, how to plan your layout for balanced illumination, how to safely run wiring, and how to make secure electrical connections. We'll also call out the code considerations and common mistakes that can turn a straightforward project into a frustrating one. By the end, you'll have a clear, confidence-building roadmap from planning all the way through to flipping the switch.
What Is Soffit Lighting and Why Does It Matter?
A soffit is the finished underside of a roof overhang — the horizontal surface you see when you look up at the eave of a house. It's tucked between the exterior wall and the edge of the roofline, and it's one of the most underused real estate in residential exterior design. Installing recessed lights into this space creates a flush, low-profile lighting solution that sits completely out of sight until it's turned on. Unlike wall-mounted lanterns or surface-mounted floodlights, soffit recessed lights keep the fixture body hidden inside the structure, leaving nothing but a clean circle of light visible from outside.
The result is a look that's simultaneously functional and refined. Recessed soffit lights cast light downward along the facade of the home, illuminating pathways, driveways, steps, and entryways while highlighting the architectural details of the structure itself. For homeowners who want to improve curb appeal, boost nighttime security, and add genuine value to their property, soffit lighting is one of the most impactful exterior upgrades available.
Benefits of Recessed Soffit Lighting
Before diving into the how-to, it's worth understanding what you're actually getting out of this upgrade. Soffit lighting isn't just decorative — it pulls real functional weight in ways that other exterior lighting options simply can't match.
- Enhanced Curb Appeal: Recessed lights create a modern, architectural look that highlights rooflines, columns, siding textures, and entryways. The clean, flush profile looks intentional and polished both day and night.
- Improved Safety and Visibility: Well-placed soffit lights illuminate walkways, steps, driveways, and garage approaches, reducing trip hazards and making it easier to navigate around your home after dark.
- Security Deterrence: A well-lit exterior is one of the most effective passive deterrents against intruders. Recessed soffit lighting eliminates dark corners and shadowed zones around the perimeter of your home.
- Increased Property Value: Thoughtfully designed exterior lighting is consistently cited as a value-adding upgrade that improves buyer appeal when it comes time to sell.
- Energy Efficiency: Modern LED recessed fixtures — like those in Amico's recessed lighting collection — consume a fraction of the energy of older incandescent or halogen alternatives, and are rated for 50,000+ hours of operation.
Choosing the Right Recessed Fixture for Your Soffit
Fixture selection is the single most important decision in this entire project. Install the wrong type of light and it won't fit your soffit, won't hold up to weather, or simply won't look right. Get it right, and the rest of the installation flows naturally. There are four key factors to evaluate: moisture rating, fixture style, size, and soffit angle.
Wet-Rated vs. Damp-Rated: Which Do You Need?
This is a non-negotiable starting point. Exterior soffits are classified as wet locations because they can be exposed to rain, wind-driven moisture, and temperature swings. A wet-rated fixture is specifically engineered to handle direct water exposure, featuring sealed housings, weatherproof gaskets, and corrosion-resistant components. A damp-rated fixture is designed only for humid environments without direct water contact — think a covered, enclosed porch — and is not appropriate for open eaves. Standard indoor recessed lights lack these seals entirely and will degrade rapidly if used outside.
For most standard residential eaves, look for a fixture with at least an IP65 rating, which means it's fully protected against water spray from any direction. In coastal environments or areas with heavy weather exposure, an IP66 or higher rating provides additional protection. When shopping Amico's 4-inch canless LED recessed lighting or 6-inch recessed LED lighting, always confirm the wet-location rating before purchasing for soffit use.
Canless vs. Retrofit Recessed Lights
The second major decision is whether you need a canless (wafer-style) fixture or a retrofit unit. This depends entirely on what's already in your soffit.
Retrofit recessed lights are designed to fit inside an existing recessed can or housing that's already installed in the soffit. If your home already has older incandescent or halogen cans in the eaves, a retrofit LED unit slides right in, connecting to the existing socket. Amico's retrofit can lights are integrated units — the LED module and trim are built as a single piece, so installation is straightforward with no separate trim assembly required.
Canless recessed lights — sometimes called wafer lights or slim panel lights — are the go-to choice when there's no pre-existing housing. These ultra-slim fixtures mount directly into a hole cut into the soffit material and are held in place by spring-loaded clips. Their low-profile design is a major advantage in shallow eaves where a traditional bulky housing simply won't fit. If you're starting from scratch on a new or unlit soffit, canless is almost always the better option.
4-Inch vs. 6-Inch: Choosing the Right Size
Both 4-inch and 6-inch fixtures are popular for soffit applications, and the right choice depends on your soffit's depth, your home's scale, and the look you're going for. Shallow soffits with limited depth above the fascia board are better suited to 4-inch canless fixtures, which require minimal clearance and sit nearly flush with the surface. A 6-inch fixture offers a broader light spread and suits wider eaves or larger homes where a more generous beam is appropriate. For a typical single-story home with standard 8- to 10-foot eaves, 4-inch fixtures tend to deliver a cleaner, more refined appearance, while 6-inch lights work well for double-story homes or wider overhangs that need greater coverage per fixture.
Flat vs. Angled Soffits: When to Use a Gimbal
Not all soffits are perfectly horizontal. Homes with a steeply pitched roofline often have angled soffits that follow the slope of the roof. If you install a standard fixed-lens recessed light on an angled soffit, the beam will shoot off to the side rather than downward — which means uneven lighting, glare, and a finished product that looks wrong. The solution is a gimbal recessed light, which features an adjustable internal head that can be tilted to compensate for the angle of the soffit, directing the beam straight down regardless of the pitch. Amico's gimbal recessed lights are specifically designed for this kind of adjustable application. If your soffit is on an angle, a gimbal fixture is not optional — it's required for a proper result.
Understanding Your Soffit Material
The material your soffit is made from affects how you cut it, how you handle it during installation, and how much care you need to take to avoid damage. Before picking up a hole saw, identify what you're working with.
- Aluminum Soffits: Durable, lightweight, and weather-resistant, aluminum is one of the most common soffit materials. It cuts cleanly with a hole saw and holds up well to outdoor conditions, but take care not to warp or bend it during the cutting process. Use a slow, controlled drill speed and let the saw do the work.
- Vinyl Soffits: Vinyl is affordable and low-maintenance but can be brittle, especially in cold temperatures. Drilling too aggressively can cause cracking along the cut edge. Work slowly and use sharp bits; if possible, cut vinyl on a warmer day when the material is less rigid.
- Wood Soffits: Wood cuts easily but must be treated or painted to withstand outdoor moisture before installing any fixtures. Confirm the wood is in good condition and free of rot before proceeding. Any exposed cut edges should be sealed after installation.
Planning Your Layout and Spacing
Good layout planning is what separates a professional-looking result from a haphazard one. Before cutting a single hole, spend time thinking through placement, spacing, and symmetry. The goal is to create even, overlapping light coverage without hot spots (overly bright areas directly beneath each fixture) or dark gaps between them.
A widely used rule of thumb for exterior soffits is the half-height rule: space your fixtures apart at a distance equal to roughly half the height of the eave. For a typical single-story home with 8- to 10-foot eaves, this means spacing lights 4 to 6 feet apart. For taller two-story eaves at 18 to 20 feet, 6 to 8 feet of spacing is more appropriate. As for distance from the wall, positioning fixtures 6 to 12 inches from the exterior wall creates a pleasing grazing effect that emphasizes the texture and detail of the facade without flooding the yard with light.
Symmetry matters just as much as spacing. Rather than measuring mechanically from end to end, think about your home's architecture first. Place lights centered between windows, flanking doorways, and aligned with columns or architectural features. If three equally spaced windows span a wall, a light centered between each window — plus one on each outer end — will look far more intentional than a grid that ignores the openings. Mark all positions on the soffit with a pencil before committing to any cuts, and step back to assess the layout from a distance before drilling.
Tools and Materials You'll Need
Having everything on hand before you start will save you multiple trips up and down a ladder. Here's a complete checklist:
- Wet-rated LED recessed lights (canless or retrofit, sized for your soffit)
- Hole saw matching your fixture's cut-out diameter
- Power drill
- Stud finder (to avoid hitting framing members)
- Fish tape or wire snake
- 12/2 or 14/2 NM-B electrical cable (confirm gauge with your breaker rating)
- UF-B cable if running wiring through exposed or outdoor areas
- Push-in Wire Connectors
- Wire stripper
- Non-contact voltage tester
- Cable staples
- Weatherproof junction boxes (if not integrated into the fixture)
- GFCI circuit breaker (recommended)
- Pencil and tape measure
- Safety glasses
- Sturdy ladder
Step-by-Step Installation Guide
With your fixtures selected and your layout marked out, you're ready to begin the actual installation. Follow these steps in order — skipping ahead, especially when it comes to electrical work, creates unnecessary risk.
- Turn Off Power at the Breaker — Go to your main electrical panel and shut off the circuit that serves the area where you'll be working. Don't assume a wall switch is enough; the circuit needs to be fully de-energized at the breaker. After switching it off, use a non-contact voltage tester at the nearest existing fixture or outlet to confirm there is no live current before touching any wiring. If you are not comfortable working with electrical systems at this stage, this is the point to call a licensed electrician.
- Mark and Cut Your Holes — Using the template included with your canless fixture (or the fixture itself as a guide), trace the cut-out circle at each marked position on the soffit. Select a hole saw that matches the specified diameter for your fixture. Wearing safety glasses, drill through the soffit material at each location, keeping the drill perpendicular to the surface for a clean, straight edge. For canless installations, the fixture will clip directly into this hole — a sloppy cut means a loose, uneven fit.
- Run Your Electrical Cable — This is the most labor-intensive step, and taking your time here pays dividends. Run a cable from your power source (an existing junction box, an exterior outlet circuit, or a new circuit from your panel) to a wall switch location, then extend cable from the switch to the first fixture opening in the soffit. From there, run individual cable lengths from that first fixture opening to each subsequent opening in the run, connecting each one in parallel so all fixtures share the same switched circuit. Leave at least 10 to 12 inches of cable hanging out from each opening for the actual wiring connections. Secure cables every 4 to 5 feet with cable staples, and use weatherproof, raintight junction boxes for any connections made inside the soffit cavity. If any portion of the cable run travels through exposed exterior areas, use UF-B cable, which is rated for wet outdoor locations.
- Make Your Wire Connections — At each fixture opening, strip roughly 6 inches of outer sheathing from the NM cable using a cable ripper, then strip about ¾ inch of insulation from each individual conductor — black (hot), white (neutral), and bare copper (ground). Connect the wires using Push-in Wire Connectors: insert each stripped wire end straight into the corresponding port on the connector until it clicks and seats firmly. Match black to black, white to white, and bare copper to ground. No twisting is required, and the internal locking mechanism holds each wire more securely than traditional alternatives. For parallel wiring at each fixture junction, all incoming and outgoing conductors of the same color are inserted together into a single connector — the hot wires together, the neutrals together, and the grounds together — so that every fixture receives power from the same branch.
- Install the Fixtures — For canless fixtures, connect the pigtail from the fixture to the junction box (if the fixture uses a separate J-box), tuck the junction box into the soffit cavity, then angle the fixture into the hole. Release the spring-loaded retaining clips and push the fixture upward until it seats flush against the soffit surface. The clips will grip the back of the soffit material and hold the fixture firmly in place. For retrofit fixtures in existing cans, simply connect the integrated LED module to the existing socket and snap the unit into the housing — no separate trim installation is needed.
- Test Before Finishing — Before buttoning everything up, restore power at the breaker and flip the wall switch. Confirm every fixture illuminates correctly and check for any flickering, which could indicate a loose connection. If any fixture fails to light, turn the power back off before investigating. Once everything is confirmed working, switch off the power again to do any final tucking and tidying of wires inside the junction boxes.
- Restore Power and Enjoy — With everything tested and confirmed, restore power one final time. Your exterior soffit lighting is ready to use. Consider adding a dusk-to-dawn photocell sensor or a smart switch timer so the lights turn on automatically at sunset — it's a simple add-on that makes the system dramatically more convenient and energy-conscious.
Safety Tips and Code Considerations
Exterior electrical work carries a higher risk profile than indoor wiring, simply because the environment is less forgiving. Here are the key safety and code factors to keep in mind throughout this project.
- GFCI Protection: While hardwired exterior lighting fixtures don't always carry the same strict GFCI mandate as outdoor receptacles under the NEC, it is considered best practice to protect the entire soffit lighting circuit with a GFCI breaker at the main panel. A GFCI breaker instantly cuts power if it detects a ground fault — a potentially life-saving feature in a wet environment. This single addition provides a strong layer of protection for the whole circuit.
- IC Rating for Attic Contact: If your soffit is adjacent to the attic and the fixture will be in contact with or near insulation above the soffit, verify that the fixture is IC-rated (insulation contact). Non-IC-rated fixtures require clearance from insulation to prevent heat buildup and potential fire risk. Many quality canless fixtures carry both an IC rating and a wet location rating.
- Never Work with Live Power: This bears repeating. Always verify with a non-contact voltage tester that wires are de-energized before handling them. Turning off a wall switch does not de-energize the wiring — the circuit breaker must be off.
- Use Rated Materials Throughout: Every component in the circuit — cables, junction boxes, connectors — should be rated for the environment. Raintight junction boxes, wet-location-rated fixtures, and appropriately gauged cable are not optional upsells; they are code-compliant requirements.
- Permit Requirements: In many jurisdictions, new electrical circuits require a permit and inspection. Adding fixtures to an existing circuit may or may not require a permit depending on your local code. Check with your local building department before starting work, especially if you're adding a new breaker or running new wiring from the panel.
Frequently Asked Questions
Can I use regular indoor recessed lights in an exterior soffit?
No. Standard indoor recessed lights are not rated for wet or damp outdoor locations. Exposure to moisture will cause rapid deterioration of the housing, lens, and internal components, and it creates a genuine electrical safety hazard. Always use fixtures explicitly labeled as wet-rated for any exterior soffit application.
How many lumens do I need for exterior soffit lighting?
For residential accent and architectural lighting along a home's facade, 400 to 800 lumens per fixture is a solid target. Decorative applications that prioritize ambiance over visibility can work with as few as 150 to 300 lumens, while higher-output fixtures in the 800 to 1,100 lumen range are better suited to security-focused installations or commercial perimeters. LED fixtures in Amico's recessed lighting lineup offer adjustable color temperature (CCT) settings, so you can dial in the warmth and intensity to match your exterior design goals. Look for fixtures with CRI 80+ to ensure that architectural surfaces, siding textures, and landscaping are rendered with accurate, natural-looking color.
What color temperature is best for exterior soffit lights?
For most residential applications, a warm white color temperature between 2700K and 3000K creates an inviting, welcoming glow that complements the natural tones of siding, brick, and stone. Cooler temperatures in the 4000K to 5000K range suit contemporary homes with modern facades or commercial exteriors where visibility and alertness take priority over ambiance. A 3000K setting is widely considered the sweet spot for a residential look that feels polished without being harsh.
How long do LED soffit lights last?
Quality ETL and FCC certified LED fixtures are rated for 50,000+ hours of operation. At typical usage of 6 hours per night, that translates to well over 20 years of service life — meaning you may never need to replace the fixtures at all. This long lifespan is one of the primary reasons LED has become the default choice for exterior soffit lighting, particularly in hard-to-access locations where replacing a burned-out fixture requires a ladder and significant effort.
Do soffit lights need to be on a separate circuit?
Not necessarily. In many cases, soffit lights can be added to an existing exterior lighting circuit, provided the total load doesn't exceed the circuit breaker's amperage rating. Because modern LED fixtures draw very little current — often less than 10 watts each — adding multiple fixtures rarely causes capacity issues. However, if you're installing a large number of lights or running an entirely new run, having a dedicated circuit gives you better control and simplifies future troubleshooting. Confirm load calculations with your local electrical code requirements before tapping into an existing circuit.
Ready to Upgrade Your Exterior Lighting?
Installing recessed lights in your exterior soffits is one of the most impactful DIY upgrades you can make to a home's exterior. With the right wet-rated fixtures, a thoughtful layout plan, safe wiring practices, and quality Push-in Wire Connectors for solid, reliable connections, the finished result looks like professional work — because it is. The key takeaways are straightforward: always use wet-rated fixtures, choose canless for shallow soffits or new installations, plan your spacing around your home's architecture rather than just measuring distances, and protect your circuit with GFCI breaker coverage for safety in outdoor environments.
Amico's recessed lighting collection includes canless, retrofit, and gimbal styles designed for exactly these kinds of installations — ETL and FCC certified, built to last 50,000+ hours, and backed by free sitewide shipping and a hassle-free return policy. Whether you're lighting one overhang or the entire perimeter of a home, Amico has the fixtures to get it done right.
Buying in Bulk? Let's Talk Volume Pricing.
Contractors, builders, and property managers installing soffit lighting across multiple units or large-scale projects can take advantage of Amico's tiered bulk pricing program. Get the fixtures you need at competitive per-unit costs with dedicated support from our wholesale team.
Request a Wholesale Quote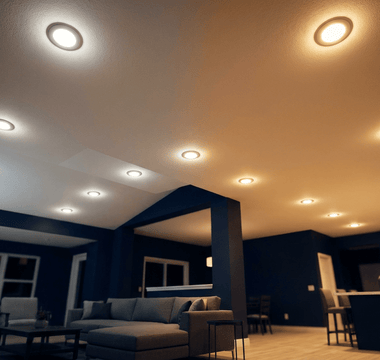


