Table Of Contents
- What Are Recessed Lighting Retrofit Kits?
- Why Choose Retrofit Over Complete Replacement?
- Types of Retrofit and Conversion Kits
- Checking Compatibility with Your Existing Fixtures
- Step-by-Step Installation Guide
- Energy Savings and Performance Benefits
- How to Choose the Right Retrofit Kit
- Common Installation Issues and Solutions
If you're tired of the yellow glow from outdated incandescent or halogen recessed lights but dreading the mess and expense of a complete rewiring project, there's good news. Recessed lighting retrofit and conversion kits offer a practical solution that brings your lighting into the LED era without tearing into your ceiling or calling an electrician for extensive work.
These innovative kits allow you to transform existing recessed fixtures into modern, energy-efficient LED lighting in less time than it takes to watch a movie. Whether you're a homeowner looking to brighten your living space or a contractor managing multiple renovation projects, retrofit kits deliver professional results with minimal disruption. The technology has advanced significantly in recent years, offering better color rendering, dimming capabilities, and design options that rival new construction installations.
In this comprehensive guide, we'll walk you through everything you need to know about recessed lighting retrofit kits. You'll discover the different types available, learn how to verify compatibility with your current fixtures, follow detailed installation instructions, and understand the long-term savings these upgrades provide. By the end, you'll have the confidence to tackle your own retrofit project or make informed decisions when selecting products for your clients.
What Are Recessed Lighting Retrofit Kits?
Recessed lighting retrofit kits are specialized LED lighting products designed to fit into your existing recessed housing cans without requiring new wiring or structural modifications. Instead of removing the entire fixture from your ceiling, you simply remove the old bulb and trim, then install the retrofit kit directly into the existing housing. This approach preserves your ceiling's integrity while delivering all the benefits of modern LED technology.
The concept addresses a common frustration: many homes and commercial buildings have perfectly functional recessed housings installed in their ceilings, but the light output, energy consumption, and bulb replacement frequency of traditional incandescent or halogen bulbs leave much to be desired. Rather than treating the entire fixture as disposable, retrofit kits recognize that the housing and wiring are still viable components that can support superior LED technology.
Most retrofit can lights consist of an integrated LED module and trim assembly. The LED chips, driver electronics, and heat management systems are built into a single unit that connects to your existing housing through either the standard Edison socket or direct wiring to the junction box inside the can. This integrated design ensures optimal performance since the LED and thermal components are engineered to work together, unlike aftermarket LED bulbs that attempt to retrofit into fixtures designed for completely different technology.
The versatility of retrofit kits extends beyond simple replacements. Many models offer features that weren't available with your original fixtures, including adjustable color temperature, enhanced dimming performance, smart home integration, and improved beam patterns. This means your "upgrade without rewiring" can actually deliver functionality that surpasses what even new construction fixtures offered just a few years ago.
Why Choose Retrofit Over Complete Replacement?
The decision between retrofitting existing fixtures and complete replacement comes down to practicality, cost, and disruption. While new construction installations have their place, retrofit solutions offer compelling advantages for most existing buildings. Understanding these benefits helps explain why retrofit kits have become the preferred choice for residential upgrades and commercial renovations alike.
Cost savings represent the most immediate advantage. A complete fixture replacement requires purchasing new housing cans, cutting into ceilings, running new electrical connections, patching drywall, and repainting. Professional installation for a single room can easily cost several hundred dollars in labor alone. Retrofit kits, by contrast, work with your existing infrastructure and can typically be installed by a capable DIYer in 15-20 minutes per fixture. For contractors managing renovation budgets, this difference between a $150 service call and a 15-minute fixture swap adds up quickly across multiple rooms or properties.
Minimal disruption matters whether you're living in the space during the upgrade or managing occupied commercial properties. Tearing into ceilings creates dust, debris, and the need to clear furniture and protect flooring. The process typically takes several days when you factor in electrical work, drywall repair, texture matching, and paint drying time. Retrofit installations, however, can be completed room by room without displacing occupants, making them ideal for hotels, offices, and rental properties where downtime equals lost revenue.
Energy efficiency improvements happen immediately with LED retrofit kits. Your existing incandescent or halogen fixtures might consume 65-100 watts per bulb, while equivalent LED retrofits use just 10-15 watts while producing the same or better light output. This 80-85% reduction in energy consumption translates to lower utility bills month after month. For buildings with dozens or hundreds of recessed fixtures, the cumulative savings can fund the retrofit project within 1-2 years through reduced electricity costs alone.
The environmental impact of retrofit versus replacement also deserves consideration. Reusing existing housings keeps functional materials out of landfills and reduces the manufacturing demand for new metal housings, packaging, and shipping. When you multiply this across millions of fixtures being upgraded nationwide, the collective environmental benefit becomes substantial. LEDs themselves contain no mercury (unlike CFLs) and last 50,000+ hours, which means decades of service before replacement becomes necessary.
Types of Retrofit and Conversion Kits
Not all retrofit kits function the same way, and understanding the distinctions helps you select the right product for your specific fixtures and installation preferences. The three main categories each offer unique advantages depending on your existing setup and desired outcome.
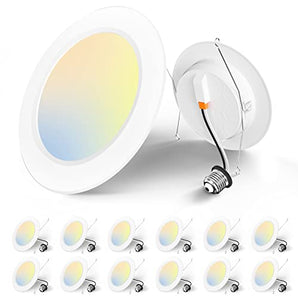
Screw-In LED Retrofit Kits
Screw-in retrofit kits represent the simplest upgrade path for fixtures with standard Edison sockets. These units feature an integrated LED module and trim assembly with a threaded adapter base that screws directly into the existing socket where your old bulb used to go. Installation requires no electrical knowledge beyond turning off the breaker and removing the old bulb and trim ring.
The appeal of screw-in designs lies in their universal compatibility with most standard recessed housings. Whether your cans were installed 30 years ago or five years ago, if they accept standard medium-base bulbs, they'll accept screw-in retrofit kits. This makes them particularly popular for residential applications where homeowners want to tackle the upgrade themselves without hiring an electrician or obtaining permits.
However, screw-in kits do have limitations. The Edison socket connection creates a potential weak point, and the socket itself can degrade over time from decades of heat exposure. Additionally, these kits rely on the existing socket's wiring connection to the junction box, which may not be as robust as a direct hardwired connection. For most residential applications, these concerns are minimal, but commercial installations or high-use areas may benefit from hardwired alternatives.
Hardwired Retrofit Kits
Hardwired retrofit kits bypass the socket entirely and connect directly to the electrical wiring in the junction box inside your recessed housing. This creates a more permanent, robust connection that eliminates the socket as a potential failure point. The installation process requires basic electrical skills but remains far simpler than replacing the entire fixture.
These kits are ideal when your existing sockets are damaged, corroded, or loose. They're also preferred for commercial applications where fixtures may operate 12-16 hours daily, as the direct wiring connection handles heat dissipation better and provides more reliable long-term performance. Many professional contractors choose hardwired retrofits for rental properties and commercial spaces specifically because of this enhanced durability.
The installation process involves removing the old socket from the junction box, then connecting the retrofit kit's wiring directly to your home's electrical supply using push-in wire connectors. These connectors accept stripped wire ends that simply insert into the connector ports until they click into place. This connection method is more reliable than traditional alternatives and doesn't require twisting or complicated techniques. For multiple fixtures, you'll connect them in parallel, ensuring each fixture receives full voltage independently.
Amico's recessed lighting collection includes hardwired retrofit options that are ETL & FCC certified and feature integrated designs where the LED module and trim are built as a single unit. This eliminates the need for separate trim installation and ensures optimal thermal management for the 50,000+ hour LED lifespan.
Trim Conversion Kits
Trim conversion kits offer a middle ground approach, replacing your existing trim and bulb with an LED-equipped trim assembly while still utilizing either the socket or hardwired connection. These kits often provide the most design flexibility, with options for different trim styles, finishes, and beam patterns that can dramatically change the aesthetic of your space.
This category includes specialized options like gimbal trims that allow you to adjust the light direction, perfect for highlighting artwork or architectural features. Wholesale gimbal recessed lights provide directional lighting capability that fixed-trim retrofits cannot match, making them valuable for retail displays, galleries, or any application where flexibility in light direction matters.
Trim conversion kits can also update the aesthetic of your space from outdated brass or white stepped baffles to contemporary flush designs with cleaner lines and better beam control. This visual transformation, combined with improved light quality and energy savings, delivers the most comprehensive upgrade without the construction requirements of new fixture installation.
Checking Compatibility with Your Existing Fixtures
Before purchasing retrofit kits, you need to verify compatibility with your existing recessed housings. While most retrofit products work with standard fixtures, certain configurations require attention to specific details to ensure proper fit and function.
Measure your housing size. Recessed housings come in standard sizes, with 4-inch, 5-inch, and 6-inch being the most common in residential settings. The size refers to the diameter of the housing opening. To determine your size, simply measure across the inside diameter of the trim opening. Most retrofit kits are specifically designed for particular housing sizes, though some universal models can adapt to multiple dimensions. If you're working with 6-inch recessed LED lighting housings, ensure your retrofit kit explicitly states 6-inch compatibility.
Check your ceiling type and clearance. The depth of your recessed housing and the space above your ceiling matter for heat dissipation and physical fit. Most housings are either "IC-rated" (insulation contact, meaning they can safely touch insulation) or "non-IC" (requiring clearance from insulation). While retrofit LED kits generate far less heat than incandescent bulbs, they still need appropriate thermal management. Verify that your retrofit kit is approved for your housing's IC rating. Additionally, measure the depth of your housing to ensure the retrofit kit will fit without protruding or requiring more clearance than available.
Identify your current bulb type and socket. If you're considering screw-in retrofit kits, confirm that your fixtures use standard medium-base (E26) sockets. Some older or specialty fixtures may use different socket types. For hardwired kits, you'll want to access the junction box inside the housing to verify the wire gauge and connection type. Most residential installations use 14 or 12-gauge wire, both of which are compatible with standard retrofit products.
Consider dimmer compatibility. If your recessed lights are on dimmer switches, you need retrofit kits specifically rated for dimming. Not all LED retrofit kits dim smoothly or to the same low levels as incandescent bulbs. Check both the retrofit kit specifications and your dimmer switch compatibility. Many older dimmer switches designed for incandescent bulbs don't work well with LEDs and may need replacement with LED-compatible models. The good news is that modern LED dimmers are inexpensive and easy to swap out if needed.
Evaluate your ceiling height and beam angle needs. The beam angle of your retrofit kit affects how light spreads in the space. Narrow beam angles (25-40 degrees) create focused downlighting suitable for task areas or accent lighting, while wide beam angles (60-120 degrees) provide more general ambient illumination. For standard 8-foot ceilings, wider beam angles typically work best for even light distribution. Higher ceilings may benefit from narrower beams to concentrate light where needed. Consider the room's purpose and your lighting goals when selecting beam patterns.
Step-by-Step Installation Guide
Installing retrofit kits is straightforward when you follow proper procedures and safety protocols. The specific steps vary slightly between screw-in and hardwired models, but the overall process remains accessible to most DIYers with basic tool skills. Here's how to complete a professional-quality installation.
What You'll Need
- Retrofit LED kit appropriate for your housing size
- Non-contact voltage tester
- Screwdriver (flathead or Phillips, depending on trim clips)
- Wire strippers (for hardwired installations)
- Push-in wire connectors (for hardwired installations)
- Step ladder or stable platform
- Work gloves for handling existing fixtures
Installation Steps for Screw-In Retrofit Kits
1. Turn off power at the breaker. Never work on light fixtures with the power on. Locate the correct circuit breaker and switch it to the off position. Use a non-contact voltage tester to verify that power is actually off before proceeding. This simple step prevents shock hazards and protects both you and your electrical system.
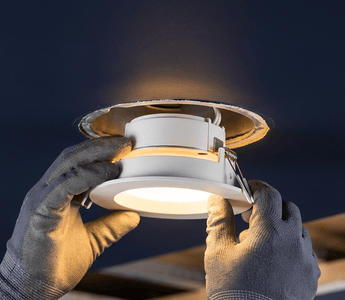
2. Remove the existing trim and bulb. Most recessed trim rings are held in place by spring clips or compression springs. Gently pull down on the trim to release these clips, then remove the trim entirely. Unscrew the old bulb from the socket. This is a good time to inspect the socket for any signs of damage, corrosion, or looseness. If the socket spins or appears damaged, consider a hardwired retrofit kit instead.
3. Prepare the retrofit kit. Remove your retrofit kit from its packaging and familiarize yourself with its components. Most screw-in kits have the LED module and trim built as an integrated unit with a threaded adapter base. Some models may have trim clips that need to be attached or adjusted to fit your specific housing size. Follow the manufacturer's instructions for any required assembly.
4. Install the retrofit kit into the socket. Thread the retrofit kit's base into the existing socket, turning clockwise until snug. Don't over-tighten, as this can damage the socket or the kit's base. The integrated trim should sit flush against your ceiling or slightly recessed into the housing opening, depending on the design. Ensure the trim is oriented correctly if it has a directional pattern.
5. Secure the trim. Push the trim assembly up into the housing opening until the retention clips or springs engage. You should feel or hear them click into place. The trim should sit evenly against the ceiling with no gaps or misalignment. If the trim sits crooked, remove it and check that the socket connection is fully seated and that the clips are properly positioned.
6. Restore power and test. Return to the breaker panel and switch the circuit back on. Test the light with the wall switch to verify proper operation. If you have dimmer switches, test the full dimming range to ensure smooth operation without flickering or buzzing. If issues arise, see the troubleshooting section below.
Installation Steps for Hardwired Retrofit Kits
1. Turn off power and remove existing components. As with screw-in installations, shut off the breaker and verify power is off with a voltage tester. Remove the trim and bulb, then locate the screws or clips holding the socket assembly to the junction box inside the housing. Remove the socket to expose the wire connections in the junction box.
2. Disconnect the old socket wiring. The existing socket will be connected to the house wiring with either twist-on connectors or push-in connectors. Remove these connectors and separate the socket wiring from the house wiring. Set the old socket aside. You should now have the house wiring exposed in the junction box, typically consisting of a black (hot) wire, white (neutral) wire, and bare copper or green (ground) wire.
3. Prepare the retrofit kit wiring. Your hardwired retrofit kit will have wiring leads that need to connect to the house wiring. Strip approximately 1/2 inch of insulation from the ends of each wire if they aren't already pre-stripped. Most retrofit kits use color-coded wiring: black to black (hot), white to white (neutral), and green or bare to bare (ground).
4. Connect the wiring using push-in wire connectors. Take a push-in wire connector and insert the stripped end of the house wire into one port and the retrofit kit wire into the matching port. Push each wire firmly until you feel or hear it click into place. The connector holds the wires securely without any twisting required, creating a reliable connection. Repeat this process for all three wire connections (hot, neutral, and ground). This connection method is more reliable than traditional alternatives and ensures consistent electrical contact.
5. Secure the retrofit kit to the housing. Once all electrical connections are made, carefully tuck the wiring back into the junction box. Most hardwired retrofit kits have a mounting bracket or direct attachment mechanism that secures to the housing. Follow the manufacturer's specific instructions to attach the kit securely. The LED module and integrated trim should position correctly within the housing opening.
6. Install the trim and test. If your kit has separate trim (though many hardwired retrofits feature integrated designs), attach it now using the provided clips or springs. Restore power at the breaker and test operation. Check for any flickering, humming, or other issues that might indicate loose connections. If you're installing multiple fixtures in parallel, test each one individually to confirm proper wiring.
Energy Savings and Performance Benefits
The financial case for LED retrofit kits extends well beyond the initial installation savings. Understanding the ongoing energy and maintenance advantages helps quantify the true value of upgrading your recessed lighting without rewiring.
Dramatic reduction in electricity consumption represents the most measurable benefit. A typical 65-watt incandescent or 50-watt halogen recessed bulb can be replaced with a 10-15 watt LED retrofit kit that produces equivalent or superior light output. For a home with 20 recessed fixtures running an average of 5 hours per day, this translates to approximately 1,000 watts (one kilowatt) of continuous demand reduced to just 200-300 watts. At average national electricity rates of $0.13 per kilowatt-hour, this saves roughly $150-170 annually just from reduced energy consumption.
The savings compound over time. LED retrofit kits rated for 50,000+ hours will outlast 25-50 incandescent bulbs or 10-15 halogen bulbs in the same fixture. Beyond the cost of replacement bulbs themselves (which adds up to several hundred dollars over the LED's lifespan), you eliminate the time, effort, and potential safety risks of repeatedly climbing ladders to change bulbs in hard-to-reach recessed fixtures. For commercial properties or facilities with high ceilings, this maintenance reduction alone can justify retrofit projects.
Improved light quality often surprises people who associate LED lighting with the harsh, cold illumination of early LED products. Modern LED retrofit kits offer CRI 80+ (Color Rendering Index), which means they render colors naturally and accurately. You can select color temperatures ranging from warm white (2700K-3000K) that mimics traditional incandescent lighting to cool white (4000K-5000K) that provides crisp, daylight-like illumination. This flexibility lets you tailor the lighting character to each space's specific needs.
Many quality retrofit kits also deliver instant-on performance without warm-up time, better beam control that reduces wasted light in ceilings and walls, and silent operation without the humming or buzzing common in older fluorescent or some CFL alternatives. The combination of these performance improvements creates noticeably better lighting environments while simultaneously reducing costs.
Heat reduction matters more than many people realize. Traditional incandescent and halogen bulbs convert 80-90% of their energy consumption into heat rather than visible light. This waste heat radiates into your living spaces, increasing cooling loads during warm months and potentially degrading insulation and housing components over years of operation. LED retrofit kits generate minimal heat, keeping your spaces cooler and reducing the secondary energy costs of compensating for light-generated heat with air conditioning.
How to Choose the Right Retrofit Kit
With numerous retrofit options available, selecting the best kit for your specific application requires considering several factors beyond just compatibility and price. Making informed choices ensures you get the performance, longevity, and satisfaction you're paying for.
Light output (lumens) should match or exceed your current fixtures. Don't rely on wattage equivalents alone when comparing LED retrofit kits. Check the actual lumen output, which measures the total amount of visible light produced. A standard 65-watt incandescent recessed bulb produces approximately 600-700 lumens, so look for LED retrofits in that range for equivalent brightness. If you want brighter lighting, simply choose kits with higher lumen ratings. Keep in mind that LED efficiency varies, and higher-quality products often deliver more lumens per watt.
Color temperature affects the ambiance and function of your space. Warm white (2700K-3000K) works well in living rooms, bedrooms, and dining areas where you want cozy, relaxing atmosphere. Neutral white (3500K-4000K) suits kitchens, bathrooms, and home offices where you need clear visibility for tasks. Cool white (4000K-5000K) is ideal for workshops, garages, and commercial spaces requiring bright, alert-inducing illumination. Some advanced retrofit kits offer selectable color temperature, allowing you to adjust the output without buying different products for different rooms.
Beam angle determines light distribution. Narrow spot beams (25-35 degrees) concentrate light in tight patterns, perfect for accent lighting or highlighting specific areas. Medium flood beams (40-60 degrees) provide balanced general lighting suitable for most residential applications. Wide flood beams (80-120 degrees) create even, diffused illumination ideal for rooms with lower ceilings or open floor plans. Consider your room size, ceiling height, and fixture spacing when selecting beam angles to avoid dark spots or overlapping hot spots.
Quality certifications and warranties signal reliable products. Look for retrofit kits that carry ETL or similar safety certifications, ensuring they've been tested to meet electrical and fire safety standards. FCC certification indicates the product won't cause interference with wireless devices or other electronics. Warranty terms reveal manufacturer confidence in product longevity; quality retrofit kits typically offer 2-5 year warranties. Avoid suspiciously cheap options lacking certifications, as they may use inferior components that fail prematurely or create safety hazards.
Dimming capability requires specific features. If you need dimmable retrofit kits, verify that they're explicitly rated for dimming and check the specified dimming range. Quality dimmable LEDs should dim smoothly to at least 10% of full brightness without flickering or dropping out. Also confirm compatibility with your existing dimmer switches or be prepared to upgrade to LED-compatible dimmers. Not all dimmers work with all dimmable LEDs, so checking compatibility lists from both the retrofit kit manufacturer and dimmer manufacturer prevents frustration.
For contractors or property managers handling larger projects, wholesale quote requests can provide significant cost advantages on volume purchases. Bulk purchasing not only reduces per-unit costs but also ensures consistency across multiple fixtures in terms of color temperature, beam pattern, and performance characteristics.
Common Installation Issues and Solutions
Even straightforward retrofit installations occasionally present challenges. Understanding common issues and their solutions helps you complete your project successfully without unnecessary frustration or service calls.
Flickering lights after installation typically indicate loose connections or dimmer incompatibility. First, shut off power and verify that all wire connections are secure, whether you're using screw-in base contact or hardwired push-in connectors. If connections are solid but flickering persists, the issue likely involves your dimmer switch. Many older dimmers designed for incandescent bulbs don't provide the correct voltage characteristics for LED drivers. Replace the dimmer with an LED-compatible model rated for the total wattage of connected fixtures. Note that even with proper dimmers, LEDs require a minimum load, so dimming a single low-wattage fixture may still cause issues.
Trim won't sit flush with the ceiling usually means the retention clips aren't engaging properly or the housing depth doesn't match the retrofit kit design. Remove the trim and check that the spring clips or retention wires are positioned correctly and haven't been bent during installation. Some retrofit kits include adjustable clips that need to be set to match your housing size. If the trim still protrudes or sits unevenly, verify that the housing isn't damaged and that ceiling thickness allows proper trim seating. Occasionally, multiple layers of drywall or ceiling tiles interfere with trim installation and may require additional adjustment.
Light doesn't turn on after installation requires systematic troubleshooting. First, verify that power is actually reaching the fixture by checking the circuit breaker and testing with a voltage tester. If power is present but the light doesn't work, the issue may be a defective retrofit kit, incorrect wiring connections, or incompatible socket conditions. For screw-in kits, ensure the base is fully threaded into the socket and making good contact. For hardwired installations, verify that hot, neutral, and ground connections are correct and secure in the push-in wire connectors. If you're installing multiple fixtures in parallel and only some work, check individual connections at each non-functioning fixture.
Buzzing or humming sounds from LED retrofit kits point to either electrical issues or incompatible dimmer switches. Some audible noise results from the LED driver components reacting to voltage fluctuations or dimmer interference. If buzzing occurs only when dimming, upgrading to a higher-quality LED-compatible dimmer usually resolves the issue. Buzzing at full brightness may indicate loose wiring connections that should be corrected immediately, or it could reflect electromagnetic interference from nearby devices. In rare cases, the retrofit kit itself may have a defective driver component and require replacement.
Color temperature doesn't match between fixtures happens when mixing retrofit kits from different manufacturers or product lines. Even products labeled as the same color temperature (such as "warm white") can vary noticeably due to manufacturing tolerances and LED binning practices. For consistent appearance, use retrofit kits from the same manufacturer and preferably the same production batch, especially for fixtures in the same room or visible sight lines. If you're retrofitting fixtures incrementally, keep track of specific product model numbers to ensure matching when you purchase additional units later.
For specialized applications or high-volume commercial projects, exploring the full range of recessed lighting options helps identify the best solution for your specific requirements. Whether you need 4-inch canless LED recessed lighting for new construction sections or retrofit solutions for existing fixtures, selecting products designed specifically for your application ensures optimal results.
Recessed lighting retrofit and conversion kits prove that major improvements don't always require major construction. By working with your existing infrastructure instead of replacing it, you can transform outdated, energy-hungry lighting into modern, efficient LED illumination without the mess, expense, and disruption of complete fixture replacement. The technology has matured to the point where retrofit solutions deliver performance that matches or exceeds new construction installations, all while requiring minimal tools and electrical knowledge.
The benefits extend far beyond simple installation convenience. You'll immediately reduce energy consumption by 80-85%, eliminate frequent bulb replacements, improve light quality with better color rendering and beam control, and reduce heat output that affects your comfort and cooling costs. For homeowners, these advantages translate to lower utility bills and better lighting that enhances daily living. For contractors and property managers, retrofit projects offer quick turnaround times, minimal tenant disruption, and compelling return on investment that makes upgrades financially viable even for budget-conscious clients.
Whether you're tackling a single room or planning a whole-building retrofit, the key to success lies in careful planning, proper product selection, and attention to compatibility details. Measure your existing housings, verify dimmer requirements, choose appropriate color temperatures and beam angles for each space, and follow proper installation procedures. When you invest a little time in preparation and select quality products backed by certifications and warranties, you'll enjoy decades of reliable, efficient lighting that makes you wonder why you waited so long to upgrade.
The lighting industry continues to advance, with retrofit solutions becoming more capable and affordable each year. Now is an excellent time to leave behind the limitations and costs of legacy lighting technology and embrace LED efficiency without the complexity of rewiring projects. Your ceilings, your wallet, and your eyes will all appreciate the difference.
Ready to Upgrade Your Lighting Without the Hassle?
Amico offers a comprehensive selection of ETL & FCC certified LED retrofit solutions backed by multi-year warranties, free shipping, and a 30-day hassle-free return policy. Whether you're a contractor managing large-scale projects or a homeowner upgrading a few rooms, we have the products and expertise to support your success.
Planning a bulk retrofit project? Our volume discount program delivers professional-grade lighting at competitive prices. Request a wholesale quote today and discover how easy and affordable it is to upgrade your entire property to efficient LED technology.


