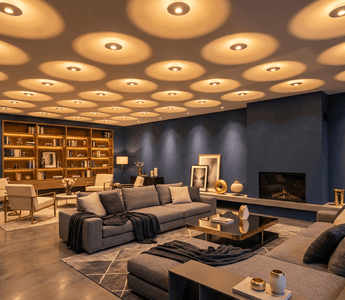
Recessed lighting has earned its place as one of the most popular choices for living rooms — and for good reason. It disappears into the ceiling, keeps sightlines clean, and delivers powerful, even illumination without the visual clutter of hanging fixtures or floor lamps. But the difference between a living room that feels warm and inviting and one that looks like a corporate office often comes down to one thing: how the recessed lights are laid out.
Whether you're working with a cozy apartment sitting area or a sprawling open-concept great room, the layout rules change with the size of the space, the ceiling height, and how you use the room. In this guide, you'll find practical recessed lighting layout ideas scaled to every living room size, along with spacing formulas, fixture selection tips, and wiring basics — everything you need to plan a layout that's both functional and beautiful.
Why Recessed Lighting Works So Well in Living Rooms
Living rooms serve more functions than almost any other space in the home. On a given evening, the same room might host a movie night, a dinner party overflow, a focused reading session, or quiet background ambiance while guests mingle. That range of activities demands a lighting system that can flex with your needs, and recessed lighting — especially when paired with dimmer switches — delivers exactly that versatility.
Beyond function, recessed fixtures offer a visual advantage that matters in rooms where aesthetics count. Because the fixture housing sits flush inside the ceiling, it draws zero attention to itself and lets the light do the talking. You can highlight artwork, draw the eye to an architectural feature, or wash a wall in soft light without any hardware competing for attention. For homeowners who want a polished, uncluttered look, few lighting types compete.
Before You Plan: Key Measurements and Terms to Know
A solid layout starts with accurate numbers. Before placing a single fixture on paper, gather these measurements and keep them handy throughout the planning process.
- Room dimensions: Measure length and width in feet, then multiply for square footage.
- Ceiling height: Standard ceilings run 8–9 feet; vaulted or cathedral ceilings can reach 12 feet or more, which changes both spacing and lumen requirements.
- Fixture spacing rule: A widely used rule of thumb is to divide ceiling height by two to find the ideal spacing between fixtures. A 9-foot ceiling suggests roughly 4.5 feet between lights.
- Wall offset rule: Place fixtures between 1.5 and 3 feet from walls to avoid scalloping (uneven light bands on the wall surface).
- Fixture size: 4-inch and 6-inch are the two most common recessed fixture diameters for residential living rooms.
With these numbers in hand, you can sketch a grid layout on graph paper or use a free online lighting planner before committing to any holes in your ceiling.
Layout Ideas for Small Living Rooms (Under 150 sq ft)
Small living rooms present a straightforward challenge: deliver enough light to fill the space without overcrowding the ceiling or creating harsh, overlapping hotspots. In a room that measures roughly 10 x 12 feet or 10 x 14 feet, most homeowners find that four to six recessed fixtures arranged in a simple grid pattern are more than sufficient.
The most practical approach for a small room is a symmetric two-by-two or two-by-three grid. Place the first row of fixtures about two to three feet from the wall and space each fixture approximately four feet from its neighbor. With 8- or 9-foot ceilings, this layout provides even coverage without dark corners, and it keeps the ceiling looking tidy rather than dotted with too many openings.
For small spaces, 4-inch recessed fixtures are often the smarter choice over 6-inch options. They deliver ample lumens for a compact room while keeping the ceiling visually light. Amico's 4-inch canless LED recessed lights are a popular pick here because they install without a separate housing can, making them ideal for finished ceilings where you don't want to cut oversized holes or deal with bulky hardware above the drywall.
Layout Ideas for Medium Living Rooms (150–300 sq ft)
A medium-sized living room — think 12 x 15 feet up to about 15 x 20 feet — gives you enough ceiling real estate to get creative without the complexity of a large space. This is the most common living room footprint in American homes, and it's where a well-executed recessed lighting layout truly shines.
Start with a standard grid, spacing fixtures four to five feet apart in both directions depending on your ceiling height. A 15 x 18-foot room with a 9-foot ceiling might use a three-by-three grid of nine fixtures, or a two-by-four grid of eight fixtures arranged along the primary seating zone. The exact count depends on the lumens per fixture, but as a general benchmark, you're targeting around 20 lumens per square foot for a comfortable ambient level in a living room.
Medium rooms also benefit from zoning: separating general ambient lighting from accent or task zones. Consider placing a cluster of fixtures over the main seating area on one dimmer circuit, then running a separate circuit for any accent fixtures near a fireplace wall or bookshelf. This lets you shift the room's mood without rewiring anything after the fact.
For medium rooms, 6-inch fixtures provide slightly more punch per fixture, which can reduce the total fixture count while maintaining even coverage. Amico's 6-inch recessed LED lights are built with integrated LED modules and CRI 80+ color rendering, so the light flatters furnishings and skin tones rather than washing everything in a flat, colorless glow.
Layout Ideas for Large Living Rooms (300+ sq ft)
Large living rooms — 20 x 20 feet and beyond — require a more deliberate strategy because a single uniform grid rarely serves the entire space well. These rooms typically host multiple functional areas: a main seating zone, a reading nook, perhaps a home bar or entertainment wall. Treating each zone as a mini-layout within the larger layout produces far better results than scattering fixtures evenly across the whole ceiling.
Begin by sketching the furniture arrangement and drawing a boundary around each functional zone. Then apply the standard spacing formula within each zone independently. A large living room might end up with three separate lighting zones, each on its own dimmer switch, allowing precise control over which area is lit and at what intensity at any given time.
Ceiling height becomes especially important in large rooms. If you have 10-foot or higher ceilings, increase your fixture spacing to five or six feet between fixtures and step up to higher-lumen fixtures to compensate for the added distance between the light source and the floor. Gimbal-style recessed lights are particularly valuable in large rooms with high ceilings or architectural features — their adjustable heads let you aim the beam precisely at a seating area, a piece of art, or a textured wall. Amico's gimbal recessed lights offer that directional flexibility while maintaining the flush, minimal look that makes recessed fixtures so appealing in the first place.
Recessed Lighting Layouts for Open Floor Plans
Open floor plans create a unique planning challenge because the living room doesn't have four walls defining its borders — it bleeds into a dining area, kitchen, or hallway. In these spaces, consistent fixture spacing across the entire ceiling can look great from a design standpoint, but it often fails to provide the right light levels in each functional zone since kitchens and dining areas typically need more focused, task-oriented light than a living area.
The most effective approach for open plans is to use a consistent fixture size and finish throughout the shared ceiling to maintain visual harmony, while varying the circuit layout so that each zone can be controlled independently. Group living room fixtures on one dimmer, dining area fixtures on another, and kitchen task lighting on a third. From above, the ceiling looks unified; from a lighting control perspective, each area functions independently.
Pay special attention to the transition zones between areas. A line of recessed fixtures positioned along the boundary between the living and dining spaces can serve double duty, contributing to both zones without requiring additional fixtures. This approach reduces total fixture count while keeping the layout efficient and balanced.
Adding Accent and Task Lighting Zones
Ambient recessed lighting covers the broad strokes, but accent and task zones are what make a living room feel intentionally designed rather than just adequately lit. Accent lighting draws attention to specific features — a gallery wall, a fireplace surround, a tall bookcase — while task lighting supports focused activities like reading or working on a laptop from the couch.
For accent lighting, place gimbal or adjustable recessed fixtures approximately two to three feet from the wall you want to illuminate, angled at roughly 30 degrees toward the surface. This creates a dramatic wash effect that highlights texture and depth without creating harsh glare. A single row of three or four fixtures spaced evenly along a feature wall is usually enough to make a strong visual statement.
For task lighting over a reading chair or home office corner within the living room, position one or two fixtures directly above the work area and aim them downward. Because these fixtures serve a focused purpose, they benefit from being on a separate dimmer so you can crank up the light level for reading without flooding the entire room.
Choosing the Right Fixture Size and Type
Two fixture diameters dominate residential living room installations: 4-inch and 6-inch. As a rule, 4-inch fixtures work best in smaller rooms, lower ceilings, and accent applications where a tighter, more focused beam is desirable. Six-inch fixtures put out more lumens per fixture and cover more ground, making them the go-to choice for primary ambient lighting in medium and large spaces.
Beyond size, the fixture type matters. Canless recessed lights are the easiest to install in finished ceilings because they clip directly into the drywall without requiring a separate housing. They're ideal for retrofits and renovations. Retrofit LED fixtures are designed specifically to replace older incandescent or halogen recessed cans, fitting into the existing housing and transforming outdated fixtures into high-efficiency LED performers — Amico's retrofit can lights are built as integrated units, meaning the LED module and trim come as one ready-to-install piece, eliminating the extra step of matching and installing a separate trim ring. Gimbal fixtures add directional flexibility for accent and task applications. Explore Amico's full lineup of recessed lighting options to find the right style for each zone in your layout.
Wiring Your Layout: What to Know Before You Start
From an electrical standpoint, recessed lighting in a living room is typically wired with multiple fixtures connected in parallel on a single circuit, meaning each fixture connects independently to the hot, neutral, and ground conductors running through the ceiling. This parallel wiring method ensures that if one fixture fails or is removed, the others continue functioning normally — a critical advantage over configurations where fixtures are dependent on one another in sequence.
When making wire connections inside the fixture junction box, use push-in wire connectors rather than traditional alternatives. The process is straightforward: strip about half an inch of insulation from each wire end, then insert the stripped ends into the corresponding ports on the connector until you feel them click into place. No twisting is required, and the connection is secure and reliable. This method is faster and more consistent than traditional approaches, which is one reason it's become standard practice among professional electricians.
Always confirm that your circuit's amperage rating supports the total wattage of all fixtures in the layout before installation. LED fixtures draw far less power than their incandescent equivalents, but a large living room layout with many fixtures can still add up. Also verify that your dimmer switch is rated for LED loads — older dimmers designed for incandescent bulbs can cause flicker or buzzing when paired with LED fixtures. All of Amico's recessed lights carry ETL and FCC certifications, confirming they meet North American safety and performance standards.
Common Recessed Lighting Mistakes to Avoid
Even a well-intentioned layout can go sideways if a few key pitfalls aren't avoided. Here are the most common mistakes homeowners make when planning living room recessed lighting:
- Too many fixtures: More lights don't always mean better light. Over-installing creates an overly bright, clinical atmosphere and wastes energy. Trust the spacing formula and start conservatively — you can always add fixtures later if needed.
- Placing fixtures too close to walls: Fixtures within 18 inches of a wall produce scalloping, those uneven curved bands of light that make the wall look unfinished. Maintain a minimum 1.5-foot offset unless you're intentionally wall-washing.
- Ignoring furniture placement: A fixture positioned directly over where a couch will sit creates an uncomfortable spotlight effect on whoever is seated. Plan the layout with the furniture footprint in mind, placing lights between seating zones rather than directly above them.
- Skipping dimmers: A fixed-output recessed lighting system in a living room is a missed opportunity. Dimmers are inexpensive to add during installation and dramatically expand how the room can be used at different times of day.
- Mixing color temperatures: Combining 3000K warm white fixtures with 4000K cool white fixtures in the same room creates an inconsistent look that's hard to pinpoint but immediately feels off. Choose one color temperature and stick with it throughout the space.
Final Thoughts
Getting recessed lighting right in a living room isn't about following a rigid formula — it's about understanding the principles behind good lighting design and applying them thoughtfully to your specific space. Whether you're outfitting a compact apartment sitting room with four carefully placed 4-inch canless fixtures or designing a multi-zone layout for a 400-square-foot great room, the fundamentals remain the same: even spacing, appropriate fixture size, zoned circuits with dimmers, and attention to how light interacts with the furniture and features in the room.
Amico's recessed lighting lineup — spanning canless, retrofit, and gimbal styles in both 4-inch and 6-inch sizes — gives you the flexibility to execute any living room layout with ETL and FCC certified fixtures that are built to deliver 50,000+ hours of reliable, CRI 80+ light. With free sitewide shipping and a 30-day hassle-free return policy, it's easy to get started without risk. Plan your layout, count your fixtures, and light your living room the way it deserves.
Lighting a Commercial Space or Multiple Properties?
If you're a contractor, property manager, or business owner looking to outfit multiple rooms or entire projects with recessed lighting, Amico's bulk sales program offers tiered volume discounts that scale with your order. Get the same ETL-certified, high-performance fixtures at pricing that makes large-scale installations more cost-effective.
Request a Wholesale Quote


