Most living rooms have a lighting problem — and it's not a shortage of fixtures. It's a shortage of layers. A single overhead light in the center of the room might technically illuminate the space, but it also flattens everything: no depth, no warmth, no sense that the room was thoughtfully designed. The result is a space that feels more like a waiting room than a living room.
The good news is that living room lighting ideas don't have to be complicated or expensive to work well. With the right layered approach, you can transform any living room into a space that's bright when you need it, cozy when you want it, and visually interesting all the time. This guide breaks down exactly how layered lighting works, which fixture types belong in each layer, and how to plan a scheme that actually fits your room — not just a Pinterest board.
Why Layered Lighting Changes Everything
Layered lighting is the practice of using multiple light sources at different heights and intensities to serve different purposes simultaneously. Interior designers have used this approach for decades because it solves a problem that single-source lighting never can: a room's needs change throughout the day. Morning coffee, afternoon reading, movie nights, and dinner parties all call for different lighting conditions — and a single overhead fixture can't adapt to all of them.
When you introduce layers, you give yourself control. Want to brighten the whole room for cleaning? Turn up the ambient layer. Settling in to read? Bring in the task light. Hosting guests? Dim the overheads and let the accent lights create atmosphere. The layered approach isn't just aesthetically superior — it's fundamentally more functional, and it makes your living space feel intentional rather than afterthought.
The Three Layers Every Living Room Needs
Lighting designers consistently organize residential lighting into three categories: ambient, task, and accent. Each layer serves a distinct purpose, and each works best when it can be adjusted independently of the others. Think of these three layers less like separate systems and more like instruments in an ensemble — each plays its own part, but together they create something richer than any one could achieve alone.
Before selecting fixtures, it helps to map out your room's function zones: where do people sit, read, watch TV, or gather for conversation? Those zones will guide your fixture placement far more effectively than a general rule about how many lights per square foot. That said, understanding what each layer does is the essential starting point.
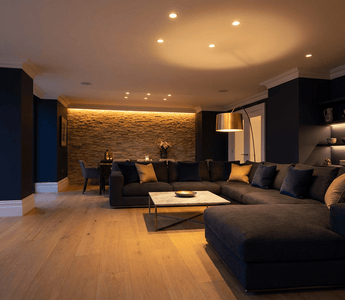
Layer 1: Ambient Lighting (The Foundation)
Ambient lighting is your base layer — the general illumination that fills the room and makes it usable. In most living rooms, this comes from ceiling-mounted fixtures, and recessed downlights are among the most effective options available. They distribute light evenly across a large area without taking up visual space or competing with your décor. Because they sit flush with the ceiling, they work in rooms with low clearance and in open-concept spaces where pendant fixtures might feel intrusive.
Amico's recessed lighting lineup is designed with exactly this use case in mind. Their fixtures are ETL and FCC certified, built to 50,000+ hour lifespans, and available in multiple sizes to match different ceiling spans and room scales. For larger living rooms, 6-inch recessed LED lights deliver broad, even coverage that fills the room without harsh hot spots. For tighter spaces or lower ceilings where subtlety matters more, 4-inch canless LED recessed lights offer a clean, compact profile that blends into the ceiling seamlessly.
One practical advantage of canless recessed fixtures is the simplified installation. Amico's canless designs are integrated units — the LED module and trim are built as a single piece, so there's no separate trim component to fit or align. Wiring multiple fixtures in parallel is the standard approach: each fixture connects independently to the circuit using push-in wire connectors. You insert the stripped wire ends into the connector ports until they click, with no twisting required. This method is more reliable than traditional alternatives and makes multi-fixture installations notably faster.
What to look for in ambient fixtures:
- Dimmer compatibility, so you can lower output for evenings and movie viewing
- CRI 80+ rating for accurate, natural-looking color rendition
- Color temperature options between 2700K (warm) and 4000K (neutral) for flexibility
- Even beam spread, typically 90 to 120 degrees, to minimize shadow pooling
Layer 2: Task Lighting (The Functional Layer)
Task lighting targets specific activity zones where you need focused, reliable light. In a living room, that usually means reading areas, side tables next to seating, a desk or workspace tucked into a corner, or a spot next to a piano or hobby area. Unlike ambient light, task lighting doesn't need to fill the whole room — it just needs to be bright enough in a specific zone to reduce eye strain and make the activity comfortable.
Floor lamps and table lamps are the most common task light sources in living rooms because they're portable and don't require electrical work. But for a cleaner, more permanent solution, directional recessed fixtures can do the job effectively. Gimbal recessed lights are particularly well-suited here: their adjustable heads can be aimed precisely at a reading chair, a work surface, or any other spot that benefits from directed light. This keeps the ceiling clean and uncluttered while delivering targeted brightness where it matters most.
The key to good task lighting is positioning. A light source placed directly overhead can create glare on reading material or screens. Ideally, task lighting should come from slightly to the side and above the activity zone, reducing glare and shadow on the surface you're working with. If you're retrofitting an existing space, adjustable gimbal fixtures give you the angle flexibility to achieve this without restructuring your ceiling layout.
Layer 3: Accent Lighting (The Personality Layer)
Accent lighting is where a living room stops being functional and starts being beautiful. This layer highlights the things you want people to notice: artwork on the walls, architectural details like a fireplace surround or built-in shelving, a statement plant, or a textured feature wall. Accent lighting works by creating contrast — a brighter point against a darker background draws the eye and adds visual depth to the room.
The ratio that lighting designers often reference is approximately three to five times more light on the focal point than on the surrounding surfaces. That sounds technical, but in practice it simply means your accent fixtures should be noticeably brighter than the ambient layer when viewed against the feature they're highlighting. Gimbal-style recessed lights are again excellent for this application because you can aim them at a specific object or surface with precision. Picture lights, wall washers, and LED strip lighting along shelves or behind a media console also contribute to this layer effectively.
Don't overlook the vertical plane when planning accent lighting. Most homeowners light their floors and surfaces well but leave walls dark, which makes rooms feel smaller and less dynamic. Washing a feature wall with light from recessed fixtures angled toward it adds perceived depth and warmth — a subtle technique that dramatically changes how a room feels at night.
How to Plan Your Living Room Lighting Layout
Planning a layered lighting scheme is easier when you start on paper before touching a single fixture. Draw a rough top-down plan of your living room and mark the function zones: seating area, TV wall, reading corner, entryway, and any architectural features worth highlighting. Then assign each zone a lighting layer and determine which fixture types will serve each function. This prevents the common mistake of installing too many ambient fixtures and too few task or accent sources.
For ambient recessed lighting placement, a general starting point is spacing fixtures roughly four to six feet apart and keeping them at least two feet from walls (or closer if you intend a wall-wash effect). Living rooms with 8-foot ceilings typically do well with 4-inch fixtures; taller ceilings benefit from the broader output of 6-inch fixtures. If your ceiling has a fan, consider Amico's ceiling fan light options, which combine air circulation with overhead illumination in a single unit — a practical choice for rooms where ceiling real estate is limited.
Always wire your layers to separate switches or circuits so you can control them independently. Putting your ambient fixtures on a dimmer switch gives you the most flexibility, allowing the same ceiling fixtures to serve both daytime task lighting and evening mood lighting without installing additional hardware.
Choosing the Right Color Temperature
Color temperature is measured in Kelvins and describes how warm or cool a light source appears. For living rooms, the most common and flattering choices fall between 2700K and 3000K (warm white) for general and ambient use. This range mimics the quality of traditional incandescent bulbs — golden, relaxed, and flattering to skin tones and wooden finishes. If your living room doubles as a workspace or study area, a 3000K to 3500K range gives a slightly crisper light that supports concentration without feeling clinical.
A common mistake is mixing very different color temperatures within the same room — for example, pairing 2700K recessed lights with a 5000K daylight floor lamp. The result looks disjointed and can make the room feel unsettled rather than cohesive. Aim to keep all fixtures within a 500K range of each other for a unified look. Most of Amico's LED fixtures are available in selectable color temperatures, which makes it straightforward to match fixtures across different product types within the same room.
Common Lighting Mistakes (and How to Avoid Them)
Even well-intentioned lighting schemes can fall flat when a few key errors are made during planning or installation. Understanding what not to do is just as valuable as knowing what to do.
- Relying on a single overhead source: One fixture in the center of the ceiling creates flat, unflattering light and leaves corners dark. Multiple distributed sources always outperform a single central one.
- Ignoring dimmers: Fixed-output lighting eliminates your ability to adapt the room to different times of day and activities. Dimmer-compatible fixtures are a non-negotiable for living rooms.
- Placing recessed lights too close together: Over-lighting with too many fixtures creates a bright, commercial feel rather than a residential one. Proper spacing is key.
- Forgetting vertical surfaces: Walls, shelves, and architectural details all benefit from directional or accent lighting. A room lit only from above lacks depth.
- Mixing incompatible color temperatures: Warm and cool sources competing in the same space create visual tension. Keep color temperature consistent across layers.
Pro Tips for a Polished Look
Once the structural layers are in place, a few finishing details separate a good lighting scheme from a great one. These aren't expensive upgrades — they're thoughtful choices that make existing fixtures perform better.
- Use warm-toned shades on floor and table lamps to soften their light output and add to the ambient warmth of the room rather than fighting it.
- Position accent fixtures 18 to 24 inches from the wall when highlighting artwork or features — this keeps shadows from falling behind the object and onto the wall surface itself.
- Layer your switch controls thoughtfully — group accent lights on one switch, ambient on another, and put at least one layer on a dimmer so you always have granular control.
- Don't overlook nightlights for hallways and adjacent rooms. Amico's nightlight options provide low-level ambient light for safe navigation at night without disrupting the ambiance of the main living space.
- Consider retrofit options for existing can housings. Amico's retrofit can lights fit directly into existing housings, making it straightforward to upgrade older incandescent fixtures to energy-efficient LED without full ceiling work.
Build a Living Room That Feels as Good as It Looks
A well-lit living room isn't about having more fixtures — it's about having the right fixtures in the right places, working together across multiple layers. When ambient, task, and accent lighting are planned thoughtfully and controlled independently, you get a room that performs beautifully at every hour of the day and for every kind of activity. The difference between a room that feels designed and one that merely feels lit comes down to this layered approach.
Amico's lineup of ETL and FCC certified LED fixtures — spanning recessed downlights, canless designs, gimbal adjustable lights, and retrofit options — gives you the building blocks to execute every layer of this scheme without compromise. With 50,000+ hour lifespans, CRI 80+ color accuracy, and free sitewide shipping backed by a 30-day return policy, it's easier than ever to upgrade your living room lighting with confidence.
Outfitting a Larger Project or Multiple Rooms?
Amico offers tiered volume discounts through our bulk sales program — ideal for contractors, builders, and homeowners tackling whole-home renovations. Request a wholesale quote and our team will put together a custom pricing package tailored to your project scope.
Request a Wholesale Quote


