Table Of Contents
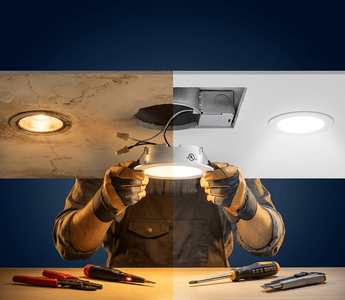
If you're still relying on traditional incandescent or halogen downlights, you're likely spending far more on electricity than necessary while dealing with frequent bulb replacements and excessive heat output. The good news? Upgrading to energy-efficient LED recessed lighting is more straightforward than most homeowners realize, and the return on investment begins the moment you flip the switch.
LED recessed lighting uses up to 85% less energy than traditional downlights while delivering superior brightness and lasting 50,000+ hours. That translates to roughly 25 years of use under typical conditions. Beyond the energy savings, modern LED fixtures offer better light quality with CRI 80+ color accuracy, instant full brightness without warm-up time, and virtually no heat emission compared to their power-hungry predecessors.
Whether you're updating a single room or transforming your entire home's lighting system, this comprehensive guide walks you through every step of replacing traditional downlights with LED recessed lighting. From planning and fixture selection to detailed installation instructions and wiring techniques, you'll gain the confidence to tackle this upgrade yourself or better understand what to expect if hiring a professional.
Why Switch from Traditional Downlights to LED Recessed Lighting?
Before diving into the installation process, it's worth understanding exactly what you'll gain from making this upgrade. The benefits extend far beyond simple energy savings, though those alone justify the investment for most homeowners.
Energy efficiency stands as the most compelling reason to switch. Traditional incandescent downlights typically consume 65-75 watts per fixture, while equivalent LED versions use just 9-15 watts to produce the same or better light output. For a home with twenty recessed lights running an average of five hours daily, this difference translates to approximately $300-400 in annual electricity savings at typical residential rates.
Longevity and reduced maintenance represent another significant advantage. Where incandescent bulbs last roughly 1,000 hours and halogens about 2,000-4,000 hours, quality LED fixtures like those from Amico's recessed lighting collection are rated for 50,000+ hours of operation. This extended lifespan means fewer ladder climbs, no more emergency bulb runs, and dramatically reduced long-term costs.
Heat reduction improves both comfort and safety. Traditional downlights waste approximately 90% of their energy as heat rather than light, turning your ceiling into a radiator and forcing air conditioning systems to work harder during warm months. LED fixtures remain cool to the touch, reducing cooling costs and eliminating burn hazards.
Improved light quality enhances your living spaces in ways you might not expect until you experience it firsthand. Modern LED recessed lights offer consistent color temperature throughout their lifespan, instant full brightness, and CRI 80+ color rendering that makes spaces look more natural and inviting compared to the yellowed, dimming output of aging incandescent bulbs.
Planning Your LED Lighting Upgrade
Proper planning prevents frustration during installation and ensures you purchase the correct fixtures the first time. Taking measurements and understanding your existing setup before ordering saves time, money, and trips to return incompatible products.
Assess Your Current Lighting Setup
Start by examining your existing downlights to determine what type of fixtures you currently have. Traditional recessed lighting typically falls into two categories: fixtures with separate housings (cans) installed in the ceiling with removable trim rings and bulbs, or older integrated units where the entire fixture needs replacement.
Measure the diameter of your current fixtures by removing the trim ring or bulb and measuring the opening in the ceiling. Common sizes include 4-inch, 5-inch, and 6-inch diameters. This measurement determines which replacement fixtures you'll need. For standard residential applications, 6-inch recessed LED lighting provides excellent general illumination, while 4-inch canless LED recessed lighting works well for smaller spaces, hallways, or accent lighting.
Check your ceiling construction as well. Most homes have either drywall ceilings with accessible attic space above or ceilings with limited clearance. This information helps you choose between canless LED fixtures (which require minimal clearance and install directly into the ceiling opening) or traditional housing-style fixtures that need more space above the ceiling.
Finally, identify whether your existing fixtures are on dimmer switches. Not all LED fixtures are dimmable, so you'll need to either select dimmable LED models or replace incompatible dimmer switches with standard on/off switches. ETL & FCC certified fixtures ensure compatibility and safety with standard residential electrical systems.
Choose the Right LED Fixtures
Selecting appropriate LED recessed lights depends on your specific situation and installation preferences. Three main categories serve different needs and existing ceiling configurations.
Canless LED recessed lights represent the most modern and straightforward installation option. These innovative fixtures eliminate the need for separate housing cans, installing directly into the ceiling opening with integrated spring clips. They require minimal clearance above the ceiling (typically just 2-3 inches), making them ideal for shallow ceiling spaces or areas with insulation and ductwork. The integrated design means the LED module and trim come as a complete unit, simplifying installation considerably.
Retrofit LED fixtures work with your existing recessed light housings if they're in good condition. These integrated units clip or screw into the existing can, connecting to the original wiring. Retrofit options provide an economical upgrade path when your housings are properly installed and you want to avoid the work of removing them. Like canless fixtures, retrofit can lights feature integrated LED modules and trim as one piece, requiring no separate trim installation.
New construction LED housings suit situations where you're adding recessed lighting to areas that never had it or completely replacing deteriorated old housings. These fixtures install before drywall goes up or require cutting new holes in existing ceilings, making them more labor-intensive but offering maximum flexibility in placement.
When selecting fixtures, consider color temperature measured in Kelvin. Warm white (2700-3000K) creates cozy, relaxing environments perfect for living rooms and bedrooms. Bright white (3500-4100K) provides crisp, energizing light ideal for kitchens and bathrooms. Cool white (5000-6500K) delivers focused, daylight-like illumination suited to workshops and task-oriented spaces.
Gather Your Tools and Materials
Having everything on hand before you start prevents mid-project trips to the hardware store. Most LED recessed lighting installations require basic tools that DIY-comfortable homeowners already own.
Essential tools and materials:
- Voltage tester or non-contact voltage detector – Critical safety equipment to confirm power is off
- Screwdriver set – Both flathead and Phillips head for removing old fixtures
- Wire strippers – For preparing wire connections
- Push-in wire connectors – Modern, reliable connection method (one per fixture, plus spares)
- Ladder or step stool – Stable access to ceiling height
- Flashlight or headlamp – Essential for seeing into dark ceiling cavities
- Utility knife – For carefully cutting drywall if enlarging openings
- Measuring tape – For verifying dimensions and spacing
- Safety glasses and work gloves – Protection from debris and sharp edges
You'll also need your new LED recessed lighting fixtures. Count your existing downlights and order the corresponding number of LED replacements, plus one or two extras for unexpected issues or future additions. Quality fixtures backed by manufacturer warranties provide peace of mind. Amico's LED fixtures come with 2-5 year warranties and ETL & FCC certifications, ensuring both reliability and safety compliance.
Step-by-Step Installation Process
With planning complete and materials assembled, you're ready to begin the actual installation. Following these steps carefully ensures safe, professional-looking results that will serve your home for decades.
Safety First: Power Down and Prepare
Electrical safety cannot be overstated when working with home lighting systems. Even experienced DIYers must follow proper shutdown procedures to eliminate the risk of shock or fire.
1. Turn off power at the circuit breaker – Locate the breaker controlling your recessed lights and switch it to the OFF position. Simply using wall switches isn't sufficient, as switches can be accidentally flipped during work. If your breaker panel lacks clear labeling, test each breaker until you identify the correct circuit. Once identified, label it for future reference.
2. Verify power is off – Return to your work area and test the fixtures with a voltage tester or non-contact voltage detector. Test both the fixture itself and the wall switch to confirm zero electrical current. This verification step catches situations where circuits are mislabeled or multiple circuits serve the same room.
3. Inform household members – Place a note on the breaker panel alerting others that you're working on the electrical system. This prevents someone from unknowingly restoring power while you're handling wires. Consider using a breaker lockout device for added security during extended projects.
4. Prepare your workspace – Clear furniture and valuables from beneath work areas. Lay down drop cloths to catch debris, dust, and insulation that may fall when you remove old fixtures. Have your ladder positioned securely and your tools within easy reach.
Removing Traditional Downlights
The removal process varies slightly depending on your existing fixture type, but the general approach remains consistent. Work methodically and preserve any reusable components like housings if you're installing retrofit fixtures.
1. Remove the bulb and trim – Start by removing the bulb if present, then detach the trim ring. Most traditional recessed light trims use spring clips, compression rings, or screws. Gently pull the trim downward while releasing the clips or unscrewing fasteners. Some trims twist and drop out once rotated counterclockwise. Set trim pieces aside in case you need to reference them later.
2. Access the fixture socket – With the trim removed, you'll see the socket assembly inside the housing can. For retrofit installations using existing housings, you'll disconnect and remove only this socket assembly. For complete fixture replacement, you'll need to remove the entire housing can.
3. Disconnect wiring – Look inside or around the housing to locate the wire connections. Traditional installations typically use twist-on wire connectors (wire nuts) joining the fixture wires to your home's electrical supply. Unscrew these connectors counterclockwise while holding the wires together, then separate the connections. You should see black (hot), white (neutral), and usually bare copper or green (ground) wires.
4. Remove the old fixture or socket – If installing retrofit LED fixtures, the housing stays in place and you only remove the old socket assembly. If installing canless fixtures or completely new housings, you'll need to remove the entire can. Most housing cans attach to ceiling joists with adjustable brackets held by screws or nails. Remove these fasteners to free the housing, carefully maneuvering it through the ceiling opening.
Inspect the ceiling opening and surrounding area. Look for any damage, water stains, or wiring issues that need attention before installing new fixtures. This is an excellent opportunity to add insulation around the fixture locations if currently lacking, though ensure you use fixtures rated for insulation contact (IC-rated) if insulation will touch the housings.
Installing Your New LED Recessed Lights
Modern LED recessed fixtures simplify installation compared to traditional recessed lighting systems. The integrated design eliminates multiple components and reduces installation time significantly.
For canless LED recessed lights:
1. Prepare the ceiling opening – Ensure the ceiling hole matches the fixture requirements. Canless fixtures typically need a specific diameter opening (usually 4-inch or 6-inch). If your existing opening is too large, you may need to patch and cut a properly sized hole. If too small, carefully enlarge it using a utility knife or drywall saw, following the fixture manufacturer's specifications.
2. Connect the wiring – Feed your home's electrical wires (black, white, and ground) through the fixture's junction box opening. Match wire colors: black to black (hot), white to white (neutral), and bare copper or green to the ground connection. Use push-in wire connectors for secure, reliable connections. Strip approximately 1/2 inch of insulation from each wire end, then insert the stripped wires into the appropriate connector ports until they click into place. This method provides more reliable connections than traditional alternatives and requires no twisting.
3. Secure the fixture – With wiring complete, fold the spring clips attached to the fixture body upward against the fixture sides. Push the entire fixture up into the ceiling opening. The spring clips will expand above the ceiling surface, pulling the fixture snugly against the ceiling and securing it in place. The fixture's trim ring or integrated trim should sit flush with the ceiling surface.
4. Make final adjustments – Ensure the fixture sits level and flush with the ceiling. Most canless fixtures allow minor adjustments by gently pulling down or pushing up to achieve perfect alignment.
For retrofit LED fixtures (using existing housings):
1. Verify housing compatibility – Confirm your existing housing can accommodates the retrofit fixture. Most standard housings work well, but some older or specialized housings may have compatibility issues. Check the retrofit fixture packaging for compatible housing types.
2. Connect the electrical – Inside the existing housing, connect your home's electrical wires to the retrofit fixture's wires using the same color-matching approach: black to black, white to white, and ground to ground. Use push-in wire connectors for these connections, inserting stripped wire ends into the connector ports until they click securely. Tuck the connected wires neatly into the housing, ensuring they don't interfere with the fixture's mounting hardware.
3. Install the retrofit fixture – Retrofit fixtures attach to the existing housing using either spring clips that grip the housing's interior edge or screw-in adapters that thread into the old socket base. Follow the specific instructions for your retrofit model. The integrated LED module and trim unit should fit completely within the housing with the trim sitting flush against the ceiling.
4. Secure and test fit – Ensure the retrofit fixture is firmly seated and the trim sits flush with the ceiling. Check that no gaps exist around the trim perimeter, as gaps can allow air leakage and reduce energy efficiency.
Wiring Multiple LED Fixtures
When replacing several downlights, proper wiring technique ensures all fixtures receive power reliably while maintaining electrical safety. Multiple fixtures connect through parallel connections, where each fixture receives power independently from the electrical supply.
In a parallel connection configuration, the electrical current has multiple paths to follow. Each LED fixture connects directly to both the hot (black) and neutral (white) supply wires. This arrangement ensures that if one fixture fails, the others continue operating normally. It also means each fixture receives full voltage regardless of how many fixtures share the circuit.
Setting up parallel connections:
1. Identify the power source – Determine which fixture location receives power from your electrical panel. This is typically the first fixture in the circuit. At this location, you'll have one cable entering from the power source and one or more cables continuing to additional fixtures.
2. Connect at each fixture junction – At each fixture location, you'll connect the fixture's wires to your home's electrical supply wires. When multiple cables are present (power coming in and power continuing to the next fixture), connect all same-colored wires together: all black wires to the fixture's black wire, all white wires to the fixture's white wire, and all ground wires to the fixture's ground connection. Push-in wire connectors accommodate multiple wires by providing multiple ports. Simply insert one stripped wire end into each port until it clicks securely.
3. Maintain consistent connections – Follow the same wiring approach at each fixture location along the circuit. This consistency ensures every fixture receives proper power and simplifies future troubleshooting if needed. Double-check each connection before securing fixtures in place.
4. Keep connections secure and protected – Once wiring is complete, ensure all connections sit securely inside junction boxes or fixture housings, protected from damage and contact with insulation or other materials. Loose wires can create fire hazards and connection failures over time.
Proper parallel connections deliver consistent brightness across all fixtures while maintaining electrical safety. This wiring method represents standard practice for residential recessed lighting installations and works perfectly with modern LED fixtures that draw minimal current compared to traditional bulbs.
Final installation steps:
1. Complete all fixture installations – Work through each location methodically, installing and wiring all fixtures before restoring power. This approach prevents repeatedly turning power on and off, which can be inconvenient and creates unnecessary risk.
2. Double-check all connections – Before closing up and restoring power, review each installation. Verify that all wire connections are secure, fixtures are properly seated, and no tools or materials remain in ceiling cavities or around fixtures.
3. Restore power and test – Return to your breaker panel and switch the circuit breaker back to the ON position. Go to the wall switch controlling your new LED recessed lights and turn it on. All fixtures should illuminate immediately, with consistent brightness and no flickering. If some fixtures don't light up or flicker, turn off power again and check those connections.
4. Inspect and enjoy – With power restored and all lights functioning, inspect your work one final time. Check that all fixtures sit flush with the ceiling, provide the desired light coverage, and operate smoothly with wall switches or dimmers.
Troubleshooting Common Issues
Even carefully executed installations occasionally encounter problems. Understanding common issues and their solutions helps you resolve problems quickly without unnecessary frustration or professional service calls.
Fixture won't turn on: First, verify power is reaching the fixture by checking the circuit breaker and wall switch. If other fixtures on the circuit work fine, the issue is isolated to that specific fixture. Turn off power and inspect the wire connections, ensuring all wires are fully inserted into the push-in wire connectors and making good contact. A loose connection prevents power flow. Also verify you haven't accidentally reversed the hot and neutral connections, though LED fixtures typically tolerate this without damage.
Flickering or dimming: If using dimmers, confirm your LED fixtures are rated as dimmable and compatible with your specific dimmer switch. Not all LEDs work with all dimmers, and incompatibility causes flickering, buzzing, or limited dimming range. Consider upgrading to an LED-compatible dimmer switch designed for low-wattage loads. If flickering occurs without dimmers, check for loose connections or insufficient wire contact in the push-in connectors.
Fixture doesn't fit opening: Measure both the existing ceiling opening and the fixture requirements carefully. If the opening is too small, carefully enlarge it following the manufacturer's specifications. If too large, you may need to install a mounting plate or adapter, patch the drywall around the opening to the correct size, or select a fixture with a larger trim ring that covers the oversized opening.
Insufficient clearance above ceiling: Canless LED fixtures require minimal clearance (typically 2-3 inches), but obstructions like ductwork, wiring, or structural members can sometimes interfere. If you encounter clearance issues, consider slightly repositioning the fixture location if possible, or select an even lower-profile fixture model. Retrofit fixtures using existing housings avoid this issue entirely since the housing clearance is already established.
Uneven light output: If some fixtures appear brighter or dimmer than others, verify all fixtures are the same model and have identical specifications. Mixed fixture types or color temperatures create inconsistent appearance. Also check that all fixtures are receiving proper power through secure connections. A poorly connected fixture may receive reduced voltage, causing dimmer output.
Trim doesn't sit flush: Ensure the fixture is properly secured with spring clips fully expanded above the ceiling surface. If installation is correct but the trim still sits unevenly, the ceiling surface may be uneven. Minor gaps can sometimes be addressed by carefully adjusting the fixture position or using trim rings with slightly more depth to accommodate ceiling irregularities.
Maintenance and Long-Term Care
One of the greatest advantages of LED recessed lighting is the dramatically reduced maintenance compared to traditional fixtures. However, some basic care practices maximize performance and lifespan while keeping your lighting looking its best.
Regular cleaning maintains optimal light output and appearance. Dust and debris accumulate on light fixtures over time, reducing brightness and making trim surfaces look dingy. Every few months, turn off power to the fixtures and gently wipe trim surfaces with a soft, dry cloth or use a vacuum with a soft brush attachment. Avoid harsh chemicals or abrasive materials that might scratch or damage trim finishes. For kitchen installations where grease may accumulate, occasionally wipe trim surfaces with a slightly damp cloth and mild soap, then dry thoroughly.
Monitor performance by staying alert to changes in light output, color, or operation. While quality LED fixtures like Amico's recessed lighting are rated for 50,000+ hours of reliable operation, issues can occasionally occur. Sudden dimming, color shifts, or flickering may indicate connection problems or fixture failure. Address these issues promptly to prevent more significant problems and maintain consistent lighting quality throughout your home.
Avoid frequent power cycling in commercial or industrial applications where lights may be controlled by motion sensors or timers. While LED fixtures handle switching far better than fluorescent lights, extremely frequent on/off cycling (hundreds of cycles daily) can slightly reduce lifespan. For these applications, consider fixtures specifically designed for high-cycling environments, or industrial lighting solutions built for demanding conditions.
Keep attic spaces ventilated if your recessed lights are installed in ceilings below attic spaces. While LED fixtures produce minimal heat compared to traditional lighting, proper attic ventilation benefits your entire home's energy efficiency and prevents heat buildup that can affect fixture electronics over time. Ensure insulation around IC-rated fixtures doesn't block ventilation paths.
Warranty awareness protects your investment. Quality LED fixtures come with substantial warranties covering defects and premature failure. Keep your purchase documentation and be aware of warranty terms. Amico backs their LED recessed lighting with 2-5 year warranties, providing confidence in long-term performance. If fixtures fail prematurely or exhibit problems within the warranty period, contact the manufacturer for replacement or support.
Plan for eventual replacement by documenting your installation. Take photos of your completed installation, note fixture models and quantities, and save packaging or specification sheets. This information proves invaluable if you need to replace a single fixture years later and want to match existing installations exactly. While 50,000+ hour lifespans mean fixtures last decades, having this documentation simplifies future remodeling or expansion projects.
With proper installation and minimal maintenance, your LED recessed lighting upgrade will deliver decades of reliable, energy-efficient illumination while dramatically reducing your energy bills and environmental impact compared to traditional downlights.
Making the Switch to Energy-Efficient Lighting
Replacing traditional downlights with LED recessed lighting represents one of the most impactful home improvements you can undertake. The combination of dramatic energy savings, virtually maintenance-free operation for decades, and improved light quality creates immediate and long-lasting value for your home.
Whether you've chosen canless fixtures for their simple installation and minimal clearance requirements, retrofit options to work with existing housings, or complete new fixtures for maximum flexibility, the installation process is well within the capabilities of homeowners comfortable with basic electrical work. By following proper safety procedures, making secure wiring connections with push-in wire connectors, and taking time to ensure proper fixture placement and alignment, you'll achieve professional-quality results that serve your home for 25 years or more.
The 85% reduction in energy consumption, elimination of frequent bulb replacements, and cool operation of LED recessed lights transform both your monthly utility bills and daily living experience. Spaces become more comfortable without the heat output of traditional bulbs, colors appear more natural with CRI 80+ color rendering, and you gain the peace of mind that comes with ETL & FCC certified fixtures backed by comprehensive warranties.
As you complete your lighting upgrade, take a moment to appreciate the difference. The consistent, high-quality illumination, instant-on convenience, and knowledge that you're reducing your environmental impact while saving money create satisfaction that extends far beyond the installation day. Your investment in energy-efficient LED lighting pays dividends every time you flip the switch.
Ready to Upgrade to Energy-Efficient LED Recessed Lighting?
Amico offers a comprehensive selection of ETL & FCC certified LED recessed lighting solutions designed for easy installation and lasting performance. From canless fixtures to retrofit options, find the perfect lighting upgrade for your project.
Contractors and businesses: Take advantage of our bulk sales program with tiered volume discounts and dedicated support.


