Table Of Contents
- What Are Canless LED Recessed Lights?
- Benefits of Modernizing with Canless LEDs
- Choosing the Right Canless Lights for Your Space
- How to Install Canless LED Recessed Lights
- Modern Design Ideas Using Canless Lighting
- Maintenance and Longevity
- Final Thoughts on Modernizing Your Lighting
If you're still living with outdated recessed lighting installed decades ago, you're not just dealing with poor illumination—you're likely paying more on energy bills while your home's aesthetic falls behind current design trends. Traditional recessed can lights with their bulky housings, frequent bulb replacements, and energy-hungry operation have become relics of the past. The good news? Modernizing your home lighting has never been easier thanks to canless LED recessed lights.
Canless recessed lighting represents a significant leap forward in home illumination technology. These slim, integrated fixtures eliminate the need for bulky metal cans in your ceiling, making installation faster and more accessible for homeowners. They consume up to 85% less energy than incandescent equivalents, last 50,000+ hours, and provide superior light quality that enhances every room in your home. Whether you're renovating a single room or planning a whole-house lighting upgrade, canless LEDs offer the perfect combination of modern aesthetics, energy efficiency, and DIY-friendly installation.
In this comprehensive guide, you'll discover everything you need to know about modernizing your home with canless LED recessed lights—from understanding the technology and choosing the right fixtures to step-by-step installation guidance and creative design applications that transform ordinary spaces into beautifully lit environments.
What Are Canless LED Recessed Lights?
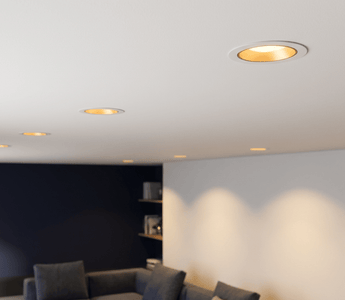
Canless LED recessed lights are ultra-thin lighting fixtures designed to install directly into your ceiling without the traditional metal housing (or "can") that older recessed lights require. The LED module and trim are integrated into a single unit that typically measures just 1-2 inches in depth, making them ideal for shallow ceiling cavities, remodeling projects, and new construction alike. Unlike traditional can lights that require a separate bulb, housing, and trim ring, canless fixtures arrive as complete, ready-to-install units.
The technology behind these fixtures centers on advanced LED chips mounted on heat-dissipating aluminum backing. This design eliminates the need for the large metal cans that once served primarily as heat sinks for hot incandescent and halogen bulbs. The streamlined construction not only simplifies installation but also reduces the fixture's overall footprint in your ceiling, leaving more room for insulation and improving your home's energy efficiency. Most canless fixtures connect directly to standard electrical junction boxes, making them compatible with existing wiring in retrofit applications.
One of the most significant advantages of canless design is the integrated construction. The LED components and decorative trim form a single piece, which means there's no separate trim installation or alignment issues to worry about. This integrated approach delivers a clean, finished appearance straight out of the box. When you're ready to upgrade your lighting, exploring options like 4-inch canless LED recessed lighting or 6-inch recessed LED lighting can help you find the perfect size for your specific application.
Benefits of Modernizing with Canless LEDs
Switching to canless LED recessed lights delivers immediate and long-term benefits that impact both your daily living experience and your home's value. The energy efficiency alone makes a compelling case: LED technology uses approximately 85% less electricity than traditional incandescent bulbs while producing the same or better light output. For a typical home with 15-20 recessed lights, this translates to hundreds of dollars in annual energy savings. When you factor in the 50,000+ hour lifespan of quality LED fixtures, you're looking at decades of reliable performance without a single bulb replacement.
The installation simplicity of canless fixtures represents another major advantage, especially for homeowners comfortable with basic electrical work. Without heavy metal cans to wrestle into place or complex mounting brackets to align, installation time drops dramatically compared to traditional recessed lighting. Most canless fixtures mount with simple spring clips that secure the unit flush against the ceiling, creating a professional appearance without specialized tools or expertise. This ease of installation makes whole-room lighting updates feasible weekend projects rather than week-long renovations requiring professional contractors.
From a design perspective, canless LEDs offer superior aesthetics and performance. The slim profile creates a more refined, contemporary look with minimal ceiling intrusion. The light quality from modern LEDs with CRI 80+ ratings renders colors more accurately than older lighting technologies, making everything from artwork to skin tones appear more natural and vibrant. Many canless fixtures also include dimming capabilities, allowing you to adjust lighting intensity to match different activities and moods throughout the day. When considering your recessed lighting options, these combined benefits make canless LEDs the clear choice for modern home illumination.
Choosing the Right Canless Lights for Your Space
Selecting the appropriate canless LED fixtures requires balancing several factors specific to each room's function, size, and aesthetic goals. The right choice ensures optimal illumination while enhancing your home's design and maintaining energy efficiency. Understanding the key selection criteria helps you make informed decisions that you'll appreciate for years to come.
Size and Spacing Considerations
Fixture size directly impacts both the amount of light delivered and the visual impact on your ceiling. The two most common sizes are 4-inch and 6-inch diameter fixtures, each suited to different applications. Four-inch fixtures work beautifully in smaller spaces, hallways, closets, and situations where you want more fixtures with focused light distribution. They create a refined appearance in rooms with lower ceilings (8 feet or less) without overwhelming the space visually. Six-inch fixtures deliver more lumens per fixture and work better for general room lighting in larger spaces like living rooms, kitchens, and master bedrooms.
Proper spacing ensures even illumination without dark spots or excessive overlap. A general rule suggests spacing fixtures approximately 4-6 feet apart for standard 8-foot ceilings, with adjustments based on fixture size and light output. For ambient lighting in living spaces, position fixtures about half the ceiling height apart—so for an 8-foot ceiling, space them roughly 4 feet apart. When highlighting specific areas like kitchen counters or bathroom vanities, you can place fixtures closer together (3-4 feet) for increased task lighting. Always measure and plan your layout before cutting any holes, considering furniture placement, architectural features, and natural light sources that affect your lighting needs.
Color Temperature and Brightness
Color temperature, measured in Kelvins (K), dramatically influences the mood and functionality of each space. Warm white (2700K-3000K) creates a cozy, inviting atmosphere ideal for bedrooms, living rooms, and dining areas. This temperature closely mimics traditional incandescent bulbs and promotes relaxation. Bright white (3500K-4100K) offers a neutral tone perfect for kitchens, bathrooms, and home offices where you need clear visibility for tasks. Daylight (5000K-6500K) provides the coolest, most energizing light suitable for workspaces, garages, and areas where color accuracy matters most.
Brightness, measured in lumens, determines how much light the fixture produces. For general ambient lighting, aim for approximately 20 lumens per square foot in living spaces. A 200-square-foot living room would need about 4,000 total lumens, which you might achieve with eight 500-lumen fixtures or five 800-lumen fixtures depending on your layout. Task-oriented spaces like kitchens benefit from higher lumen outputs (30-50 lumens per square foot), while bedrooms and dining rooms can use lower levels (10-20 lumens per square foot) for a more relaxed ambiance. Many quality fixtures offer adjustable light output or dimming capabilities, giving you flexibility to customize brightness for different activities.
Special Features to Consider
Modern canless LED fixtures often include advanced features that enhance convenience, safety, and performance. Dimmable fixtures provide the most versatility, allowing you to adjust light levels from bright task lighting to soft ambient glow. When choosing dimmable fixtures, verify compatibility with your existing dimmer switches or plan to upgrade to LED-compatible dimmers that prevent flickering and buzzing. Some fixtures include built-in color temperature selection, letting you switch between warm, neutral, and cool white settings to match different times of day or activities.
For specific installations, consider specialized options like IC-rated fixtures for direct contact with ceiling insulation, airtight designs that prevent conditioned air loss, and wet-rated models for bathrooms, covered porches, and other moisture-prone locations. Directional or gimbal-style options from collections like wholesale gimbal recessed lights allow you to aim light at artwork, architectural features, or specific work areas. ETL and FCC certification ensures fixtures meet rigorous safety and performance standards, giving you confidence in your investment. When evaluating features, prioritize those that address your specific needs rather than paying for capabilities you won't use.
How to Install Canless LED Recessed Lights
Installing canless LED recessed lights is one of the most homeowner-friendly electrical projects, especially when replacing existing recessed fixtures. The streamlined design eliminates many of the challenges associated with traditional can lights, making this a manageable weekend project for anyone comfortable working with basic electrical connections. Before beginning any electrical work, always turn off power at the circuit breaker and verify it's off using a non-contact voltage tester.
1. Plan Your Layout – Start by determining the optimal placement for your fixtures based on room dimensions, ceiling height, and lighting goals. Mark the center point for each fixture on your ceiling using a pencil. For new installations in finished ceilings, use a stud finder to locate ceiling joists and ensure your planned locations won't intersect with structural members or existing wiring. If you're retrofitting old can lights, you'll work with existing hole locations, which simplifies the layout process. Creating a detailed plan prevents mistakes that are difficult to correct once you've cut into your ceiling.
2. Prepare the Ceiling Opening – For new installations, most canless fixtures require a 4-inch or 6-inch diameter hole depending on the fixture size. Many fixtures include a paper or cardboard template to trace the exact opening size. Use a drywall saw or hole saw attachment on a drill to create clean, precise openings. For retrofit applications replacing old can lights, you may need to enlarge or reduce the existing opening to match your new fixtures. If enlarging, cut carefully to maintain ceiling integrity; if reducing, you can use trim rings or adjust with joint compound and touch-up paint around the fixture perimeter.
3. Install Junction Box (if needed) – New installations require an approved electrical junction box mounted to a ceiling joist or between joists using an adjustable bar hanger. The junction box houses all electrical connections and must be rated for ceiling fan support if you're installing fixtures in locations that might later accommodate ceiling fan lights. Position the box so it will be accessible through your ceiling opening but won't interfere with the fixture body. For retrofits with existing boxes already in place, inspect the box condition and ensure it's securely mounted before proceeding.
4. Make Electrical Connections – Pull the electrical cable through the junction box and strip approximately 6 inches of outer sheathing to expose the individual wires. Strip about 1/2 inch of insulation from each wire end. Connect the fixture's black wire to the circuit's black (hot) wire, white to white (neutral), and green or bare copper to the ground wire using push-in wire connectors. To make these connections, simply insert the stripped wire ends into the appropriate connector ports until they click securely into place. This connection method is more reliable than traditional alternatives and requires no twisting or special tools. When installing multiple fixtures on the same circuit, connect them using parallel wiring where each fixture receives power independently from the circuit, ensuring consistent performance across all fixtures.
5. Secure the Fixture – Once electrical connections are complete and safely tucked into the junction box, position the fixture body into the ceiling opening. Most canless fixtures use spring-loaded clips that compress as you push the fixture into place, then expand to grip the ceiling from above. Push the fixture firmly and evenly until it sits flush with the ceiling surface. The spring clips should engage automatically, holding the fixture securely without additional fasteners. Gently tug the fixture to verify it's properly secured before restoring power.
6. Test and Adjust – Return to your circuit breaker and restore power to the lighting circuit. Test each fixture to ensure proper operation. If you've installed dimmable fixtures, test them with your dimmer switch across the full range of settings. Check that all fixtures illuminate evenly and that there's no flickering or buzzing. If you notice any issues, turn off power again and inspect your connections. Once everything operates correctly, you can enjoy your modernized lighting system backed by the confidence of quality fixtures with proper ETL and FCC certification.
Modern Design Ideas Using Canless Lighting
Canless LED recessed lights offer remarkable versatility in creating modern, sophisticated lighting designs that enhance both functionality and aesthetics. The clean, minimalist appearance of these fixtures complements contemporary interior design while providing the layered lighting that makes spaces feel polished and purposeful. Understanding how to apply these fixtures strategically transforms ordinary rooms into thoughtfully illuminated environments.
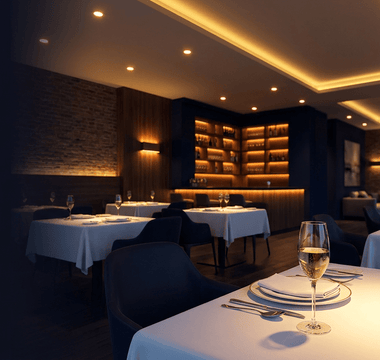
In kitchens, combine general ambient lighting with focused task lighting for optimal functionality. Install fixtures approximately 18-24 inches from the wall around the room's perimeter for ambient light, then add dedicated fixtures directly over work surfaces—countertops, islands, and sinks—spaced 24-30 inches apart for shadow-free task lighting. This layered approach ensures you can see clearly while preparing food while maintaining pleasant overall illumination. Consider using slightly cooler color temperatures (3500K-4000K) in kitchens for crisp, energizing light that makes the space feel clean and modern.
Living rooms benefit from strategic placement that highlights architectural features and creates visual interest. Position fixtures to wash walls with light, emphasizing texture and color while making the space feel larger. Use adjustable or gimbal fixtures to accent artwork, bookshelves, or other focal points. Create distinct lighting zones by grouping fixtures on separate switches or dimmer controls—one set for general ambient lighting, another for accent lighting—allowing you to adjust the mood for different activities from entertaining guests to quiet evenings watching television.
For bathrooms, recessed lighting provides a sleek alternative to bulky vanity bars while delivering excellent illumination. Install fixtures symmetrically above mirrors or, even better, on either side of mirrors at face height for shadow-free grooming light. Add general ceiling fixtures for ambient illumination and shower-rated fixtures inside shower enclosures for safety and functionality. Bright white or daylight color temperatures (4000K-5000K) work best in bathrooms where color accuracy matters for grooming and makeup application.
Bedroom lighting should prioritize comfort and relaxation. Use warm white (2700K-3000K) fixtures on dimmer switches to create a soothing atmosphere. Position fixtures away from directly above the bed to avoid harsh overhead light while you're lying down. Consider placing fixtures in closets, over dressers, or in reading nooks for targeted task lighting. The ability to dim fixtures from bright for morning routines to low ambient light for evening wind-down makes bedroom recessed lighting both practical and comfortable.
Throughout your home, coordinating fixture sizes, styles, and color temperatures creates visual continuity that feels intentional and professional. Larger 6-inch fixtures work well in primary living spaces, while 4-inch options complement hallways, closets, and smaller rooms. For comprehensive lighting solutions across different areas, exploring Amico's full range of recessed lighting options ensures you find the perfect fixtures for every space in your home.
Maintenance and Longevity
One of the most appealing aspects of canless LED recessed lights is their virtually maintenance-free operation. Unlike traditional lighting that requires frequent bulb replacements, quality LED fixtures deliver 50,000+ hours of reliable illumination—that's over 20 years of typical use before any service becomes necessary. The integrated design means there are no bulbs to track, purchase, or replace, eliminating those awkward ladder trips and the ongoing expense of replacement lamps.
The minimal maintenance required centers primarily on keeping fixtures clean for optimal light output. Dust and debris can accumulate on the trim and lens over time, gradually reducing brightness. Every few months, simply wipe fixtures with a soft, dry cloth or use a vacuum with a soft brush attachment to remove dust. For more thorough cleaning, use a slightly damp cloth with mild soap, ensuring power is off and no moisture enters the fixture housing. This simple maintenance preserves both appearance and performance throughout the fixture's long service life.
The longevity of LED technology also contributes to your home's sustainability profile. By eliminating frequent bulb replacements, you reduce waste while the exceptional energy efficiency lowers your carbon footprint compared to traditional lighting. The robust construction of quality fixtures with proper ETL and FCC certification ensures safe, reliable operation year after year. Many manufacturers offer warranties ranging from 2-5 years, providing additional peace of mind that your lighting investment is protected. When you choose well-engineered fixtures built to last, you're making a one-time investment that continues delivering value for decades rather than a recurring expense that demands constant attention.
Final Thoughts on Modernizing Your Lighting
Modernizing your home lighting with canless LED recessed lights represents one of the most impactful upgrades you can make to your living space. The combination of energy efficiency, superior light quality, minimal maintenance, and contemporary aesthetics delivers benefits you'll appreciate every single day. Whether you're renovating a single room or planning a whole-house lighting transformation, canless LEDs offer the perfect balance of performance, longevity, and value that makes them the clear choice for today's homeowners.
The installation process, while requiring basic electrical knowledge and safety precautions, remains accessible to confident DIYers who want to take control of their home improvement projects. The streamlined design eliminates many of the complications associated with traditional recessed lighting, turning what was once a complex, time-consuming installation into a manageable weekend project. For those who prefer professional installation, the reduced labor time translates to lower contractor costs, making the upgrade more affordable regardless of how you approach it.
As you plan your lighting modernization, remember that thoughtful fixture selection, proper spacing, and strategic placement make the difference between adequate lighting and exceptional illumination that enhances your home's beauty and functionality. Take time to consider each room's specific needs, activities, and design goals. The investment you make in quality fixtures today pays dividends in reduced energy costs, eliminated maintenance, and improved daily living for years to come. With the right approach and reliable fixtures backed by solid warranties and certifications, your modernized lighting system will continue performing beautifully long into the future.
Ready to transform your home's lighting with modern, energy-efficient canless LED recessed lights? Amico offers a comprehensive selection of high-quality fixtures designed for easy installation and long-lasting performance. Every product is backed by ETL and FCC certification, generous warranties, and free shipping, ensuring you get professional-grade lighting at prices that respect your budget.
If you're a contractor, property manager, or planning a larger lighting project, take advantage of significant savings through our bulk purchasing program. We offer tiered volume discounts that make outfitting entire properties or multiple projects more affordable than ever.
Request a wholesale quote today and discover how Amico can be your trusted partner for all your lighting needs. Visit our Wholesale Quote Request page to get started, or explore our complete collection of lighting solutions designed to illuminate your world with quality, efficiency, and style.


