Table Of Contents
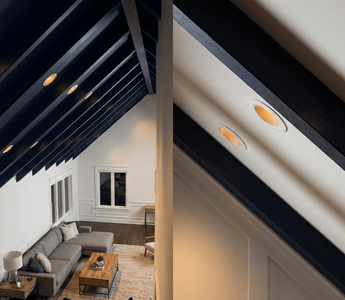
Sloped and vaulted ceilings add architectural drama to any space, but they present unique challenges when it comes to installing recessed lighting. The angled surfaces affect everything from fixture selection to beam direction, making proper planning essential for achieving balanced illumination and professional results.
Unlike flat ceiling installations, sloped ceilings require specialized fixtures or adjustable housings that can accommodate angles ranging from subtle slopes to dramatic cathedral peaks. The good news is that modern LED recessed lighting systems have simplified this process significantly, with many fixtures designed specifically for angled applications. With the right approach and quality components, you can transform your vaulted space with clean, efficient lighting that highlights the architectural features rather than fighting against them.
This comprehensive guide walks you through every aspect of installing recessed lighting on sloped and vaulted ceilings, from selecting compatible fixtures and planning your layout to wiring connections and final adjustments. Whether you're tackling a single fixture or lighting an entire cathedral ceiling, these techniques will help you achieve results that rival professional installations.
Understanding Sloped Ceiling Challenges
Installing recessed lighting on sloped ceilings involves several considerations that don't apply to standard flat ceiling work. The angle of your ceiling directly impacts how light disperses throughout the room, potentially creating uneven illumination patterns if not properly addressed. A fixture mounted perpendicular to a sloped surface will naturally direct its beam at an angle rather than straight down, which can leave floor areas dim while creating bright spots on opposite walls.
Ceiling pitch is measured in degrees or as a ratio of rise to run. Most residential sloped ceilings range from 15 to 45 degrees, with cathedral ceilings often falling in the 30-45 degree range. The steeper your ceiling angle, the more critical it becomes to use fixtures with adjustable trim or gimbal features that allow you to redirect the light beam. This adjustability ensures that your lighting serves functional purposes rather than just highlighting your ceiling's opposite slope.
Another challenge involves the physical installation process itself. Working on a ladder at awkward angles while managing electrical connections and fixture positioning requires careful planning and often an extra set of hands. The good news is that canless LED recessed lighting systems have dramatically simplified sloped ceiling installations by eliminating the need for separate housings and reducing the number of components you need to manage while balancing on a ladder.
Choosing the Right Fixtures for Angled Ceilings
Not all recessed lighting fixtures are suitable for sloped ceiling installations, so understanding your options is the first critical step. Traditional can-style housings require specific slope-rated models with adjustable mounting brackets, while modern canless systems often include built-in slope compatibility up to certain angles. The fixture type you choose will significantly impact both installation difficulty and long-term performance.
Slope-Rated Housing Requirements
If you're working with traditional recessed can housings, you must verify that they're specifically rated for sloped ceiling installation. Standard housings designed for flat ceilings cannot be safely adapted for angled mounting, as they lack the necessary bracket adjustments and may create fire hazards if improperly installed. Slope-rated housings feature adjustable mounting bars that can be set to match your ceiling angle, ensuring proper support and code compliance. These fixtures typically accommodate slopes up to 45 degrees, though you should always verify the manufacturer's specifications for your specific ceiling pitch.
Canless LED Systems
Modern canless LED fixtures have revolutionized sloped ceiling installations by eliminating the separate housing entirely. These integrated units mount directly into your ceiling with simple junction box connections, making them ideal for both new construction and retrofit applications. Amico's recessed lighting systems are designed as integrated units where the LED module and trim are built as one piece, simplifying installation on angled surfaces. Most quality canless systems accommodate slopes up to 38 degrees without special modifications, and many include adjustable trim features for beam direction control.
Gimbal and Adjustable Trim Options
For sloped ceilings, adjustable gimbal trim is often your best choice for directing light exactly where you need it. Gimbal recessed lights feature a pivoting inner ring that allows you to angle the light beam independent of the fixture's mounting orientation. This adjustability is invaluable on sloped ceilings, letting you aim light downward toward the floor or highlight specific features regardless of your ceiling angle. The gimbal mechanism typically provides 30-40 degrees of directional adjustment, giving you precise control over your lighting design.
Planning Your Recessed Light Layout
Proper layout planning becomes even more critical on sloped ceilings because the angled surfaces affect light distribution patterns. The standard spacing rules that apply to flat ceilings need adjustment to account for the increased distance between your fixtures and the floor areas they're illuminating. A well-planned layout ensures even coverage without dark corners or over-lit zones that waste energy.
Start by measuring your ceiling slope and calculating the actual vertical height from floor to ceiling at various points. On a steeply sloped ceiling, fixtures positioned near the peak will be significantly farther from the floor than those near the lower edges, which affects their effective coverage area. As a general guideline, space your fixtures approximately 4-6 feet apart along the slope, adjusting based on your specific ceiling height and desired light intensity. For vaulted ceilings with symmetrical slopes, create a balanced layout that mirrors on both sides of the peak to maintain visual harmony.
Consider the functional requirements of your space when positioning fixtures. Task areas like kitchen counters or reading nooks need more concentrated lighting, while ambient lighting for general illumination can use wider spacing. Mark your planned fixture locations on the ceiling with painter's tape before cutting any holes, then view the layout from multiple angles in the room to verify that the spacing feels balanced. This dry-run approach lets you make adjustments before committing to permanent modifications.
Tools and Materials You'll Need
Gathering all necessary tools and materials before starting your installation saves frustration and multiple trips up and down your ladder. Working on sloped ceilings requires some specialized equipment beyond standard flat ceiling installations, particularly for safely accessing high or awkwardly positioned work areas.
Essential Tools:
- Adjustable ladder or scaffolding rated for your ceiling height
- Voltage tester or non-contact voltage detector
- Hole saw sized for your fixtures (typically 4-inch or 6-inch)
- Drill with adjustable clutch settings
- Wire strippers and cable cutter
- Stud finder with electrical wire detection
- Measuring tape and level
- Headlamp or work light for hands-free illumination
- Safety glasses and dust mask
Materials and Components:
- Slope-rated recessed fixtures or canless LED systems
- 14/2 or 12/2 NM electrical cable (gauge depends on circuit amperage)
- Wire nuts (twist-on connectors) for secure connections
- Electrical boxes if required by your fixture type
- Cable clamps and staples
- Drywall saw for adjusting rough openings if needed
- Joint compound and paint for finishing (if required)
When selecting 6-inch recessed LED lighting or other fixture sizes, ensure they're compatible with your ceiling construction and insulation requirements. Many modern LED fixtures are IC-rated for direct contact with insulation, which is essential for maintaining energy efficiency in sloped ceiling applications where insulation follows the roof line.
Step-by-Step Installation Process
With your layout planned and materials gathered, you're ready to begin the physical installation. Working methodically through each step ensures safe, code-compliant results that will provide reliable performance for years to come. Always begin by shutting off power at the circuit breaker and verifying that circuits are de-energized before proceeding with any electrical work.
1. Mark and Cut Fixture Openings
Transfer your layout plan to the ceiling by marking the center point of each fixture location. Use a stud finder to verify that no framing members or electrical wires run through your planned locations, adjusting positions slightly if necessary to avoid obstructions. For canless fixtures, the manufacturer's template (often included with the fixture) ensures perfectly sized openings. Position the template at your marked center point, ensuring it's level even though the ceiling is sloped. This level positioning is important because your fixture trim will follow this orientation.
When cutting through drywall, use a hole saw sized appropriately for your fixture type. Most 4-inch canless LED recessed lighting fixtures require a 4-inch opening, while 6-inch fixtures need correspondingly larger holes. Cut slowly and steadily, applying even pressure to prevent the saw from binding or jumping. If you encounter unexpected resistance, stop immediately and verify you haven't hit a framing member or wire that wasn't detected during your initial scan.
2. Run Electrical Cable
Running cable to recessed light locations on sloped ceilings often requires working in attic spaces that follow the roof pitch. This can be challenging, but careful planning makes the process manageable. If you have attic access above your vaulted ceiling, route cables from your power source to each fixture location, leaving approximately 18 inches of extra cable extending through each opening. This extra length gives you comfortable working room for making connections without straining the wire.
Secure cables every 4-5 feet using appropriate staples, keeping them at least 1.25 inches from the edge of framing members to prevent accidental puncture from drywall screws or nails. In finished spaces without attic access, you may need to fish cables through existing walls, which can be more challenging. For complex retrofits or situations where running new cable is impractical, consider consulting a licensed electrician to ensure code-compliant installation.
3. Prepare Fixture Connections
Before installing fixtures into their openings, prepare all electrical connections at a comfortable working height rather than overhead on a ladder. Strip approximately 1/2 inch of insulation from each wire end using wire strippers, taking care not to nick the copper conductor. For most LED recessed fixtures, you'll be connecting black (hot) to black, white (neutral) to white, and green or bare copper (ground) to the fixture's ground wire or grounding screw.
Use wire nuts for all connections — the standard, code-accepted method for secure electrical splices. Hold the matching stripped wire ends together, place the wire nut over them, and twist clockwise until the connector is snug and no bare copper is exposed below the cap. Give each wire a gentle tug afterward to confirm it's held firmly. Be sure to select the correct wire nut size for the number and gauge of conductors you're joining, as a properly sized connector creates a tight, well-insulated connection that stands up to the thermal cycling LED fixtures experience during normal operation.
4. Install and Secure Fixtures
With connections prepared, you're ready to install fixtures into their ceiling openings. For canless LED systems, the integrated design means you're installing a complete unit rather than separate components. Guide the fixture's electrical connection through the ceiling opening first, then carefully push the fixture body into place. Most canless fixtures use spring clips or toggle-style mounting hardware that expands against the back of the drywall to secure the fixture.
Ensure that the fixture sits flush against the ceiling surface without gaps around the trim ring. On sloped ceilings, you may need to slightly adjust the fixture's orientation to achieve a clean, finished appearance. If you're using gimbal-style fixtures, verify that the gimbal mechanism moves freely and that you can achieve your desired beam angle before completing the installation. Once secured, the fixture should feel solid with no movement when gently tugged.
5. Test and Adjust
After all fixtures are installed and secured, restore power at the circuit breaker and test each light. Verify that all fixtures illuminate properly and that switches control the correct lights. This is also the time to make final adjustments to gimbal angles or directional settings, standing at floor level to evaluate how effectively the light coverage meets your needs. Quality LED fixtures from manufacturers like Amico provide 50,000+ hours of reliable operation with CRI 80+ color rendering, ensuring your installation will deliver consistent performance for years without lamp replacements.
Wiring Multiple Fixtures Properly
When installing several recessed lights on a sloped ceiling, proper wiring technique ensures reliable operation and code compliance. Multiple fixtures should always be connected using parallel connections, where each fixture receives power from the main supply cable independently. This method ensures that if one fixture fails, the others continue operating normally.
To create parallel connections, run your main supply cable from the switch to the first fixture location. At this point, create a junction using wire nuts that link the supply cable, the fixture's leads, and a continuation cable that runs to the next fixture. Each subsequent fixture receives power through this same parallel connection pattern. Wire nuts accommodate multiple conductors easily — just choose a connector size rated for the number and gauge of wires you're joining, typically 2-4 conductors per nut.
Maintain consistent polarity throughout your installation by always connecting black to black (hot), white to white (neutral), and ground wires together. Label cables as you work to avoid confusion, especially in complex layouts where multiple cable runs converge at junction points. For larger installations involving many fixtures, consider dividing them across multiple circuits to avoid overloading a single breaker and to provide flexibility in controlling different lighting zones.
Common Mistakes to Avoid
Even experienced DIYers can encounter pitfalls when installing recessed lighting on sloped ceilings. Being aware of these common mistakes helps you avoid problems that could compromise your installation's safety, functionality, or appearance.
Using Non-Slope-Rated Fixtures: Installing standard flat-ceiling housings on sloped surfaces creates serious safety hazards and code violations. Always verify that your fixtures are explicitly rated for your ceiling angle. This is less of a concern with modern canless LED systems, which typically include slope compatibility in their base design, but it's still important to verify specifications before purchasing.
Inadequate Support: Sloped ceiling fixtures must be properly supported to prevent sagging or separation over time. Ensure that mounting hardware is tight and that fixtures designed for junction box mounting are attached to properly braced electrical boxes. Never rely solely on drywall to support fixture weight, particularly on steeper slopes where gravity works against the mounting system.
Improper Spacing: Applying flat-ceiling spacing rules to sloped installations often results in uneven lighting. Account for the increased distance between high-mounted fixtures and the floor by adjusting your spacing plan. What works for an 8-foot flat ceiling may leave dark spots on a vaulted ceiling where fixtures are 12-15 feet from the floor at the peak.
Ignoring Insulation Contact: Many sloped ceilings have insulation following the roof line, which means your recessed fixtures will be in direct contact with insulation material. Only use IC-rated (Insulation Contact) fixtures in these situations, as non-IC fixtures can overheat and create fire hazards when surrounded by insulation. Quality LED fixtures typically generate much less heat than older halogen or incandescent options, but IC rating remains an important safety consideration.
Poor Wire Management: Sloped ceiling installations often involve longer cable runs and more complex routing than flat ceiling work. Secure all cables properly with appropriate staples or clamps, maintaining required distances from framing edges. Loose cables can be damaged during insulation work or other attic activities, potentially creating dangerous short circuits.
Troubleshooting Tips
Even with careful installation, you may encounter issues that require troubleshooting. Understanding how to diagnose and resolve common problems saves time and frustration while ensuring your lighting system performs as intended.
Fixtures Won't Illuminate: If newly installed fixtures don't light up, systematically check your connections starting at the switch and working toward the fixtures. Verify that power is reaching the switch using a voltage tester, then check connections at each fixture. Loose connections are common when working overhead at awkward angles, so re-verify that each wire nut is twisted on tightly with no loose strands or exposed copper. Also confirm that LED fixtures are receiving the correct voltage type (most require standard 120V AC power).
Uneven Light Distribution: If some areas appear significantly brighter or dimmer than others, the issue likely involves fixture positioning or beam angle rather than electrical problems. Adjust gimbal angles to redirect light toward dim zones, or consider whether your fixture spacing needs modification. On very steep slopes, you may need additional fixtures to compensate for the increased mounting height at the ceiling peak.
Flickering or Buzzing: These symptoms often indicate incompatible dimmer switches or loose electrical connections. LED fixtures require LED-compatible dimmers; using old-style incandescent dimmers with LED lights causes performance issues. If you're using the correct dimmer type and still experiencing problems, re-check all wire connections and verify that your circuit voltage is stable and within normal range (typically 110-120V for residential applications).
Fixture Separation from Ceiling: If fixtures gradually pull away from the ceiling over time, the mounting hardware isn't providing adequate support against the component weight and gravity on the slope. This is more common with heavier traditional housings than with modern lightweight LED systems. Reinstall affected fixtures with proper bracing or consider upgrading to lighter-weight canless alternatives that place less stress on mounting systems.
For installations requiring multiple fixture types or specialized applications, Amico offers comprehensive product lines including retrofit can lights for renovation projects and industrial lighting solutions for commercial sloped ceiling applications. Their products carry ETL and FCC certifications for safety and performance, backed by warranties ranging from 2-5 years depending on the specific product line.
Installing recessed lighting on sloped and vaulted ceilings transforms architectural features that might otherwise remain shadowy into well-illuminated spaces that showcase your home's design. While the angled surfaces present unique challenges compared to standard flat ceiling installations, modern LED lighting technology and proper planning make these projects accessible to confident DIYers and professionals alike.
The key to successful sloped ceiling lighting lies in selecting appropriate fixtures designed for angled mounting, planning your layout to account for variable mounting heights, and executing careful installation with attention to electrical safety and code compliance. Adjustable gimbal fixtures give you directional control that's particularly valuable on slopes, while integrated canless LED systems simplify installation by eliminating separate housings and reducing the number of components you need to manage at awkward angles.
Whether you're lighting a dramatic cathedral ceiling in a living room, illuminating a vaulted master bedroom, or adding task lighting to a sloped kitchen ceiling, these techniques provide the foundation for professional-quality results. With energy-efficient LED technology offering 50,000+ hours of reliable operation, your installation will provide beautiful, functional lighting for decades with minimal maintenance required.
Need Lighting for Commercial or Large-Scale Projects?
Amico offers specialized bulk pricing and volume discounts for contractors, electricians, and businesses. Get professional-grade LED recessed lighting with ETL and FCC certifications, backed by comprehensive warranties and free shipping on all orders.
Request Wholesale Quote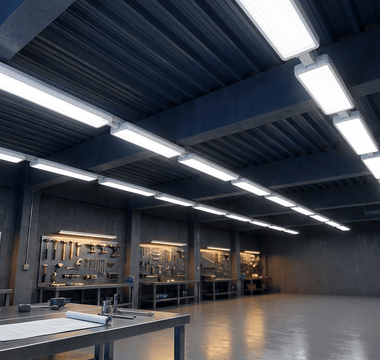


