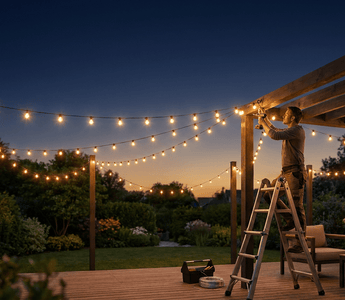
There are few outdoor upgrades as instantly rewarding as a set of well-hung string lights. Whether you're draping them across a backyard patio, weaving them through pergola beams, or stretching them from post to post above a dining area, outdoor string lights create that warm, inviting glow that makes any space feel like a destination. The good news: hanging them yourself is a straightforward weekend project that requires minimal tools and no electrician — just a solid plan and the right materials.
This step-by-step guide walks you through everything you need to know about how to hang outdoor string lights, from measuring your space and choosing the right fixtures to installing anchor points and connecting power safely. Whether you're working with a small balcony or a sprawling backyard, the process is the same, and by the end, you'll have a setup that looks professionally done and lasts for seasons to come.
Why Outdoor String Lights Transform Any Space
Outdoor string lights do something that most lighting fixtures simply can't: they define an outdoor room. By adding a luminous ceiling overhead, they create a sense of enclosure and coziness in an otherwise open-air environment. Restaurants, hotels, and event venues have long relied on this effect, and today, homeowners are bringing the same technique to their backyards, decks, and patios with equally impressive results.
Beyond aesthetics, string lights are highly practical. They provide ambient illumination for evening gatherings, extend the usability of outdoor spaces well after sunset, and add a layer of visual warmth that security floodlights or wall-mounted fixtures simply can't replicate. When combined with other LED string lights designed for outdoor durability, the result is a setup that's as functional as it is beautiful.
Step 1: Plan Your Layout and Measure Your Space
Good planning is what separates a clean, professional-looking installation from a tangled, uneven mess. Before you buy a single bulb, spend time walking your space and visualizing where the lights will go. Think about the shape of the area, where guests will gather, and what overhead structures are available to support the lights.
Measure the perimeter and the span of each run carefully, then add 10–15% extra length to account for sag, draping, and slack at connection points. Sketch a simple diagram showing where each anchor point will go and how many strands you'll need. Common layout shapes include straight runs from post to post, a V-shape from a central pole, a grid pattern overhead, or a loose crisscross pattern for a more relaxed feel.
A few planning questions to answer before you shop:
- How many anchor points do I have (fences, walls, trees, or posts)?
- What is the total linear footage I need to cover?
- Will I need a dedicated outdoor outlet or an extension cord?
- Do I want the lights to hang level or with a gentle curve (catenary sag)?
Step 2: Choose the Right Outdoor String Lights
Not all string lights are built for outdoor use. When shopping, look for lights rated for outdoor or wet/damp locations, which means the bulb sockets and wiring are sealed or treated to resist moisture, UV exposure, and temperature swings. LED string lights are the clear choice for outdoor installations: they run cooler than incandescent bulbs, consume a fraction of the energy, and last dramatically longer, with quality LEDs rated for 50,000+ hours of use.
Pay attention to the cord material as well. Heavy-duty rubber or weatherproof PVC-coated cord holds up far better outdoors than thin plastic-coated wire. Bulb spacing is another consideration — bulbs spaced 12 to 18 inches apart give a classic bistro look, while tighter spacing (6 inches) creates a denser, more festive glow. For color quality, look for lights with a CRI of 80 or higher so that outdoor furnishings, plants, and people are rendered in natural, accurate tones. Amico's LED string lights are built with outdoor durability and energy efficiency in mind — a reliable starting point for any backyard project.
Step 3: Gather Your Tools and Materials
Having everything ready before you start saves significant time and prevents mid-project trips to the hardware store. The specific hardware you need depends on your anchor points, but the following list covers most standard installations:
- Outdoor-rated LED string lights (measured length plus 15% extra)
- Heavy-duty guide wire or steel cable (for long unsupported spans)
- Screw-in eye hooks or lag hooks (stainless steel or galvanized)
- Turnbuckles (optional, for tensioning guide wire)
- S-hooks or carabiner clips (for attaching lights to guide wire)
- Zip ties or light clips (for securing lights to existing structures)
- Drill with appropriate bit (masonry bit for brick/stucco, wood bit for posts)
- Tape measure and pencil
- Ladder (rated for the height you're working at)
- Outdoor-rated extension cord or GFCI outlet
- Push-in Wire Connectors (if hardwiring any connections)
- Wire strippers (if hardwiring)
If you're spanning a long distance without a solid overhead structure, a guide wire strung between two anchor points will support the weight of the lights and prevent excessive sagging or drooping over time.
Step 4: Install Your Anchor Points
Anchor points are the foundation of your installation, and getting them right ensures your lights hang evenly and stay put through wind and weather. The method you use depends entirely on what surfaces you're working with.
- Wood surfaces (fences, posts, pergolas, eaves): Pre-drill a pilot hole slightly smaller than your eye hook's shank, then drive the hook in by hand or with a screwdriver through the eye for extra torque. Use stainless steel or galvanized hardware to prevent rust.
- Masonry surfaces (brick walls, stucco, concrete): Use a masonry drill bit to create a pilot hole, insert a masonry anchor or wall plug, then screw in your eye hook. Don't skip the anchor — without it, the hook won't hold under load.
- Freestanding poles: If your yard has no natural anchor points, install one or two freestanding wooden or metal posts set in concrete. A 4×4 wooden post set 18–24 inches deep in a concrete footing will support typical string light loads without issue.
- Trees: Screw-in eye hooks can be used on healthy, mature trees, but avoid stapling or nailing lights directly to bark. Keep in mind that trees move in the wind, so allow extra slack in the line.
Space anchor points no more than 10 to 12 feet apart for unsupported strands. For longer spans, run a guide wire first and hang the lights from it using S-hooks or clips.
Step 5: Hang and Secure the String Lights
With your anchor points in place, you're ready to run the lights. Start at the end closest to your power source and work outward to minimize cord management issues later. Feed the strand along your planned route, looping the cord through each eye hook or clipping it to the guide wire as you go.
- Hook the first end: Attach the strand's starting loop or plug end to the first anchor point. Most quality string light strands have reinforced hanging loops built into the cord at regular intervals — use these, not the wire itself, to bear the load.
- Tension the line: Pull each section taut enough to prevent excessive sagging, but allow a natural catenary curve (a gentle arc between anchor points) — this looks more intentional and elegant than a perfectly rigid line.
- Secure at each anchor: Loop the built-in hanging rings over your eye hooks, or use S-hooks to attach the strand to guide wire. For overhead structures like pergola beams, zip ties or clear light clips work well and stay nearly invisible.
- Check bulb orientation: Globe-style bulbs should hang vertically. If any bulbs are tilted or seated unevenly, reseat them now before the lights are turned on.
- Manage excess cord: Gather any excess cord at the end of the strand and use cable clips or zip ties to secure it neatly to the nearest anchor structure.
Step 6: Connect Power Safely
Most outdoor string lights are plug-in and simply connect to a standard outdoor outlet, which makes the power step straightforward. However, there are a few important safety practices to follow regardless of how you're connecting.
Always use a GFCI (Ground Fault Circuit Interrupter) outlet or GFCI-protected extension cord for outdoor lighting. GFCI outlets cut power instantly if a fault is detected, protecting against electric shock in wet conditions. If your outdoor outlet isn't already GFCI-protected, it's worth having one installed before proceeding — it's a small upgrade with significant safety value.
If you're making any hardwired connections (such as connecting multiple strands to a junction box or timer), use Push-in Wire Connectors rather than older twist-on alternatives. Simply insert each stripped wire end into the appropriate port until it clicks firmly into place — no twisting required. This creates a secure, vibration-resistant connection that holds up well in outdoor environments where wires may shift with temperature changes or wind movement. Push-in Wire Connectors are more reliable than traditional methods and significantly reduce the chance of a loose connection over time.
For long runs, avoid daisy-chaining too many strands beyond the manufacturer's recommended limit (usually 3–5 strands). Exceeding this limit can overload the cord and create a fire hazard. When connecting multiple strands, each should be wired in a parallel configuration so that each strand receives the full rated voltage independently, rather than having voltage drop across a series of connections. If your layout requires more coverage, run a second circuit from the outlet rather than extending a single chain.
Creative Layout Ideas for Any Yard
The way you arrange your string lights has as much impact on the final look as the lights themselves. Here are some proven layouts that work across a range of yard types and sizes:
- Straight bistro run: Two parallel lines strung from house to fence or post to post — clean, classic, and works in long narrow spaces.
- Crisscross canopy: Multiple strands crossing at angles above a patio or dining area, creating a full overhead canopy effect. Ideal for square or rectangular spaces.
- V-shape or star pattern: Strands radiating outward from a central pole to perimeter anchors, like spokes on a wheel. Dramatic and visually striking.
- Pergola wrap: Weave lights through pergola beams either parallel to the beams or diagonally for a more layered look.
- Tree canopy drape: Loosely draped strands through tree branches create a firefly-in-the-woods effect that's especially magical in wooded yards.
- Fence line border: A single strand run along the top of a fence adds subtle perimeter lighting that doubles as a boundary marker.
Don't be afraid to combine multiple methods. For example, a crisscross canopy above the main seating area paired with a fence-line border creates layered depth and defines the space beautifully.
Outdoor String Light Safety Tips
String lights are a low-risk project, but a few precautions go a long way toward keeping your installation safe season after season.
- Always use lights rated for outdoor or wet locations — never substitute indoor string lights outdoors.
- Inspect all strands for cracked insulation, broken sockets, or corroded connections before hanging and before each season.
- Don't exceed the maximum strand count specified by the manufacturer when connecting strands together.
- Use a GFCI outlet or adapter for all outdoor electrical connections.
- Keep cords away from walkways to prevent tripping hazards, and avoid routing cords across rooflines without proper support.
- In high-wind regions, use guide wire rather than relying solely on the light strand to bear the tension.
- Install a timer or smart plug to prevent the lights from running unattended overnight or during extreme weather.
- Take down or secure lights during severe storms, especially if they're hung in exposed areas without guide wire support.
Frequently Asked Questions
How high should outdoor string lights be hung?
Most outdoor installations look best with lights hung between 8 and 12 feet above the ground. This height is high enough to avoid head-clearance issues while still feeling intimate and close. For dining areas, aim for 8–9 feet at the lowest point of the sag; for open walkways or larger patios, 10–12 feet works well.
What is the best way to hang string lights without nails or drilling?
If drilling into walls or fences isn't an option, heavy-duty outdoor adhesive hooks (rated for at least 5–7 lbs.) can work on smooth painted surfaces or vinyl siding. Cup hooks that screw directly into existing wood trim require minimal installation. Freestanding poles set in weighted bases are another no-drill option that works on concrete patios or decks.
Can you leave outdoor string lights up year-round?
Yes, provided the lights are specifically rated for outdoor use and your climate isn't exceptionally harsh. LED string lights are generally more resilient than incandescent alternatives in cold temperatures. That said, inspect the strands each spring for any winter wear, and take them down during major storms or hurricane-force winds to prevent damage.
How far apart should the poles or posts be for string lights?
For unsupported light strands, keep post spacing to 10–12 feet to prevent excessive sagging. If you're running a guide wire between the posts, you can span up to 15–20 feet between anchor points, depending on the weight of your lights and the gauge of your guide wire.
Do outdoor string lights need to be on a dedicated circuit?
Not necessarily, but they should be on a circuit that isn't overloaded with other high-draw appliances. LED string lights draw very little power compared to incandescent alternatives, but it's still good practice to calculate your total wattage and ensure you're well within the circuit's capacity. Always use a GFCI-protected outlet outdoors, regardless of circuit type.
Bring Your Outdoor Space to Life
Hanging outdoor string lights is one of the most accessible and rewarding DIY lighting projects you can tackle in a single weekend. With a solid plan, the right hardware, and quality LED lights built for outdoor conditions, the results can be genuinely stunning. Start with a clear layout, take your time on the anchor points, respect the power safety basics, and the rest comes together quickly. Whether you're creating a cozy backyard retreat, dressing up a rooftop deck, or lighting a pergola for outdoor dining, the warm overhead glow of well-hung string lights will make the space feel entirely transformed.
For more inspiration and energy-efficient lighting solutions across every area of your home, explore Amico's full LED string light collection and discover how the right light can change everything.
Lighting a Larger Space or Managing a Commercial Project?
Amico supplies contractors, businesses, and property managers with ETL & FCC certified LED lighting at volume — from outdoor string lights and recessed lighting to high bay lights and industrial lighting solutions. Our bulk sales program offers tiered volume discounts with free sitewide shipping, backed by a 30-day hassle-free return policy and up to 5-year warranties.
Request a Wholesale Quote


