Hallways are the connective tissue of any home — the spaces you pass through dozens of times a day without giving them much thought. But poor hallway lighting is something everyone feels, even if they can't name it: the dim stretch between rooms, the shadows that make a narrow corridor feel even smaller, the single overhead fixture that casts more gloom than glow. The good news is that recessed LED lighting is one of the most effective and elegant solutions available, and it's more approachable than most homeowners expect.
This hallway lighting guide walks you through everything you need to know — from picking the right fixture size and spacing your lights correctly, to choosing the right color temperature and wiring multiple fixtures together properly. Whether you're tackling a short entry hall or a long multi-door corridor, the principles covered here will help you transform a forgotten passageway into a bright, welcoming part of your home. Amico's recessed lighting lineup is built specifically for these kinds of practical, everyday applications, and we'll show you exactly how to put it to work.
Why Recessed LEDs Are Ideal for Hallways
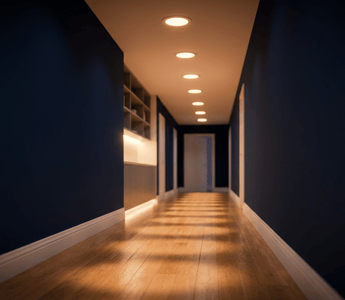
Hallways present a unique lighting challenge: they're typically narrow, often lack natural light, and need to feel open rather than cramped. Surface-mounted fixtures and pendant lights can visually lower the ceiling and intrude on the limited horizontal space. Recessed LEDs solve this by sitting flush with the ceiling plane, keeping the sightlines clean and unobstructed. The result is a hallway that feels taller, wider, and more intentional — without any dramatic renovation work.
Beyond aesthetics, recessed LEDs offer substantial practical advantages. They consume significantly less energy than incandescent or fluorescent alternatives, with lifespans exceeding 50,000 hours — meaning you're unlikely to need a replacement for decades under normal use. They also run cooler, which is a genuine safety benefit in enclosed ceiling spaces. For hallways that run long distances or connect multiple zones of the home, this efficiency adds up quickly on the electricity bill.
Choosing the Right Fixture Size for Narrow Spaces
Fixture diameter is one of the most important decisions you'll make, and hallways call for a more restrained approach than open living areas. The two most common options are 4-inch and 6-inch recessed fixtures, and in most hallways, smaller is better. A 4-inch fixture delivers focused, clean illumination without visually overwhelming a tight ceiling. Multiple smaller fixtures spaced evenly also create a more balanced, finished look than fewer large ones.
Amico's 4-inch canless LED recessed lighting is particularly well-suited to hallway applications. Canless designs eliminate the need for a separate housing can, which simplifies installation considerably — especially when you're working with finished ceilings and limited attic access. For slightly wider hallways or higher ceilings (9 feet and above), 6-inch recessed LED lighting can work beautifully, providing broader light spread per fixture and allowing for slightly wider spacing intervals.
A general rule of thumb: match the fixture diameter to the hallway width. In a hallway that's 3 to 4 feet wide, 4-inch fixtures are the clear choice. In a hallway approaching 5 to 6 feet, 6-inch fixtures become a reasonable option.
Spacing and Placement: How to Lay Out Your Fixtures
Proper spacing is what separates a professionally lit hallway from one that has uneven pools of light and dark gaps between fixtures. The standard rule is to divide the ceiling height in half to determine the spacing between fixtures. For an 8-foot ceiling, plan to space recessed lights approximately 4 feet apart. For a 9-foot ceiling, 4.5 feet between fixtures is a good target. This approach ensures the light cones overlap sufficiently to create consistent, shadow-free illumination along the entire length of the hall.
Centering fixtures along the hallway's lengthwise axis is equally important. Positioning them off-center — even slightly — creates asymmetry that's visually distracting in a narrow space. Use a chalk line or laser level during layout to mark your centerline on the ceiling before cutting any holes. This small extra step makes a significant difference in the final result.
For very long hallways, consider whether you want uniform brightness throughout or a slightly layered approach. Some homeowners prefer brighter light near doors and entryways, with slightly softer illumination in the middle run. This can be achieved through dimmer controls rather than varying fixture placement, which keeps the layout symmetrical and easier to manage.
Color Temperature and CRI: Setting the Right Mood
Color temperature — measured in Kelvin (K) — determines whether your hallway feels warm and welcoming or crisp and energized. For residential hallways, the sweet spot is generally between 2700K and 3000K. This range produces a warm white light that complements wood tones, neutral wall colors, and art or decor you may have displayed along the hall. It reads as inviting rather than clinical, which matters in transitional spaces where you want to feel at ease.
If your hallway connects directly to a home office, mudroom, or utility area, you might lean toward 3500K or 4000K for a slightly brighter, more alert-feeling environment. The key is consistency: avoid mixing color temperatures in a single hallway, as the shift between warm and cool zones is immediately noticeable and rarely flattering.
CRI (Color Rendering Index) is the other variable worth understanding. CRI measures how accurately a light source renders colors compared to natural daylight, on a scale of 0 to 100. Amico's LED fixtures deliver CRI 80+, which means artwork, wall colors, flooring, and furnishings in your hallway will appear true and vibrant rather than washed out or distorted. For most hallway applications, CRI 80+ is more than sufficient to achieve excellent visual quality.
Wiring Basics for Hallway Recessed Lighting
Wiring multiple recessed fixtures in a hallway is simpler than many homeowners assume, provided you understand the correct method. All fixtures in a hallway run should be connected in parallel — meaning each fixture receives power directly from the circuit, rather than power flowing through one fixture to reach the next. Parallel connections ensure that if one fixture fails, the others continue to operate normally, and each fixture receives the full voltage it requires.
For making connections, always use push-in wire connectors. These connectors accept stripped wire ends inserted directly into the ports until they click into place — no twisting required. This method creates a secure, vibration-resistant connection that is more reliable than traditional alternatives. Simply strip approximately 5/8 inch of insulation from each wire, insert the stripped end into the appropriate port on the connector, and confirm the click. Match black (hot) to black, white (neutral) to white, and green or bare copper (ground) to ground throughout the run.
Before beginning any wiring work, always shut off the circuit breaker for the area you're working in and verify the power is off with a non-contact voltage tester. Working on live circuits is dangerous and entirely avoidable with this simple precaution.
Dimming Controls and Smart Options
One of the most underrated upgrades for hallway lighting is a compatible dimmer switch. The ability to dial down the brightness at night — when you don't need full illumination but want enough light to navigate safely — dramatically improves the livability of any hallway. It also extends the lifespan of your fixtures further and reduces energy consumption during lower-use hours.
When selecting a dimmer, confirm that your recessed LED fixtures are rated as dimmable (Amico's LED fixtures are dimmable) and choose a dimmer specifically designed for LED loads rather than an older incandescent-rated unit. Incompatible dimmers can cause flickering, buzzing, or incomplete dimming ranges. Look for dimmers labeled "LED compatible" or "CFL/LED" on the packaging.
For hallways with multiple entry points — such as a hall accessed from the living room at one end and a bedroom at the other — consider 3-way dimmer switches that allow control from both locations. This is a relatively simple wiring upgrade that adds a significant quality-of-life improvement to daily use.
Installation Tips for a Clean, Professional Finish
Canless recessed LED fixtures, like those in Amico's lineup, are designed for straightforward installation directly into drywall without a separate housing can. The LED module and trim are built as a single integrated unit, so there's no separate trim ring to install or align independently — the fixture goes in as one piece and locks into place with spring clips that grip the drywall from behind. This integrated design speeds up installation considerably and eliminates alignment headaches.
Here are a few practical tips that make hallway installations go smoothly:
- Use a hole saw for clean cuts. A standard recessed lighting hole saw bit (matching your fixture's diameter) produces a cleaner, more precise opening than a drywall saw, especially in finished ceilings.
- Check for joists and obstructions before cutting. Use a stud finder and a small inspection camera or phone with a camera through a small pilot hole to confirm there's clearance above each planned fixture location.
- Label your wires before pulling them through. In long hallway runs, it's easy to lose track of which wire goes where. A small piece of tape with a number or letter on each wire saves time and prevents errors.
- Test each fixture before closing up the ceiling. Restore power briefly after wiring each fixture to confirm it illuminates correctly before moving to the next one.
Amico's retrofit can lights are an excellent option if your hallway already has older recessed housing cans installed. These retrofit units are designed to install directly into existing cans, updating your hallway to modern LED efficiency without any ceiling patching or new construction work. If you're updating an older home with outdated fixtures, this is often the fastest and most cost-effective upgrade path.
Common Hallway Lighting Mistakes to Avoid
Even with a solid plan, a few avoidable missteps can undermine the final result. Understanding these pitfalls ahead of time will save you time, money, and frustration.
- Placing fixtures too close to walls. In narrow hallways, the temptation is to center fixtures on the ceiling width — which is correct — but some installers inadvertently place the first and last fixtures too close to the end walls, creating glare spots near doorframes. Keep the first and last fixtures at least 18 to 24 inches from end walls.
- Under-lighting the space. One or two fixtures in a long hallway leaves dark gaps that make the space feel uninviting. Follow the spacing formula and err toward adding an extra fixture if you're on the borderline.
- Mixing fixture styles or trim finishes. Consistency matters in tight spaces. Mixing brushed nickel and matte white trim finishes, or combining different fixture profiles, creates a disjointed look that reads as unfinished.
- Skipping the dimmer. A hallway at full brightness at 2 a.m. is an unpleasant experience. Dimming capability costs relatively little to add during installation and pays dividends every night.
- Ignoring IC rating requirements. If your fixtures will be in contact with ceiling insulation, ensure they carry an IC (insulation contact) rating. Installing a non-IC fixture in contact with insulation is a fire hazard and a code violation in most jurisdictions.
Final Thoughts
A well-lit hallway does more than serve a functional purpose — it sets the tone for every room it connects to and shapes the overall feel of your home. Recessed LED lighting is the most effective way to achieve that balance of clean aesthetics, consistent illumination, and long-term efficiency in narrow spaces. With the right fixture size, proper spacing, compatible dimming controls, and careful installation, even the most forgettable corridor can become a defining feature of your home's interior.
Amico's recessed lighting collection offers ETL and FCC certified fixtures backed by a 2 to 5 year warranty, free sitewide shipping, and a 30-day hassle-free return policy — so you can plan and purchase with confidence. Whether you're updating a single hallway or retrofitting an entire home, the right lighting starts with the right foundation.
Outfitting a Multi-Unit Property or Large Project?
If you're a contractor, property manager, or developer lighting multiple hallways across a building or development, Amico's bulk sales program offers tiered volume discounts that make large-scale projects significantly more cost-effective. Get a customized quote tailored to your project's fixture count, specifications, and timeline.
Request a Wholesale Quote


