Table Of Contents
- Understanding Recessed Lighting Types
- Planning Your Recessed Lighting Layout
- Tools and Materials You'll Need
- Safety First: Preparation and Precautions
- Installing Recessed Lights in New Construction
- Retrofit Installation for Existing Ceilings
- Wiring and Electrical Connections
- Finishing Touches and Testing
- Common Issues and Troubleshooting
- Maintenance and Longevity Tips
Recessed lighting transforms any space with clean, modern illumination that enhances both functionality and aesthetics. Whether you're updating a kitchen, brightening a living room, or creating the perfect ambiance in a bedroom, installing recessed lights is one of the most impactful home improvement projects you can tackle. The sleek, flush-mount design eliminates visual clutter while providing targeted or ambient lighting exactly where you need it.
This comprehensive guide walks you through every step of the recessed lighting installation process, from planning your layout to making the final electrical connections. We'll cover both new construction installations and retrofit projects for existing ceilings, ensuring you have the knowledge to handle your specific situation. You'll learn professional techniques that electricians use, safety protocols that protect you and your home, and insider tips that save time and prevent common mistakes.
With quality LED recessed lighting solutions and proper installation techniques, you'll enjoy energy-efficient, long-lasting illumination that increases your home's value and comfort. Let's get started on creating the perfect lighting setup for your space.
Understanding Recessed Lighting Types
Before you begin installation, it's essential to understand the different types of recessed lighting available and which best suits your project. The two primary categories are traditional housing-based fixtures and modern canless designs, each offering distinct advantages depending on your ceiling structure and installation preferences.
Traditional Recessed Lights consist of a metal housing (can) that sits above the ceiling, a trim piece visible from below, and a separate bulb or integrated LED module. These fixtures have been the industry standard for decades and work well in new construction where you have full ceiling access. They require adequate clearance above the ceiling, typically 6-8 inches depending on the model, and come in various sizes with 4-inch and 6-inch diameters being most common for residential applications.
Canless Recessed Lights represent the latest innovation in recessed lighting technology. These ultra-slim fixtures eliminate the bulky housing can entirely, integrating the LED light source, driver, and trim into a single compact unit. Canless designs install much faster, require minimal ceiling clearance (often just 2-3 inches), and are ideal for retrofit applications. Many homeowners and contractors prefer modern canless recessed lighting for their easier installation and superior energy efficiency.
New Construction vs. Retrofit Fixtures
The installation method you'll use depends largely on whether you're working with exposed framing or finished ceilings. New construction fixtures are designed for installation before drywall goes up, featuring adjustable mounting brackets that attach directly to ceiling joists. These provide the most secure installation and greatest flexibility in positioning. Retrofit fixtures are engineered for installation in existing ceilings through a cut hole, using spring clips or other mechanisms to grip the drywall from above. Retrofit models work perfectly when remodeling or updating lighting in completed rooms without major demolition.
Understanding IC (Insulation Contact) ratings is also crucial for safe installation. IC-rated fixtures can safely contact insulation without creating fire hazards, making them necessary for insulated ceilings. Non-IC fixtures require a clearance of at least three inches from insulation, limiting their use to uninsulated spaces or requiring insulation to be pulled back around the fixture.
Planning Your Recessed Lighting Layout
Proper planning prevents both under-lighting and over-lighting while ensuring even illumination throughout your space. The general rule for spacing recessed lights is to divide your ceiling height by two to determine the distance between fixtures. For standard 8-foot ceilings, this means placing lights approximately 4 feet apart. However, this is just a starting point that should be adjusted based on room function, fixture size, and desired lighting effect.
Begin by determining your lighting goals for the space. General ambient lighting requires even distribution across the ceiling, typically with fixtures arranged in a grid pattern. Task lighting for kitchens, workspaces, or reading areas needs concentrated illumination in specific zones, with lights positioned directly above work surfaces. Accent lighting highlights architectural features, artwork, or focal points, requiring strategic placement closer to walls or specific objects you want to emphasize.
Creating Your Layout Plan
Start by sketching your room to scale, marking existing electrical boxes, switches, and any obstacles like ceiling joists, ductwork, or plumbing. Measure carefully and mark potential fixture locations, keeping these guidelines in mind:
- Wall spacing: Position the first row of lights 24-30 inches from walls to prevent creating shadows and dark corners
- Between-fixture distance: Space lights 4-6 feet apart for general lighting in residential settings
- Symmetry: Align fixtures in visually pleasing patterns that complement room dimensions and furniture layout
- Obstacle avoidance: Identify ceiling joists, beams, and mechanical systems that could interfere with installation
- Switching zones: Group lights logically so switches control functional zones rather than random combinations
For kitchens, place recessed lights 18-24 inches apart over countertops and islands for optimal task lighting. In living rooms and bedrooms, space fixtures further apart (4-6 feet) for comfortable ambient lighting. Bathrooms benefit from recessed lights positioned around mirrors and over shower areas, using appropriately rated fixtures for wet locations.
Tools and Materials You'll Need
Having the right tools and materials prepared before you start makes installation smoother and safer. The specific items you'll need vary slightly between new construction and retrofit installations, but this comprehensive list covers most residential recessed lighting projects.
Essential Tools
- Voltage tester or non-contact voltage detector: Absolutely essential for confirming power is off before working
- Drill with assorted bits: Includes hole saw matching your fixture size (typically 4-inch or 6-inch) and standard bits for pilot holes
- Stud finder: Locates ceiling joists and helps you avoid cutting into structural members
- Wire strippers and cutters: For preparing electrical connections
- Screwdrivers: Both flathead and Phillips head in various sizes
- Measuring tape and pencil: For accurate layout marking
- Drywall saw or jab saw: For retrofit installations in finished ceilings
- Ladder or work platform: Sturdy access to ceiling height
- Flashlight or headlamp: Illuminating dark ceiling cavities and attic spaces
Required Materials
- Recessed light fixtures: Choose quality LED options that match your ceiling type and lighting needs
- Electrical wire: Typically 14/2 or 12/2 NM-B cable depending on your circuit amperage
- Wire connectors (wire nuts): Appropriate sizes for your wire gauge
- Electrical boxes and cable clamps: If adding new circuits or junction boxes
- Cable staples: For securing wiring to joists according to code
- Electrical tape: Additional connection security
- Junction boxes: If splicing into existing circuits
For larger projects or professional installations, consider investing in a wire fishing kit for pulling cables through finished walls and ceilings. Thermal imaging cameras can also help identify insulation and locate joists without invasive exploration, though these are optional for most DIY projects.
Safety First: Preparation and Precautions
Electrical work demands strict attention to safety protocols. Recessed lighting installation involves working with live circuits, cutting into ceilings, and navigating confined attic spaces, each presenting specific hazards that proper preparation mitigates. Never skip safety steps to save time - the risks simply aren't worth it.
Turn off power at the breaker box before beginning any electrical work. Simply flipping a wall switch isn't sufficient because switches can be miswired or someone could accidentally turn them back on. Locate the correct circuit breaker, switch it to the off position, and tape it with a clear warning label so others know not to restore power. Use a voltage tester to verify power is truly off at the work location before touching any wires.
Check local building codes and permit requirements before starting your project. Many jurisdictions require electrical permits for adding new circuits or fixtures, and final inspections ensure work meets safety standards. While some simple fixture replacements may not require permits, adding new recessed lights to existing circuits or running new wiring typically does. Verify requirements with your local building department to avoid complications when selling your home or filing insurance claims.
Working Safely in Ceilings and Attics
If your installation requires attic access, take precautions to work safely in these challenging environments. Always step only on ceiling joists or install temporary walking planks across joists - stepping on drywall or insulation between joists will result in falling through the ceiling. Wear a dust mask when working around insulation, as fiberglass particles irritate lungs and skin. Long sleeves, pants, and gloves protect against insulation contact and splinters from rough framing.
Adequate lighting is crucial when working in dark ceiling cavities. A headlamp keeps your hands free while providing light exactly where you're looking. Watch for protruding nails, sharp metal edges, and low clearances that can cause injuries. In hot weather, attics become dangerously hot - work during cooler morning hours and take frequent breaks to avoid heat exhaustion.
Installing Recessed Lights in New Construction
New construction installations offer the easiest approach to recessed lighting since you have complete access to framing before drywall covers everything. This method provides maximum flexibility in fixture positioning and makes running electrical wire straightforward. Whether building a new home or working on a room addition, these steps guide you through professional-quality installation.
Step-by-Step New Construction Installation
1. Mark fixture locations - Using your pre-planned layout, measure and mark the center point of each fixture location on the ceiling joists. Double-check measurements to ensure even spacing and proper alignment. Mark both the joist and the subfloor above (if accessible) so you can verify positions from either side.
2. Install fixture housings - Position each new construction housing at its marked location, adjusting the expandable bars to span between ceiling joists. The housing should sit flush with where the finished drywall surface will be - most fixtures have alignment guides showing proper depth. Secure the mounting bars to joists using the provided screws or nails, ensuring the housing is level and stable.
3. Run electrical cable - Starting from your power source (existing junction box, switch, or panel), run NM-B cable through drilled holes in ceiling joists to each fixture location. Drill holes in the center third of joists, at least 1.25 inches from the edge to maintain structural integrity and protect cables from drywall screws. Maintain at least 8 inches of wire slack at each fixture for connections.
4. Secure wiring properly - Staple cables within 8 inches of each electrical box and every 4-5 feet along runs according to electrical code. Don't over-tighten staples, which can damage wire insulation. Leave the cable sheathing intact until you're ready to make connections, protecting wires from damage during construction.
5. Make electrical connections - Strip cable sheathing carefully, remove 3/4 inch of insulation from individual wires, and connect to fixture leads using wire connectors. Match black to black (hot), white to white (neutral), and green or bare copper to ground. Tuck connections neatly into the junction box, ensuring no bare wire is exposed outside connectors.
6. Install after drywall - After drywall installation and finishing, install the trim pieces and LED modules according to manufacturer instructions. Most modern fixtures feature simple push-in or twist-lock trim attachments that secure without tools. Quality fixtures like those from Amico's recessed lighting collection are designed for straightforward installation that saves contractors and DIYers valuable time.
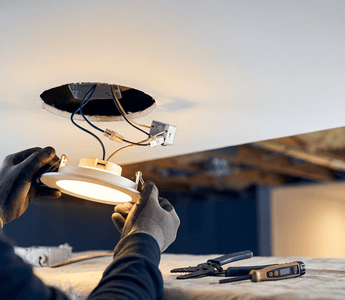
Retrofit Installation for Existing Ceilings
Retrofit installations bring modern recessed lighting to existing rooms without major demolition or reconstruction. This approach works perfectly for remodeling projects, lighting upgrades, or adding task lighting to finished spaces. Canless LED retrofit fixtures have made this process significantly easier than traditional methods, reducing installation time and eliminating the need for bulky housings.
The key to successful retrofit installation is working carefully to avoid damaging existing ceiling finishes while navigating around insulation, wiring, and structural elements hidden above. With proper technique and the right fixtures, you can achieve professional results in a single afternoon.
Step-by-Step Retrofit Installation
1. Locate ceiling joists and obstacles - Use a stud finder to locate joists and mark their positions. This prevents cutting into structural members and helps you avoid areas where you can't install fixtures. Also check for existing wiring, plumbing, or HVAC components that might interfere with your planned locations. Adjust your layout as needed to work around obstacles while maintaining good light distribution.
2. Cut ceiling openings - Using your fixture's provided template or measuring the required hole size, mark circular cutouts at each fixture location. Drill a small pilot hole first to check for obstructions, then use a hole saw or drywall saw to cut the opening. Cut carefully to create clean edges - jagged cuts make trim installation difficult and may be visible around fixture edges.
3. Run cable to fixtures - This is typically the most challenging part of retrofit installation. If you have attic access above, running cable from above is straightforward. Without attic access, you'll need to fish cable through the ceiling cavity, working from one hole to the next. A fish tape or flexible drill bit extension helps pull cables through tight spaces. Some installations may require cutting additional small access holes that you'll patch later.
4. Connect fixtures to power - Retrofit fixtures typically tap into existing lighting circuits. Turn off power to the circuit you're using, verify it's off with a voltage tester, then make connections at an existing junction box or fixture location. If adding multiple fixtures, wire each fixture in parallel — connecting each one directly back to the same power source so they share the same voltage and operate independently. Always follow the wiring diagram provided with your specific fixtures.
5. Adjust CCT and test - Before finalizing the installation, restore power and adjust the CCT (color temperature) setting on each fixture to your desired setting. Confirm the light output looks correct and the fixture operates as expected. Once testing is complete, turn off power again at the breaker before proceeding to physical installation.
6. Install retrofit housings or canless units - For traditional retrofit cans, insert the housing through the ceiling hole, adjust it to sit flush with the ceiling surface, and secure it using the built-in clips that grip the drywall from above. For canless fixtures, the entire unit typically inserts through the hole with spring clips that expand and lock against the ceiling. Make electrical connections to the fixture leads before fully securing it in place.
7. Attach trim and test - Install the LED module according to manufacturer specifications. Most retrofit units simply push into place or twist-lock for tool-free installation. Restore power at the breaker and test each fixture to confirm proper operation before considering the job complete.
Wiring and Electrical Connections
Proper electrical connections ensure safe, reliable operation of your recessed lighting system. Whether wiring a single fixture or creating circuits with multiple lights, understanding basic electrical principles and following code requirements prevents problems and hazards. Most recessed lighting runs on standard 120-volt household circuits, simplifying installation for anyone with basic electrical knowledge.
The most common wiring configuration for recessed lights is parallel wiring, where each fixture connects independently back to the same power source. This ensures every fixture receives the same voltage and operates independently — if one fixture fails, the others continue to function normally.
Making Safe Wire Connections
Every electrical connection must be mechanically secure and properly insulated to prevent shorts, arcing, and fires. Start by stripping cable sheathing back 6-8 inches where it enters junction boxes, being careful not to nick the individual wire insulation. Use wire strippers to remove exactly 3/4 inch of insulation from each conductor - too much creates exposed copper that could short, while too little prevents solid connections.
When joining wires, use Push-in Wire Connectors for a secure and reliable connection. Simply insert each stripped wire end straight into the corresponding port until it clicks into place — no twisting or additional tools required. Gently tug each wire to verify it is firmly held. Push-in connectors provide a more consistent and reliable connection compared to traditional methods, making them the preferred choice for professional installations.
Understanding Wire Colors and Connections
- Black (Hot): Carries power from the breaker to fixtures and must be connected to the fixture's black or colored lead wire
- White (Neutral): Completes the circuit back to the panel and connects to white fixture leads
- Green or Bare Copper (Ground): Safety conductor that must connect to fixture ground wires and metal housing ground screws
- Red (Switched Hot): Sometimes used for three-way switches or separately controlled fixture groups
Always connect like colors together and ensure ground connections are made at every fixture and junction point. Ground wires provide critical safety protection by directing fault currents safely to the panel where breakers can trip, preventing shock and fire hazards.
Finishing Touches and Testing
After completing the electrical connections and securing all fixtures, several final steps ensure professional results and reliable long-term performance. These finishing touches make the difference between an acceptable installation and one that looks factory-perfect while operating safely for years.
Begin by carefully tucking all wire connections into their respective junction boxes, making sure no wires are pinched or strained. Connections should sit comfortably within boxes with enough slack that they're not under tension, but not so much excess wire that boxes are overstuffed. Overcrowded boxes generate heat and make future maintenance difficult, while inadequate slack stresses connections and can pull wires loose over time.
Testing Your Installation
Before permanently installing trim pieces and declaring victory, thoroughly test your lighting system to identify any issues while access is still easy. Restore power at the breaker panel and use the wall switch to turn lights on and off several times, confirming all fixtures respond properly. Check that switches control the intended fixtures and that no lights flicker or fail to illuminate.
If fixtures don't work correctly, immediately turn off power at the breaker and troubleshoot connections before proceeding. Common problems include loose wire nuts, reversed connections, or damaged wires that occurred during installation. A multimeter helps diagnose electrical issues if you're comfortable using one, but when in doubt, consult a licensed electrician rather than guessing at complex electrical problems.
Installing Trims and Final Adjustments
Once you've confirmed all fixtures operate correctly, install trim pieces according to manufacturer instructions. Most modern LED recessed lights feature simple trim attachment systems - push-in spring clips, twist-lock rings, or magnetic attachments that require no tools. Ensure trims sit flush against the ceiling without gaps, adjusting housing depth if necessary on models that allow repositioning.
For adjustable or gimbal-style fixtures, set the desired beam angle and direction. Kitchen task lighting typically aims straight down over work surfaces, while accent lighting angles toward walls or artwork you want to highlight. Take time to adjust each fixture individually for the best lighting effect throughout your space. Quality adjustable recessed fixtures maintain their settings reliably without sagging or drifting over time.
Common Issues and Troubleshooting
Even carefully executed installations occasionally encounter problems. Understanding common issues and their solutions helps you diagnose and fix problems quickly, avoiding frustration and unnecessary service calls. Most recessed lighting problems fall into a few categories with straightforward remedies.
Lights Won't Turn On
If newly installed fixtures don't illuminate, systematically check the most common causes. First, verify power is actually reaching the switch by testing with a voltage tester - perhaps the breaker wasn't turned back on or tripped during testing. Confirm the switch itself works properly and is wired correctly. Next, check fixture connections, ensuring hot, neutral, and ground wires are properly connected with no loose wire nuts. LED fixtures can be polarity-sensitive, so verify black connects to black and white to white throughout the circuit.
For fixtures in a series where some work and others don't, the problem typically exists at the last working fixture or first non-working one. Power stops at faulty connections, preventing downstream fixtures from receiving electricity. Check connections at these transition points first when troubleshooting partial circuit failures.
Flickering or Dimming Issues
Flickering lights usually indicate loose connections, incompatible dimmers, or voltage fluctuations. Start by tightening all wire connections and ensuring no stray wire strands create partial shorts. If using dimmer switches, confirm they're compatible with LED fixtures - older dimmer models designed for incandescent bulbs often cause LED flickering. Replace incompatible dimmers with LED-rated models designed for solid-state lighting.
Dimming that occurs when other appliances or equipment activate suggests inadequate circuit capacity. Recessed lighting should be on dedicated circuits or circuits with minimal additional load. If lights dim when the refrigerator compressor starts or the microwave runs, the circuit is overloaded and requires redistribution of loads or additional circuits.
Overheating or Thermal Shutdown
LED fixtures contain thermal protection that shuts them down when temperatures exceed safe limits, then automatically resets when cooling occurs. If fixtures cycle on and off or shut down after operating briefly, overheating is the likely cause. Check that IC-rated fixtures are used in insulated ceilings, and verify insulation isn't blocking ventilation holes even on IC-rated models. Ensure fixtures aren't buried under excessive insulation that prevents heat dissipation.
Adequate clearance above canless fixtures matters too, even though they're designed for tight spaces. Allow at least the manufacturer's recommended clearance for proper cooling. In extremely hot attics, additional ventilation or switching to fixtures with higher temperature ratings may be necessary for reliable operation during summer months.
Maintenance and Longevity Tips
Quality LED recessed lighting requires minimal maintenance compared to older lighting technologies, but a few simple practices maximize performance and lifespan. Modern LED fixtures from reputable manufacturers typically last 50,000 hours or more - that's over 20 years at 6 hours per day. Proper care ensures you reach or exceed these expectations while maintaining optimal light output and appearance.
Clean fixture trims and lenses annually to remove dust, cooking residue, or other buildup that reduces light output and creates a dingy appearance. Turn off power before cleaning, then wipe surfaces with a soft, slightly damp cloth and mild soap if needed. Avoid harsh chemicals or abrasive cleaners that scratch or damage finishes. For hard-to-reach fixtures, extendable dusters with microfiber heads allow cleaning without ladders.
Maximizing LED Fixture Lifespan
While LED technology is remarkably durable, certain factors accelerate degradation or cause premature failures. Excessive heat is the primary enemy of LED longevity, so ensure adequate ventilation and avoid over-insulating around fixtures even when they're IC-rated. In extremely hot climates or poorly ventilated attics, consider fixtures specifically rated for high-temperature applications.
Using compatible dimmer switches extends LED life compared to operating at full brightness constantly, and reduces energy consumption further. The reduced power levels generate less heat while providing adjustable lighting for different needs and times of day. Quality LED-rated dimmers provide smooth, silent operation without the buzzing or humming associated with incompatible controls.
If you experience fixture failures despite proper installation and operation, check warranty coverage before replacing units out of pocket. Reputable manufacturers like Amico stand behind their products with warranties ranging from 2-5 years, covering defects and premature failures. Keep purchase records and installation dates documented for warranty claims, and register products when manufacturers offer registration programs for extended coverage or upgrade notifications.
When to Upgrade or Replace Fixtures
Even long-lasting LED fixtures eventually decline in performance or become obsolete as technology advances. Consider upgrading when light output drops noticeably (usually to about 70% of original brightness), color temperature shifts, or when new features like smart home integration or improved energy efficiency justify replacement costs. Older LED fixtures from early adoption years may consume significantly more power than current models while producing less light, making upgrades economically attractive.
Technology improvements in beam angles, color rendering, and dimming performance also motivate upgrades. If your current fixtures don't render colors accurately or create harsh lighting you find unpleasant, newer generations with higher CRI (Color Rendering Index) ratings and refined optics dramatically improve lighting quality without changing your layout or doing major electrical work.
Installing recessed lighting transforms your home's illumination while adding value and modern appeal that buyers appreciate. Whether you've tackled a complete new construction project or upgraded existing spaces with retrofit fixtures, the skills you've gained through this process serve you for future lighting projects and general electrical work. The satisfaction of flipping that switch and seeing your carefully planned lighting design come to life makes all the measuring, cutting, and wiring worthwhile.
Remember that successful installations balance proper planning, quality materials, and attention to detail throughout every step. Taking time to plan optimal fixture placement, using the right tools and safety equipment, making secure electrical connections, and testing thoroughly before finishing prevents problems and ensures professional results. Quality LED recessed fixtures provide decades of reliable, energy-efficient illumination when installed correctly, justifying the investment in both materials and your time.
As you enjoy your newly illuminated space, you'll likely identify other areas that would benefit from similar upgrades. The techniques and confidence you've developed make subsequent projects faster and easier, whether adding flush mount ceiling lights in hallways, upgrading garage lighting for better visibility, or installing outdoor security lighting for safety and curb appeal. Each project builds your skills while improving your home's functionality and comfort.
Ready to Start Your Recessed Lighting Project?
Explore Amico's complete selection of high-quality, energy-efficient LED recessed lighting designed for easy installation and long-lasting performance. From canless retrofit fixtures to new construction options, find everything you need to illuminate your space perfectly. Enjoy free shipping, UL certification, and warranties that protect your investment.
Shop Recessed LightingGet Expert Help


